10 Irresistible Fall Desserts to Savor This Season
10 Irresistible Fall Desserts to Savor This Season
Fall is the perfect time to satisfy your sweet tooth with seasonal flavors that warm the soul. From pumpkin spice to cozy apple treats, these 10 delicious fall desserts are sure to bring a smile to your face. Get ready to enjoy the tastes of autumn with these delightful recipes that are easy to whip up and perfect for sharing with friends and family.
Indulge In The Richness Of Pumpkin Spice Cheesecake
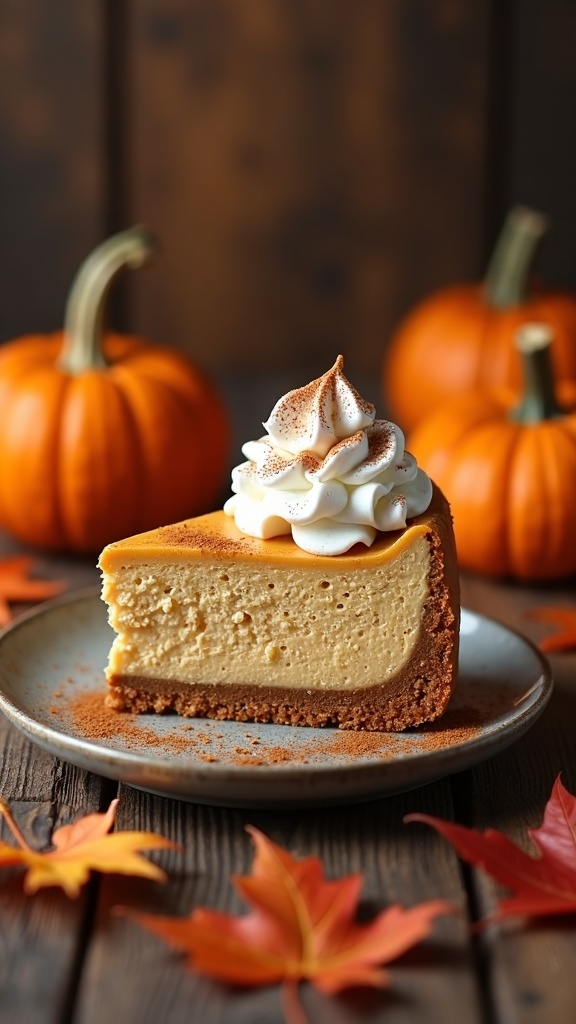
Fall is the perfect time to enjoy the warm flavors of pumpkin spice, and what better way to celebrate than with a slice of pumpkin spice cheesecake? This dessert combines the creamy texture of cheesecake with the cozy spices that make autumn so special.
The image captures a beautifully sliced pumpkin spice cheesecake, topped with a swirl of whipped cream and a sprinkle of cinnamon. The rich, golden filling sits on a perfectly baked crust, making it a feast for the eyes as well as the palate. Surrounding the cheesecake are vibrant autumn leaves and small pumpkins, setting the mood for a festive gathering.
This cheesecake is not just a treat; it’s a celebration of the season. Perfect for Thanksgiving or any fall gathering, it’s sure to impress your guests. Serve it with a cup of coffee or tea for a delightful afternoon snack.
Ingredients
- 1 ½ cups graham cracker crumbs
- ½ cup unsalted butter, melted
- 2 cups cream cheese, softened
- 1 cup pumpkin puree
- 1 cup granulated sugar
- 3 large eggs
- 1 teaspoon vanilla extract
- 1 teaspoon ground cinnamon
- ½ teaspoon ground nutmeg
- ½ teaspoon ground ginger
- ¼ teaspoon ground cloves
- 1 cup heavy whipping cream
- 2 tablespoons powdered sugar
- 1 teaspoon vanilla extract (for whipped cream)
Instructions
- Prepare the Crust: Preheat your oven to 325°F (160°C). In a bowl, mix graham cracker crumbs with melted butter until combined. Press the mixture into the bottom of a 9-inch springform pan. Bake for 10 minutes and let cool.
- Make the Filling: In a large bowl, beat the cream cheese until smooth. Add pumpkin puree, sugar, eggs, vanilla, and spices. Mix until well combined and creamy.
- Pour and Bake: Pour the filling over the cooled crust. Bake for 50-60 minutes, or until the center is set but still slightly jiggly. Turn off the oven and let the cheesecake cool inside for an hour.
- Chill: Remove from the oven and refrigerate for at least 4 hours, preferably overnight.
- Prepare the Whipped Cream: In a bowl, whip the heavy cream with powdered sugar and vanilla until soft peaks form. Spread or pipe the whipped cream on top of the chilled cheesecake before serving.
Savor The Sweetness Of Caramel Apple Crisp
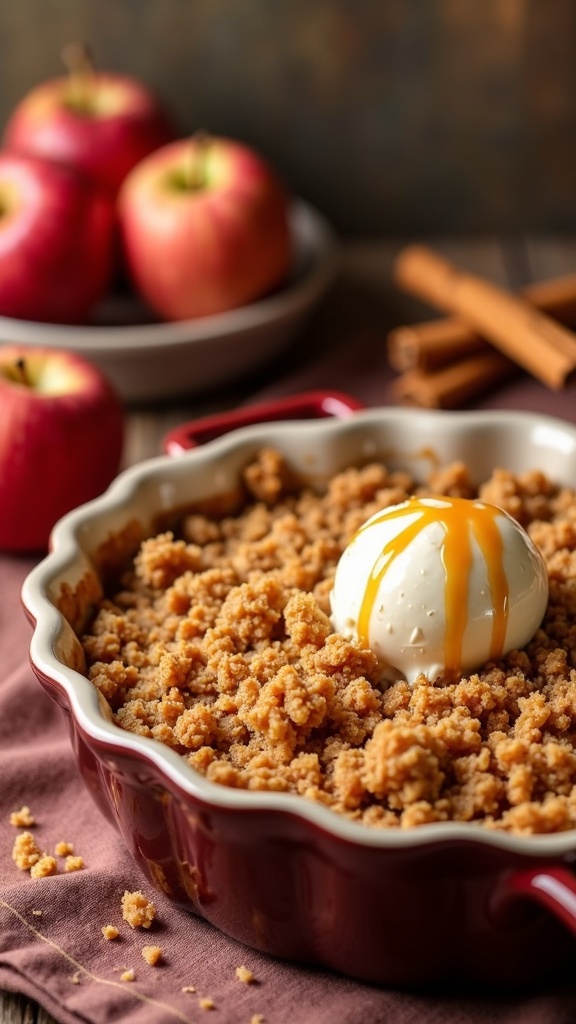
Caramel Apple Crisp is a delightful treat that perfectly captures the essence of fall. The image shows a warm, golden-brown crisp topped with a scoop of creamy vanilla ice cream drizzled with rich caramel sauce. In the background, fresh red apples and cinnamon sticks hint at the delicious flavors within.
This dessert is all about the combination of tender apples and a crunchy topping. The apples bring a tart sweetness, while the crisp topping adds a satisfying crunch. The caramel sauce ties everything together, making each bite a little piece of heaven.
Making Caramel Apple Crisp is simple and rewarding. You can enjoy it warm from the oven, making it a perfect dessert for cozy gatherings or family dinners. Pair it with a cup of hot cider or coffee for a complete fall experience.
Ingredients
- 6 cups sliced apples (Granny Smith or Honeycrisp work well)
- 1 tablespoon lemon juice
- 1/2 cup granulated sugar
- 1 teaspoon ground cinnamon
- 1/4 teaspoon salt
- 1 cup rolled oats
- 1 cup all-purpose flour
- 1/2 cup brown sugar, packed
- 1/2 cup unsalted butter, melted
- 1/2 cup caramel sauce (store-bought or homemade)
Instructions
- Preheat your oven to 350°F (175°C).
- In a large bowl, toss the sliced apples with lemon juice, granulated sugar, cinnamon, and salt. Spread this mixture evenly in a greased baking dish.
- In another bowl, combine oats, flour, brown sugar, and melted butter. Mix until crumbly.
- Sprinkle the oat mixture over the apples, covering them evenly.
- Bake for 30-35 minutes until the topping is golden brown and the apples are bubbly.
- Remove from the oven and let it cool slightly. Drizzle with caramel sauce before serving.
- Enjoy warm, ideally with a scoop of vanilla ice cream on top!
GET 21 QUICK & EASY LOW-CALORIE MEAL PLANS
Enjoy The Warmth Of Spiced Pear Galette
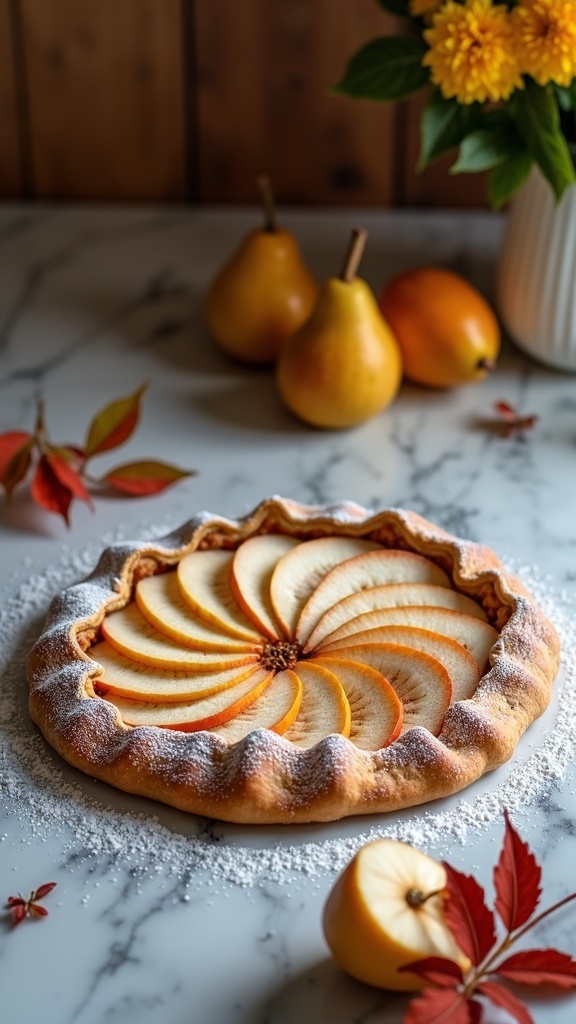
As the leaves change color and the air turns crisp, there's nothing quite like a warm dessert to bring comfort. A spiced pear galette is the perfect treat for fall. This rustic tart showcases the sweetness of ripe pears, enhanced by warm spices like cinnamon and nutmeg. The flaky crust cradles the tender fruit, making each bite a delightful experience.
The galette is not only delicious but also visually appealing. The sliced pears are arranged beautifully, creating a stunning centerpiece for any gathering. Dusting it with powdered sugar adds a touch of sweetness and elegance. Pair it with a scoop of vanilla ice cream or a dollop of whipped cream for an extra special touch.
Making a spiced pear galette is simpler than it looks. With just a few ingredients, you can whip up this delightful dessert in no time. Gather your friends and family, and enjoy the warmth of this seasonal treat together!
Ingredients
- 1 pre-made pie crust
- 3 ripe pears, thinly sliced
- 1/4 cup granulated sugar
- 1 teaspoon ground cinnamon
- 1/4 teaspoon ground nutmeg
- 1 tablespoon lemon juice
- 1 egg (for egg wash)
- Powdered sugar for dusting
Instructions
- Preheat the oven to 375°F (190°C).
- In a bowl, combine sliced pears, granulated sugar, cinnamon, nutmeg, and lemon juice. Toss until the pears are well coated.
- Roll out the pie crust on a baking sheet lined with parchment paper. Leave a border of about 2 inches around the edges.
- Arrange the pear mixture in the center of the crust, leaving the border clear.
- Fold the edges of the crust over the pears, pleating it as you go to create a rustic look.
- Beat the egg and brush it over the crust for a golden finish.
- Bake for 30-35 minutes, or until the crust is golden brown and the pears are tender.
- Let it cool slightly, then dust with powdered sugar before serving.
Delight In The Comfort Of Sweet Potato Pie
Sweet potato pie is a classic dessert that brings warmth and joy to any fall gathering. Its rich, creamy filling is made from sweet potatoes, which add a natural sweetness and a beautiful orange hue. Topped with a dollop of whipped cream, this pie is not just a treat for the taste buds but also a feast for the eyes.
The image captures a perfectly baked sweet potato pie, with a golden crust and a smooth filling. The whipped cream on top adds a touch of elegance, while the scattered spices hint at the warm flavors inside. Surrounding the pie are small pumpkins and autumn leaves, setting the perfect fall scene.
Making sweet potato pie is a delightful experience. The aroma of baking sweet potatoes fills the kitchen, creating a cozy atmosphere. This dessert is perfect for Thanksgiving or any fall celebration, and it’s sure to impress your family and friends.
Ingredients
- 2 cups mashed sweet potatoes (about 2 medium sweet potatoes)
- 1 cup granulated sugar
- 1/2 cup milk
- 1/4 cup unsalted butter, melted
- 2 large eggs
- 1 teaspoon vanilla extract
- 1 teaspoon ground cinnamon
- 1/2 teaspoon ground nutmeg
- 1/4 teaspoon salt
- 1 unbaked pie crust
Instructions
- Prepare the Sweet Potatoes: Preheat your oven to 350°F (175°C). Boil or bake the sweet potatoes until soft. Once cooled, peel and mash them until smooth.
- Mix the Filling: In a large bowl, combine the mashed sweet potatoes, sugar, milk, melted butter, eggs, vanilla, cinnamon, nutmeg, and salt. Mix until well blended.
- Fill the Crust: Pour the sweet potato mixture into the unbaked pie crust, smoothing the top with a spatula.
- Bake the Pie: Place the pie in the oven and bake for 45-50 minutes, or until the filling is set and a knife inserted in the center comes out clean.
- Cool and Serve: Allow the pie to cool before serving. Top with whipped cream and a sprinkle of cinnamon for an extra touch.
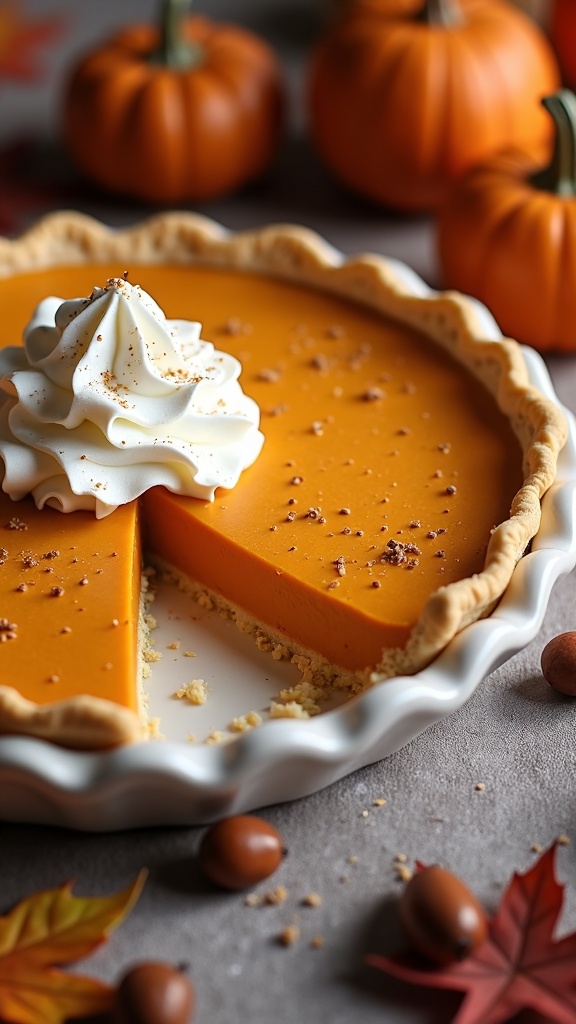
Explore The Tradition Of Classic Pumpkin Pie
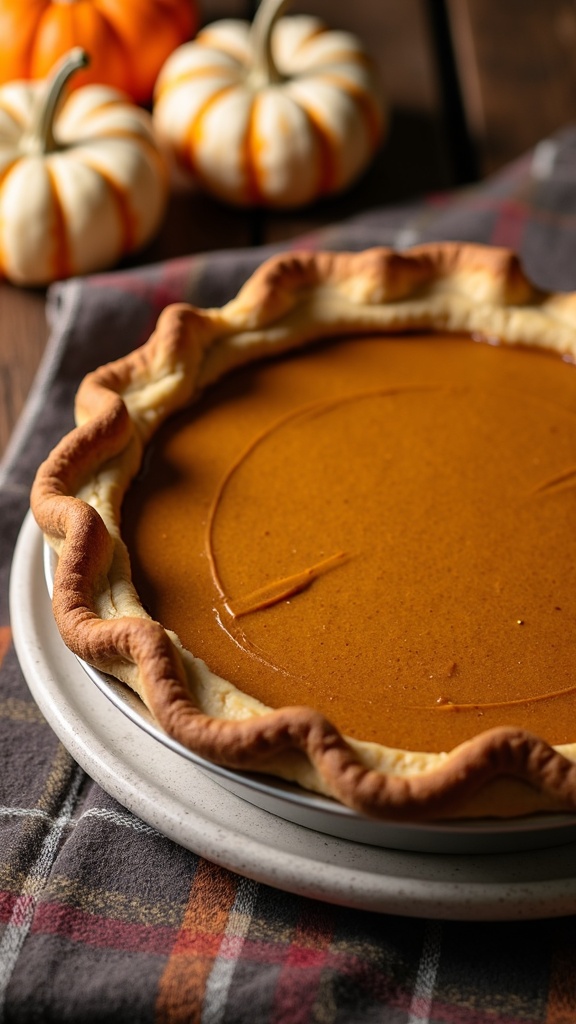
Pumpkin pie is a beloved dessert that captures the essence of fall. Its smooth, spiced filling nestled in a flaky crust is a staple at Thanksgiving tables. The warm flavors of cinnamon, nutmeg, and ginger bring comfort and joy, making it a favorite for many.
As you prepare to enjoy this classic treat, think about the memories it creates. Families gather around the table, sharing stories and laughter, all while savoring each slice. The sight of a freshly baked pumpkin pie, with its golden crust and rich filling, is enough to make anyone's mouth water.
Making pumpkin pie is a delightful process. You can use fresh pumpkin or canned puree, depending on your preference. The key is to balance the spices just right, ensuring each bite is bursting with flavor. Whether you top it with whipped cream or enjoy it plain, pumpkin pie is sure to please.
Ingredients
- 1 unbaked pie crust
- 1 can (15 oz) pumpkin puree
- 3/4 cup granulated sugar
- 1 teaspoon ground cinnamon
- 1/2 teaspoon ground ginger
- 1/4 teaspoon ground nutmeg
- 1/4 teaspoon salt
- 3 large eggs
- 1 can (12 oz) evaporated milk
Instructions
- Preheat your oven to 425°F (220°C).
- In a large bowl, mix together the pumpkin puree, sugar, cinnamon, ginger, nutmeg, and salt until well combined.
- Beat in the eggs one at a time, then stir in the evaporated milk until smooth.
- Pour the pumpkin filling into the unbaked pie crust.
- Bake for 15 minutes, then reduce the temperature to 350°F (175°C) and continue baking for 40-50 minutes, or until a knife inserted in the center comes out clean.
- Let the pie cool before serving. Enjoy with whipped cream or on its own!
GET 8-WEEKS OF WORKOUTS TO LOSE INCHES
Relish The Flavor Of Maple Pecan Tart
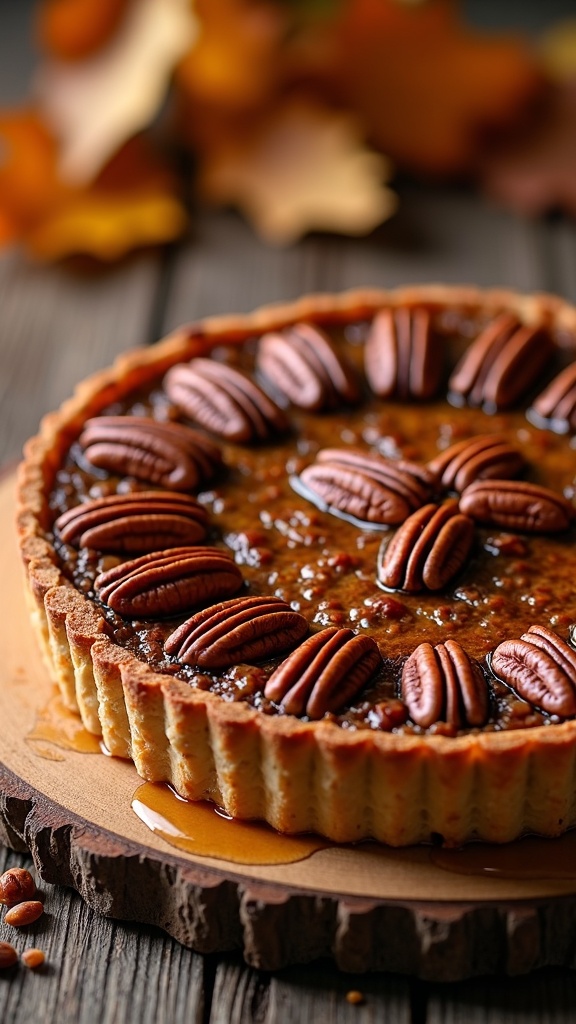
Fall is the perfect time to enjoy the rich flavors of maple and pecans. A maple pecan tart is a delightful dessert that captures the essence of the season. The golden crust cradles a sweet, sticky filling made with pure maple syrup and crunchy pecans. Each slice offers a warm, comforting taste that pairs beautifully with a scoop of vanilla ice cream or a dollop of whipped cream.
The tart's presentation is just as inviting as its flavor. With a glossy top adorned with whole pecans, it looks stunning on any dessert table. The combination of textures—from the crisp crust to the chewy filling—creates a satisfying bite that everyone will love.
Making this tart is easier than you might think. With a few simple ingredients and steps, you can whip up this seasonal treat that will impress your family and friends.
Ingredients
- 1 ½ cups all-purpose flour
- ½ cup unsalted butter, chilled and diced
- ¼ cup granulated sugar
- 1 egg yolk
- 2-3 tablespoons cold water
- 1 cup maple syrup
- ¾ cup packed brown sugar
- 3 large eggs
- 1 teaspoon vanilla extract
- 2 cups pecan halves
Instructions
- Make the Crust: In a bowl, mix flour and sugar. Cut in the butter until the mixture resembles coarse crumbs. Stir in the egg yolk and cold water until the dough forms. Roll out and fit into a tart pan. Chill for 30 minutes.
- Preheat Oven: Preheat your oven to 350°F (175°C).
- Prepare the Filling: In a saucepan, combine maple syrup and brown sugar. Heat until sugar dissolves. Remove from heat and let cool slightly. Whisk in eggs and vanilla.
- Assemble the Tart: Place pecan halves in the cooled crust. Pour the maple mixture over the pecans.
- Bake: Bake for 40-45 minutes, or until the filling is set. Let it cool before serving.
Treat Yourself To Cozy Cinnamon Roll Casserole

When the leaves start to change and the air turns crisp, it’s time to enjoy some warm, comforting treats. This cozy cinnamon roll casserole is perfect for those chilly fall mornings. It combines the classic flavors of cinnamon rolls with the ease of a casserole, making it a delightful addition to your breakfast table.
The image shows a beautifully baked cinnamon roll casserole, golden and gooey, nestled in a white dish. The rolls are swirled with cinnamon and topped with a light glaze, inviting you to dig in. Surrounding the dish are hints of fall, with pumpkins and flowers adding to the seasonal charm. A warm cup of coffee sits nearby, ready to complement the sweet rolls.
This dish is not only delicious but also simple to prepare. You can whip it up for a family gathering or just treat yourself on a cozy weekend. Let’s get into the ingredients and instructions so you can enjoy this delightful fall dessert!
Celebrate With A Festive Apple Cider Doughnut Cake
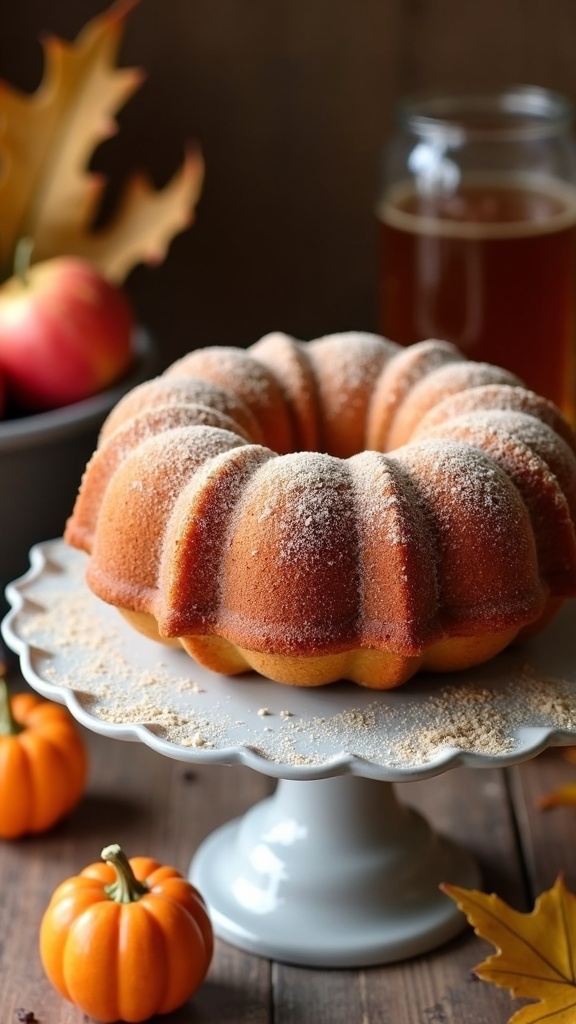
Fall is the perfect time to enjoy warm, comforting desserts, and nothing says autumn quite like a delicious apple cider doughnut cake. This cake captures the essence of fall with its rich flavors and cozy spices. The image showcases a beautifully baked bundt cake, dusted with cinnamon sugar, sitting on a charming cake stand. Surrounding it are vibrant autumn leaves and small pumpkins, adding to the festive vibe.
This cake is not just a treat for the eyes; it’s a delightful blend of apple cider, warm spices, and a moist texture that makes it irresistible. Perfect for gatherings or a cozy night in, this dessert will surely become a favorite.
Ingredients
- 2 cups apple cider
- 2 cups all-purpose flour
- 1 cup granulated sugar
- 1/2 cup unsalted butter, softened
- 2 large eggs
- 1 teaspoon baking powder
- 1 teaspoon baking soda
- 1 teaspoon ground cinnamon
- 1/2 teaspoon ground nutmeg
- 1/4 teaspoon salt
- 1/4 cup brown sugar, packed
- Cinnamon sugar for dusting
Instructions
- Reduce the Cider: In a saucepan, bring the apple cider to a boil. Reduce heat and simmer until it’s reduced to about 1 cup. Let it cool.
- Mix Dry Ingredients: In a bowl, whisk together flour, baking powder, baking soda, cinnamon, nutmeg, and salt.
- Cream Butter and Sugar: In a separate bowl, cream the softened butter and granulated sugar until light and fluffy. Add the eggs one at a time, mixing well after each addition.
- Combine: Gradually add the dry ingredients to the butter mixture, alternating with the cooled apple cider. Mix until just combined.
- Bake: Pour the batter into a greased bundt pan and bake at 350°F (175°C) for 40-45 minutes or until a toothpick comes out clean.
- Cool and Dust: Allow the cake to cool in the pan for 10 minutes, then turn it out onto a wire rack. Once cool, dust with cinnamon sugar before serving.
Revel In The Decadence Of Chocolate Hazelnut Tart

Fall is the perfect time to enjoy rich and comforting desserts, and a Chocolate Hazelnut Tart fits the bill perfectly. This tart features a luscious chocolate filling, complemented by the nutty crunch of hazelnuts. The combination is simply irresistible, making it a great choice for gatherings or cozy nights in.
The tart sits beautifully on a wooden board, showcasing its glossy chocolate top sprinkled with roasted hazelnuts. The dark crust adds a nice contrast, while the warm tones of the wooden background evoke the essence of fall. It’s a dessert that not only tastes amazing but also looks stunning on any table.
To make this delightful treat, gather your ingredients and follow the steps below. You’ll be rewarded with a dessert that’s sure to impress!
Ingredients
- 1 1/2 cups all-purpose flour
- 1/2 cup unsweetened cocoa powder
- 1/4 cup powdered sugar
- 1/2 teaspoon salt
- 1/2 cup unsalted butter, chilled and cubed
- 1 large egg yolk
- 1/4 cup cold water
- 1 cup dark chocolate, chopped
- 1/2 cup heavy cream
- 1/2 cup hazelnuts, toasted and chopped
- 1 tablespoon vanilla extract
Instructions
- Make the Crust: In a bowl, mix flour, cocoa powder, powdered sugar, and salt. Add the chilled butter and mix until crumbly. Stir in the egg yolk and cold water until a dough forms. Press the dough into a tart pan and chill for 30 minutes.
- Bake the Crust: Preheat the oven to 350°F (175°C). Bake the crust for 15-20 minutes until firm. Let it cool.
- Prepare the Filling: In a saucepan, heat the heavy cream until just boiling. Pour it over the chopped chocolate and let it sit for a minute. Stir until smooth, then mix in the hazelnuts and vanilla extract.
- Fill the Tart: Pour the chocolate mixture into the cooled crust, spreading it evenly. Let it set in the fridge for at least 2 hours.
- Serve: Once set, slice the tart and enjoy! You can garnish with extra hazelnuts or a dusting of cocoa powder if desired.
Experience The Delight Of Maple Pumpkin Muffins
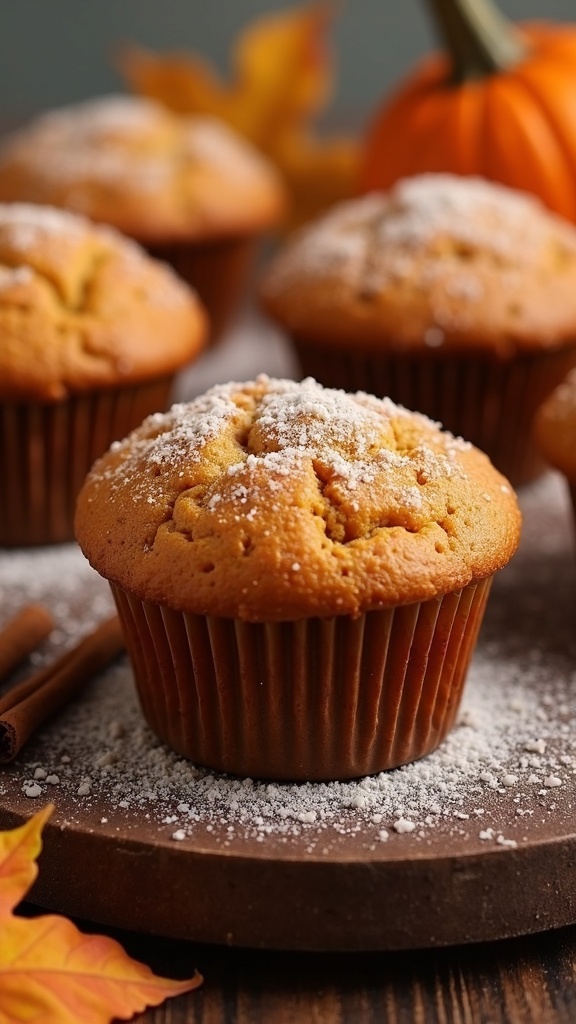
As the leaves turn and the air gets crisp, nothing says fall quite like the aroma of freshly baked maple pumpkin muffins. These delightful treats are soft, moist, and bursting with the warm flavors of pumpkin and maple. Topped with a light dusting of powdered sugar, they make for a perfect snack or breakfast option.
Imagine biting into a muffin that’s not only fluffy but also infused with the rich taste of pumpkin and a hint of maple syrup. Each bite is a cozy hug, making them a must-have for your fall dessert lineup. Pair them with a warm cup of coffee or tea, and you’re in for a treat!
Let’s get to the fun part—making these scrumptious muffins at home!
Ingredients
- 1 cup pumpkin puree
- 1/2 cup maple syrup
- 1/2 cup vegetable oil
- 2 large eggs
- 1 teaspoon vanilla extract
- 1 1/2 cups all-purpose flour
- 1 teaspoon baking soda
- 1 teaspoon baking powder
- 1 teaspoon ground cinnamon
- 1/2 teaspoon ground nutmeg
- 1/4 teaspoon salt
- Powdered sugar for dusting
Instructions
- Preheat your oven to 350°F (175°C). Line a muffin tin with paper liners.
- In a large bowl, whisk together the pumpkin puree, maple syrup, vegetable oil, eggs, and vanilla extract until smooth.
- In another bowl, mix the flour, baking soda, baking powder, cinnamon, nutmeg, and salt.
- Gradually add the dry ingredients to the wet ingredients, stirring until just combined. Be careful not to overmix!
- Fill each muffin cup about 2/3 full with the batter.
- Bake for 18-20 minutes, or until a toothpick inserted into the center comes out clean.
- Let the muffins cool in the pan for a few minutes before transferring them to a wire rack. Dust with powdered sugar before serving.
Struggling to Stay on Track with Your Eating?
You’re not alone. One of the biggest obstacles I see people
face is not knowing what to eat. Between busy schedules, endless diet
advice online, and trying to cook healthy meals that actually taste good—it’s
easy to feel stuck or overwhelmed.
That’s why I created my 21 Quick & Easy Custom
Low-Calorie Meal Plans Program. These plans are built specifically for
you—your goals, your lifestyle, and your food preferences. You won’t find
any cookie-cutter diets here. Just real, satisfying meals that help you stay
full, energized, and on track without the stress.
✅ No more guessing.
✅
No more skipping meals or eating “diet food” you hate.
✅
Just a clear, doable plan that fits your life.
👉 Ready to eat better,
feel better, and finally make progress? [Click here to get your custom meal plans today.]
Not Seeing the Inches Drop No Matter What You Do?
If you’re working out but still not seeing the results in
the mirror, I hear you. So many people come to me after months of doing cardio
or random workouts—and still struggling to lose inches or tone up. The truth
is, your body needs more than just movement. It needs a proven strategy.
My 8-Week Workout Program to Lose Inches is designed
to do just that—burn fat, tighten up, and give you visible results.
These workouts are fun, effective, and designed for real people with real
lives. Whether you’re getting back into fitness or ready to take it to the next
level, this program gives you a clear path to success.
✅ Just 8 weeks to build strength,
confidence, and a fitter shape.
✅
No endless cardio.
✅
No gym required (unless you want it).
👉 If you're ready to
drop inches and feel amazing in your own skin, [click here to start the 8-Week Workout Program].


Comments
Post a Comment