10 Delicious 5-Ingredient Appetizer Recipes for Effortless Entertaining
10 Delicious 5-Ingredient Appetizer Recipes for Effortless Entertaining
Hosting doesn't have to be a hassle! With these 5-ingredient appetizer recipes, you'll whip up tasty bites in no time, leaving you free to enjoy the festivities. Perfect for any occasion, these simple yet delicious ideas will impress your guests without requiring hours in the kitchen.
Deliciously Simple Caprese Skewers

Caprese skewers are a delightful and easy appetizer that brings together fresh flavors in a fun way. These skewers feature juicy cherry tomatoes, creamy mozzarella balls, and fragrant basil leaves, all drizzled with a balsamic glaze. They are not just visually appealing but also incredibly tasty, making them a perfect choice for any gathering.
Making these skewers is a breeze. Simply thread a cherry tomato, a basil leaf, and a mozzarella ball onto a toothpick. Repeat until your platter is full. A drizzle of balsamic glaze adds that extra touch of flavor and sophistication. These bites are sure to impress your guests!
Ingredients
- 1 pint cherry tomatoes
- 8 ounces fresh mozzarella balls
- 1 bunch fresh basil leaves
- Balsamic glaze
- Salt and pepper to taste
Instructions
- Prepare the Skewers: On each toothpick, thread one cherry tomato, followed by a basil leaf, and then a mozzarella ball. Repeat until all ingredients are used.
- Season: Arrange the skewers on a serving platter. Drizzle with balsamic glaze and sprinkle with salt and pepper to taste.
- Serve: Enjoy immediately or refrigerate until ready to serve. These skewers are best enjoyed fresh!
Succulent Shrimp Cocktail With Zesty Sauce

Nothing says classy like a shrimp cocktail. This dish is not only visually appealing but also incredibly easy to prepare. The shrimp are perfectly cooked, plump, and juicy, making them a delightful treat for any gathering. Served in a clear glass bowl, the shrimp are garnished with fresh parsley and lemon slices, adding a pop of color and freshness.
The zesty sauce on the side is the perfect complement, offering a tangy kick that enhances the natural sweetness of the shrimp. This appetizer is a crowd-pleaser and can be whipped up in no time, making it ideal for effortless entertaining.
Ingredients
- 1 pound large shrimp, peeled and deveined
- 1 cup cocktail sauce
- 1 tablespoon lemon juice
- 1 teaspoon Worcestershire sauce
- Fresh parsley for garnish
- Lemon wedges for serving
Instructions
- Cook the Shrimp: In a large pot, bring water to a boil. Add the shrimp and cook for 2-3 minutes until they turn pink and opaque. Drain and let cool.
- Prepare the Sauce: In a small bowl, mix the cocktail sauce, lemon juice, and Worcestershire sauce. Adjust seasoning to taste.
- Serve: Arrange the shrimp in a serving bowl. Garnish with fresh parsley and serve with lemon wedges and the zesty sauce on the side.
Savory Spinach And Feta Pinwheels

These Savory Spinach and Feta Pinwheels are a delightful addition to any gathering. They look fresh and vibrant, with their green spinach swirls and creamy feta filling. Perfect for a quick appetizer, these pinwheels are not only easy to make but also packed with flavor.
To create these tasty bites, you’ll need just a few simple ingredients. The combination of spinach and feta gives a nice balance of earthiness and creaminess. Plus, they can be made ahead of time, making them ideal for effortless entertaining.
When you slice the pinwheels, you reveal beautiful spirals that are sure to impress your guests. Serve them on a platter with some fresh herbs for a pop of color. They’re great for parties, picnics, or even as a light snack at home.
Ingredients
- 2 cups fresh spinach, chopped
- 1 cup feta cheese, crumbled
- 1/2 cup cream cheese, softened
- 1/4 cup sour cream
- 4 large flour tortillas
Instructions
- In a bowl, mix the chopped spinach, feta cheese, cream cheese, and sour cream until well combined.
- Spread the mixture evenly over each tortilla.
- Roll the tortillas tightly, starting from one edge.
- Wrap each rolled tortilla in plastic wrap and refrigerate for at least 1 hour.
- Once chilled, slice the rolls into bite-sized pinwheels and serve.
Flavor-Packed Hummus With Fresh Veggies
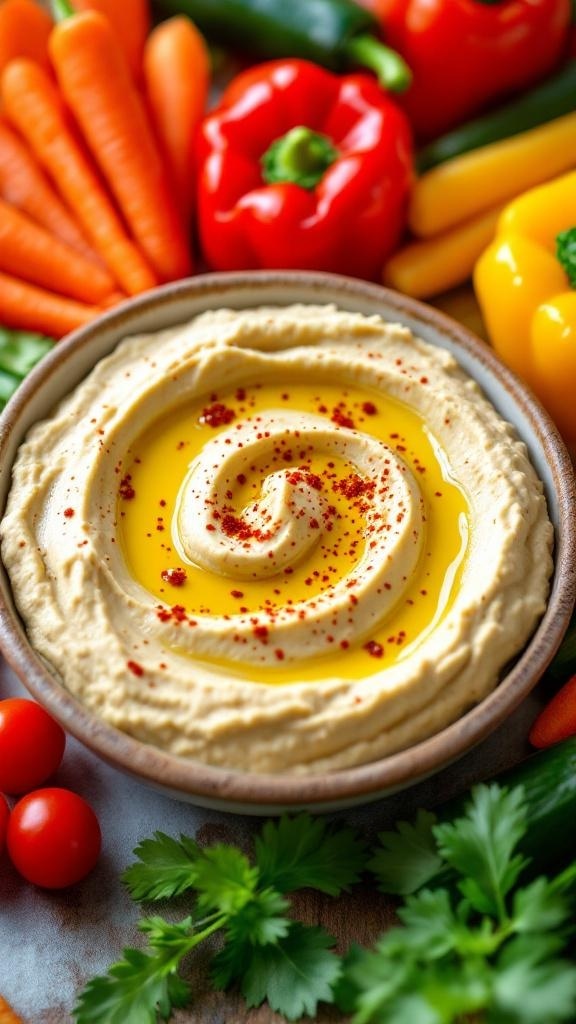
Hummus is a fantastic appetizer that never fails to impress. It’s creamy, smooth, and bursting with flavor. The image showcases a beautiful bowl of hummus drizzled with olive oil and sprinkled with paprika, surrounded by an array of fresh veggies. You can see vibrant carrots, bell peppers, and cherry tomatoes, all ready for dipping.
This dish is not only delicious but also healthy. Hummus is made primarily from chickpeas, which are packed with protein and fiber. Pairing it with fresh vegetables adds crunch and color, making it a perfect choice for gatherings.
Making hummus is simple and requires just a few ingredients. You can whip it up in no time, making it ideal for effortless entertaining. Serve it at your next get-together, and watch your guests enjoy every bite!
Ingredients
- 1 can (15 oz) chickpeas, drained and rinsed
- 1/4 cup tahini
- 2 tablespoons olive oil
- 2 tablespoons lemon juice
- 1 clove garlic, minced
- Salt to taste
- Paprika for garnish
- Fresh veggies for dipping (carrots, bell peppers, cucumbers, cherry tomatoes)
Instructions
- Blend Ingredients: In a food processor, combine chickpeas, tahini, olive oil, lemon juice, garlic, and salt. Blend until smooth.
- Adjust Consistency: If the hummus is too thick, add a little water, one tablespoon at a time, until you reach your desired consistency.
- Serve: Transfer the hummus to a serving bowl. Drizzle with olive oil and sprinkle paprika on top.
- Prepare Veggies: Cut fresh veggies into sticks or bite-sized pieces for easy dipping.
- Enjoy: Serve immediately with the fresh veggies and enjoy!
Zesty Mini Meatballs In Marinara Sauce
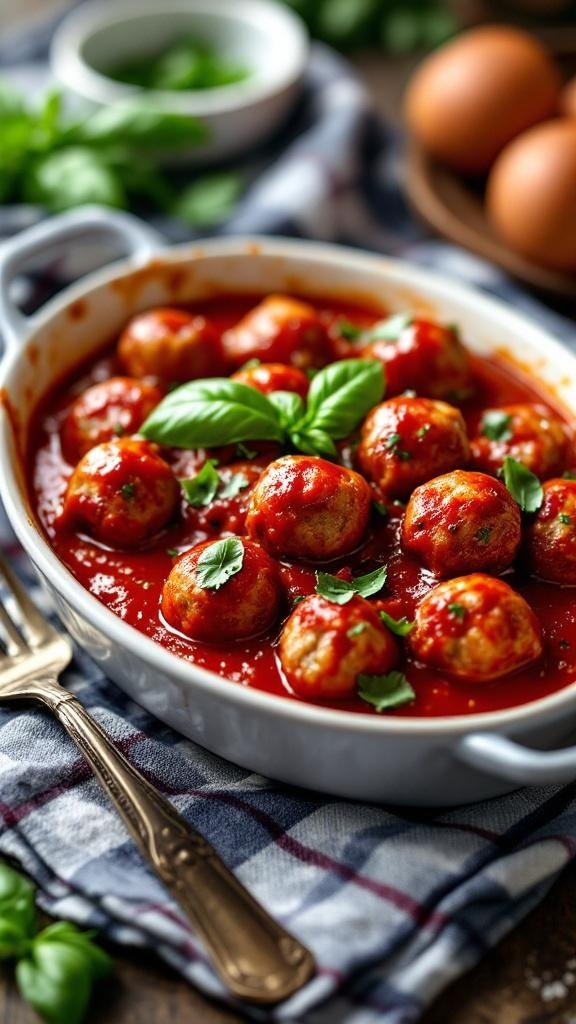
These zesty mini meatballs in marinara sauce are the perfect appetizer for any gathering. They are easy to make and packed with flavor. The vibrant red sauce complements the juicy meatballs, making them a crowd favorite. You can serve them on toothpicks for easy snacking or as a main dish with some crusty bread.
The meatballs are made with simple ingredients, ensuring you can whip them up without any hassle. Plus, they look great on the table, garnished with fresh basil. Your guests will love these little bites of goodness!
Ingredients
- 1 pound ground beef
- 1/2 cup breadcrumbs
- 1/4 cup grated Parmesan cheese
- 1 large egg
- 1 teaspoon Italian seasoning
- 2 cups marinara sauce
- Fresh basil for garnish
Instructions
- Preheat your oven to 400°F (200°C).
- In a large bowl, combine ground beef, breadcrumbs, Parmesan cheese, egg, and Italian seasoning. Mix until well combined.
- Form the mixture into small meatballs, about 1 inch in diameter.
- Place the meatballs on a baking sheet lined with parchment paper and bake for 15-20 minutes, or until cooked through.
- While the meatballs are baking, heat the marinara sauce in a saucepan over medium heat.
- Once the meatballs are done, add them to the marinara sauce and let them simmer for a few minutes.
- Serve hot, garnished with fresh basil.
Refreshing Cucumber Sandwiches With Cream Cheese

These cucumber sandwiches are a delightful addition to any gathering. They are light, refreshing, and incredibly easy to make. The combination of crisp cucumber, creamy cheese, and a hint of dill creates a perfect bite-sized treat. Ideal for tea parties or casual get-togethers, these sandwiches are sure to impress your guests.
The image showcases beautifully layered cucumber sandwiches, topped with thinly sliced radishes and fresh dill. The vibrant colors make them visually appealing, and they look as tasty as they are. These sandwiches are not just a feast for the eyes; they are also a breeze to prepare.
To make these sandwiches, you’ll need just a few simple ingredients. The best part? They come together in no time, making them perfect for effortless entertaining.
Ingredients
- 1 loaf of white or whole grain bread
- 8 oz cream cheese, softened
- 1 large cucumber, thinly sliced
- 1/2 cup radishes, thinly sliced
- Fresh dill for garnish
Instructions
- Prepare the Bread: Start by trimming the crusts off the bread slices. Cut each slice into quarters or desired shapes.
- Spread the Cream Cheese: Evenly spread a layer of softened cream cheese on each piece of bread.
- Add Cucumber: Place a few slices of cucumber on top of the cream cheese.
- Layer Radishes: Add a slice or two of radish for a bit of crunch and flavor.
- Garnish: Top with a sprig of fresh dill for a pop of color and added taste.
- Assemble: Place another piece of bread on top to complete the sandwich. Serve immediately or refrigerate until ready to serve.
Tasty Cheese And Charcuterie Board

Creating a cheese and charcuterie board is a fun way to impress your guests without spending hours in the kitchen. This image showcases a vibrant spread filled with various cheeses, cured meats, nuts, and fresh fruits. The colorful arrangement not only looks appealing but also offers a variety of flavors and textures that everyone will enjoy.
Start with a selection of cheeses. A mix of hard and soft cheeses, like cheddar, brie, and blue cheese, adds depth to your board. Pair these with some thinly sliced cured meats, such as prosciutto or salami, for a savory kick. Don't forget to include some crunchy elements like mixed nuts and crackers, which provide a nice contrast to the creamy cheeses.
Fresh fruits, like grapes and cherry tomatoes, add a pop of color and a refreshing taste. You can also include some olives or pickles for a tangy touch. Arrange everything on a wooden board or platter, and garnish with fresh herbs for a beautiful presentation.
This cheese and charcuterie board is perfect for any gathering, whether it’s a casual get-together or a festive celebration. It’s simple, elegant, and sure to be a hit!
Ingredients
- 1 cup assorted cheeses (cheddar, brie, blue cheese)
- 1 cup assorted cured meats (prosciutto, salami)
- 1 cup mixed nuts (almonds, walnuts)
- 1 cup fresh fruits (grapes, cherry tomatoes)
- 1 cup crackers or breadsticks
- Fresh herbs for garnish
Instructions
- Choose a large wooden board or platter for your arrangement.
- Start by placing the cheeses on the board, spacing them out evenly.
- Next, add the cured meats, folding or rolling them for a nice presentation.
- Fill in the gaps with mixed nuts and crackers, creating a balanced look.
- Finally, add fresh fruits and herbs for color and garnish.
- Serve with small plates and toothpicks for easy snacking.
Sweet And Savory Bacon-Wrapped Dates

Bacon-wrapped dates are a delightful mix of sweet and savory flavors that make for a perfect appetizer. These little bites are not only easy to prepare but also pack a punch of taste that will impress your guests. The crispy bacon complements the soft, sweet dates beautifully, creating a mouthwatering experience.
To make these treats, you only need five ingredients. They are simple to find and quick to assemble. Once baked, the bacon becomes crispy, while the dates become warm and gooey. Serve them on a wooden platter for a rustic touch, and watch your guests enjoy every bite!
Ingredients
- 20 pitted dates
- 10 slices of bacon, cut in half
- 1/2 cup goat cheese or cream cheese
- 1/4 cup honey
- 1/4 teaspoon black pepper
Instructions
- Preheat your oven to 400°F (200°C).
- Stuff each date with a small amount of goat cheese or cream cheese.
- Wrap each stuffed date with half a slice of bacon and secure with a toothpick.
- Place the wrapped dates on a baking sheet lined with parchment paper.
- Drizzle honey over the wrapped dates and sprinkle with black pepper.
- Bake for 15-20 minutes or until the bacon is crispy. Serve warm and enjoy!
Sweet And Savory Antipasto Skewers

Sweet and savory antipasto skewers are a fun and easy appetizer that will impress your guests. These colorful bites combine fresh ingredients like cherry tomatoes, olives, and cheese, all beautifully arranged on skewers. The mix of flavors and textures makes each bite a delightful experience.
To make these skewers, you can use a variety of ingredients based on your preference. The combination of salty meats, creamy cheese, and fresh veggies creates a balanced taste that everyone will love. Plus, they are super simple to assemble, making them perfect for any gathering.
Here’s how to whip up your own sweet and savory antipasto skewers:
Ingredients
- 1 cup cherry tomatoes
- 1 cup mozzarella cheese, cubed
- 1/2 cup olives (green and black)
- 8 slices of salami or prosciutto
- Fresh parsley for garnish
- Skewers
Instructions
- Prepare the Ingredients: Wash the cherry tomatoes and set them aside. Cube the mozzarella cheese if not pre-cubed.
- Assemble the Skewers: Take a skewer and start by threading a cherry tomato, followed by a folded slice of salami, a cube of mozzarella, and an olive. Repeat this process until the skewer is filled, leaving some space at the end for easy handling.
- Garnish: Once all skewers are assembled, sprinkle fresh parsley over them for a pop of color and flavor.
- Serve: Arrange the skewers on a platter and serve immediately or refrigerate until ready to serve.
Tasty Pesto And Cheese Stuffed Peppers
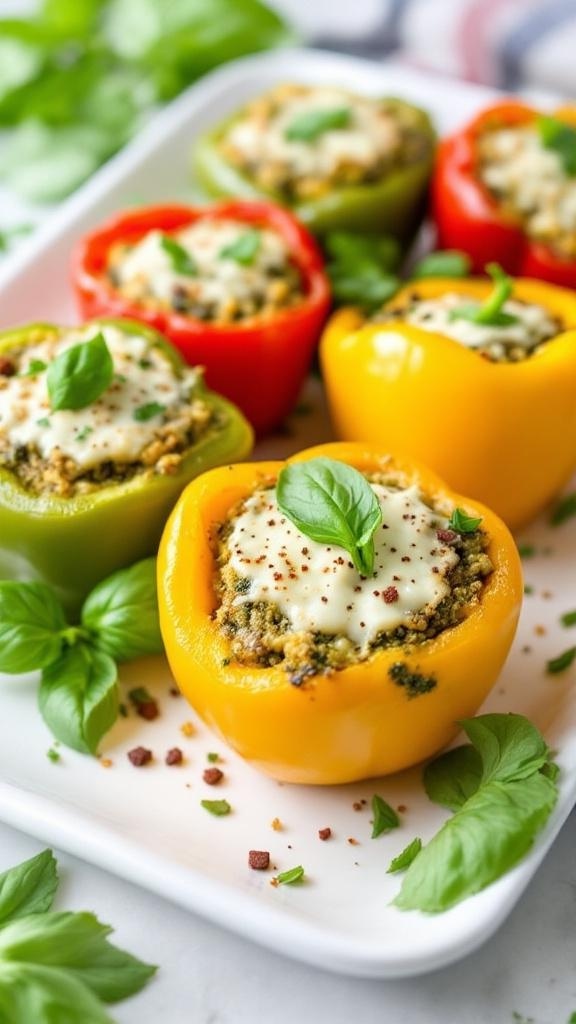
These pesto and cheese stuffed peppers are a colorful and delicious addition to any gathering. Bright red, yellow, and green peppers are filled with a savory mixture of pesto, cheese, and breadcrumbs. They not only look appealing but also pack a flavorful punch that everyone will love.
Preparing these stuffed peppers is simple and quick. Start by cutting the tops off the peppers and removing the seeds. Then, mix your favorite pesto with cheese and breadcrumbs. Fill each pepper generously with this tasty mixture. Bake until the peppers are tender and the cheese is bubbly. Serve them warm, garnished with fresh basil for an extra touch.
These appetizers are perfect for effortless entertaining. They can be made ahead of time and popped in the oven just before guests arrive. Plus, they cater to various dietary preferences, making them a hit at any party.
Ingredients
- 4 bell peppers (any color)
- 1 cup pesto
- 1 cup shredded mozzarella cheese
- 1/2 cup breadcrumbs
- Fresh basil for garnish
Instructions
- Preheat your oven to 375°F (190°C).
- Cut the tops off the bell peppers and remove the seeds.
- In a bowl, mix the pesto, mozzarella cheese, and breadcrumbs until well combined.
- Stuff each pepper with the mixture, packing it in tightly.
- Place the stuffed peppers in a baking dish and cover with foil.
- Bake for 25-30 minutes, then remove the foil and bake for an additional 10 minutes until the cheese is bubbly.
- Garnish with fresh basil before serving.
Struggling to Stay on Track with Your Eating?
You’re not alone. One of the biggest obstacles I see people
face is not knowing what to eat. Between busy schedules, endless diet
advice online, and trying to cook healthy meals that actually taste good—it’s
easy to feel stuck or overwhelmed.
That’s why I created my 21 Quick & Easy Custom
Low-Calorie Meal Plans Program. These plans are built specifically for
you—your goals, your lifestyle, and your food preferences. You won’t find
any cookie-cutter diets here. Just real, satisfying meals that help you stay
full, energized, and on track without the stress.
✅ No more guessing.
✅
No more skipping meals or eating “diet food” you hate.
✅
Just a clear, doable plan that fits your life.
👉 Ready to eat better,
feel better, and finally make progress? [Click here to get your custom meal plans today.]
Not Seeing the Inches Drop No Matter What You Do?
If you’re working out but still not seeing the results in
the mirror, I hear you. So many people come to me after months of doing cardio
or random workouts—and still struggling to lose inches or tone up. The truth
is, your body needs more than just movement. It needs a proven strategy.
My 8-Week Workout Program to Lose Inches is designed
to do just that—burn fat, tighten up, and give you visible results.
These workouts are fun, effective, and designed for real people with real
lives. Whether you’re getting back into fitness or ready to take it to the next
level, this program gives you a clear path to success.
✅ Just 8 weeks to build strength,
confidence, and a fitter shape.
✅
No endless cardio.
✅
No gym required (unless you want it).
👉 If you're ready to
drop inches and feel amazing in your own skin, [click here to start the 8-Week Workout Program].


Comments
Post a Comment