10 Easy and Healthy Air Fryer Dinner Recipes You'll Love
10 Easy and Healthy Air Fryer Dinner Recipes You'll Love
Cooking healthy meals doesn't have to be a chore, especially when you have an air fryer in your kitchen. This handy appliance makes it simple to whip up delicious dinners that are both easy to prepare and good for you. From crispy veggies to lean proteins, we’ve rounded up 10 tasty recipes that will have you enjoying guilt-free dinners in no time.
Quick And Delicious Air Fryer Chicken Tenders

Air fryer chicken tenders are a fantastic option for a quick and healthy dinner. They’re crispy on the outside and juicy on the inside, making them a hit with both kids and adults. The image shows a plate piled high with golden-brown chicken tenders, perfectly cooked and ready to be enjoyed. Dipping sauces like ranch and hot sauce sit nearby, adding to the excitement.
These tenders are not just tasty; they’re also easy to make. You can whip them up in no time, making them perfect for busy weeknights. Plus, using an air fryer means you can enjoy that crispy texture without all the oil. Let’s dive into how to make these delicious chicken tenders!
Ingredients
- 1 pound chicken tenders
- 1 cup breadcrumbs
- 1/2 cup all-purpose flour
- 2 large eggs
- 1 teaspoon garlic powder
- 1 teaspoon paprika
- Salt and pepper to taste
- Cooking spray
Instructions
- Prepare the Breading: In one bowl, mix flour, garlic powder, paprika, salt, and pepper. In another bowl, beat the eggs. In a third bowl, place the breadcrumbs.
- Coat the Chicken: Dip each chicken tender first into the flour mixture, then into the egg, and finally into the breadcrumbs, ensuring they are well-coated.
- Preheat the Air Fryer: Set your air fryer to 400°F (200°C) and let it preheat for about 5 minutes.
- Cook the Chicken: Arrange the breaded chicken tenders in a single layer in the air fryer basket. Spray lightly with cooking spray. Cook for 10-12 minutes, flipping halfway through, until golden brown and cooked through.
- Serve: Remove the chicken tenders from the air fryer and let them cool slightly. Serve with your favorite dipping sauces and enjoy!
Easy Air Fryer Turkey Meatballs With Marinara

Air fryer turkey meatballs are a fantastic way to enjoy a classic dish with a healthy twist. These meatballs are juicy, flavorful, and cooked to perfection in the air fryer, making them a quick and easy dinner option. The image showcases perfectly round meatballs nestled in a rich marinara sauce, served over a bed of spaghetti. Fresh basil leaves add a pop of color and a hint of freshness to the dish.
Making these meatballs is simple. You can whip them up in no time, and they are perfect for meal prep or a cozy family dinner. Pair them with your favorite pasta or serve them on their own with a side salad for a lighter meal.
Ingredients
- 1 pound ground turkey
- 1/4 cup breadcrumbs
- 1/4 cup grated Parmesan cheese
- 1/4 cup chopped fresh parsley
- 1 large egg
- 2 cloves garlic, minced
- 1 teaspoon Italian seasoning
- Salt and pepper to taste
- 1 jar marinara sauce
- Spaghetti or your choice of pasta
Instructions
- In a large bowl, combine ground turkey, breadcrumbs, Parmesan cheese, parsley, egg, garlic, Italian seasoning, salt, and pepper. Mix until well combined.
- Form the mixture into meatballs, about 1 inch in diameter.
- Preheat the air fryer to 375°F (190°C). Place the meatballs in the air fryer basket in a single layer.
- Cook for 10-12 minutes, turning halfway through, until the meatballs are cooked through and golden brown.
- While the meatballs are cooking, heat the marinara sauce in a saucepan over medium heat.
- Once the meatballs are done, add them to the marinara sauce and let them simmer for a few minutes.
- Serve the meatballs over cooked spaghetti and garnish with fresh basil.
Flavorful Air Fryer Veggie Tacos With Avocado Crema

Veggie tacos are a fantastic way to enjoy a healthy meal, and using an air fryer makes them even easier. Imagine colorful bell peppers, zucchini, and corn, all perfectly roasted and tucked into warm tortillas. The vibrant colors and fresh ingredients make these tacos not just tasty but also visually appealing.
Top them off with creamy avocado crema, which adds a rich texture and a burst of flavor. This dish is perfect for a quick weeknight dinner or a fun gathering with friends. Plus, it’s a great way to sneak in more veggies!
Ingredients
- 1 red bell pepper, sliced
- 1 yellow bell pepper, sliced
- 1 zucchini, sliced
- 1 cup corn (fresh or frozen)
- 1 tablespoon olive oil
- 1 teaspoon chili powder
- 1 teaspoon cumin
- Salt and pepper to taste
- 8 small corn tortillas
- Fresh cilantro for garnish
Avocado Crema Ingredients
- 1 ripe avocado
- 1/2 cup Greek yogurt
- 1 tablespoon lime juice
- Salt to taste
Instructions
- Preheat your air fryer to 400°F (200°C).
- In a bowl, toss the sliced bell peppers, zucchini, and corn with olive oil, chili powder, cumin, salt, and pepper.
- Add the veggies to the air fryer basket and cook for about 10-12 minutes, shaking halfway through.
- While the veggies are cooking, prepare the avocado crema. In a blender, combine the avocado, Greek yogurt, lime juice, and salt. Blend until smooth.
- Warm the tortillas in a dry skillet or microwave for a few seconds.
- Assemble the tacos by filling each tortilla with the roasted veggies and drizzling with avocado crema. Garnish with fresh cilantro.
Enjoy your delicious air fryer veggie tacos with avocado crema!
Zesty Air Fryer Shrimp With Garlic And Paprika
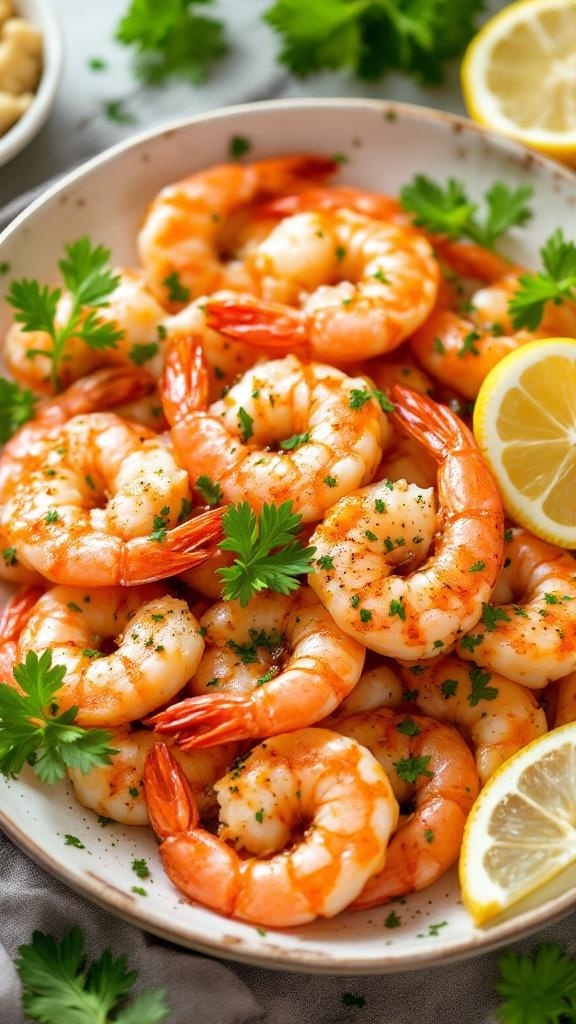
Air fryers are a fantastic way to whip up quick and healthy meals. This zesty air fryer shrimp recipe is a perfect example. The shrimp are seasoned with garlic and paprika, giving them a delightful kick. The vibrant colors of the shrimp, garnished with fresh parsley and lemon slices, make this dish not only tasty but visually appealing too.
The shrimp cook quickly in the air fryer, resulting in a juicy texture that pairs well with a variety of sides. You can serve them over rice, toss them in a salad, or enjoy them on their own as a healthy snack. This recipe is simple enough for a weeknight dinner but impressive enough for guests.
Ingredients
- 1 pound large shrimp, peeled and deveined
- 2 tablespoons olive oil
- 4 cloves garlic, minced
- 1 teaspoon paprika
- 1 teaspoon salt
- 1/2 teaspoon black pepper
- 1 tablespoon fresh parsley, chopped
- 1 lemon, sliced
Instructions
- Prepare the Shrimp: In a bowl, combine olive oil, minced garlic, paprika, salt, and black pepper. Add the shrimp and toss until coated.
- Preheat the Air Fryer: Set the air fryer to 400°F (200°C) and preheat for about 5 minutes.
- Cook the Shrimp: Place the shrimp in a single layer in the air fryer basket. Cook for 6-8 minutes, shaking the basket halfway through for even cooking.
- Garnish: Once cooked, remove the shrimp and sprinkle with fresh parsley. Serve with lemon slices on the side.
GET 21 QUICK & EASY LOW-CALORIE MEAL PLANS
Air Fryer Cauliflower Wings With Spicy Sauce

Cauliflower wings are a fantastic alternative to traditional chicken wings. They are crispy, flavorful, and packed with nutrients. This dish is perfect for game nights or as a healthy snack. The air fryer gives them a delightful crunch without all the extra oil.
The image shows golden-brown cauliflower florets drizzled with a spicy sauce, garnished with fresh green onions. A side of creamy dipping sauce adds a nice contrast to the heat. These wings are not just tasty; they’re also easy to make!
To prepare these cauliflower wings, you’ll need a few simple ingredients. The air fryer makes cooking quick and efficient, ensuring you get that crispy texture without the fuss of deep frying.
Ingredients
- 1 medium head of cauliflower, cut into florets
- 1 cup all-purpose flour
- 1 cup water
- 1 teaspoon garlic powder
- 1 teaspoon paprika
- 1/2 teaspoon salt
- 1 cup hot sauce (your choice)
- 2 tablespoons melted butter
- Chopped green onions for garnish
Instructions
- Prepare the Cauliflower: In a bowl, mix flour, water, garlic powder, paprika, and salt to create a batter. Dip each cauliflower floret into the batter, ensuring it’s fully coated.
- Air Fry: Preheat your air fryer to 400°F (200°C). Place the battered cauliflower in the fryer basket in a single layer. Cook for about 15 minutes, shaking the basket halfway through.
- Make the Sauce: In a separate bowl, combine hot sauce and melted butter. Once the cauliflower is done, toss it in the sauce until well coated.
- Serve: Return the sauced cauliflower to the air fryer for an additional 5 minutes to crisp up. Garnish with chopped green onions and serve with your favorite dipping sauce.
Tender Air Fryer Garlic Herb Chicken Thighs

These air fryer garlic herb chicken thighs are a fantastic choice for a quick and healthy dinner. The image shows beautifully cooked chicken thighs, golden brown and garnished with fresh herbs. They look juicy and tender, ready to be enjoyed with a side of roasted vegetables.
Using an air fryer makes this dish not only easy but also healthier than traditional frying methods. The garlic and herbs add a delightful flavor that pairs perfectly with the chicken. Plus, the crispy skin gives you that satisfying crunch without all the extra oil.
Let’s get cooking!
Ingredients
- 4 chicken thighs, bone-in and skin-on
- 2 tablespoons olive oil
- 4 cloves garlic, minced
- 1 teaspoon dried thyme
- 1 teaspoon dried rosemary
- Salt and pepper to taste
- Fresh parsley for garnish
Instructions
- Prepare the Chicken: Pat the chicken thighs dry with paper towels. This helps achieve a crispy skin.
- Make the Marinade: In a bowl, mix olive oil, minced garlic, thyme, rosemary, salt, and pepper.
- Coat the Chicken: Rub the marinade all over the chicken thighs, ensuring they are well coated.
- Preheat the Air Fryer: Set your air fryer to 400°F (200°C) and let it preheat for about 5 minutes.
- Cook the Chicken: Place the chicken thighs in the air fryer basket, skin side up. Cook for 20-25 minutes, flipping halfway through, until the internal temperature reaches 165°F (75°C).
- Garnish and Serve: Once cooked, remove the chicken from the air fryer and let it rest for a few minutes. Garnish with fresh parsley before serving.
Delicious Air Fryer Eggplant Parmesan

Eggplant Parmesan is a classic dish that brings comfort and flavor to any dinner table. Using an air fryer makes this recipe healthier without sacrificing taste. The image showcases beautifully layered eggplant slices, topped with marinara sauce and melted cheese, garnished with fresh basil. This dish is not only visually appealing but also packed with nutrients.
To make this delicious Air Fryer Eggplant Parmesan, you will need a few simple ingredients. The air fryer cooks the eggplant to perfection, giving it a crispy texture while keeping it tender inside. This method cuts down on oil, making it a lighter option for your family.
Ready to whip up this tasty dish? Let’s get started!
Ingredients
- 2 medium eggplants, sliced into 1/2-inch rounds
- 1 cup breadcrumbs
- 1/2 cup grated Parmesan cheese
- 1 teaspoon garlic powder
- 1 teaspoon Italian seasoning
- 2 cups marinara sauce
- 2 cups shredded mozzarella cheese
- Salt and pepper to taste
- Fresh basil for garnish
Instructions
- Prepare the Eggplant: Sprinkle salt on the eggplant slices and let them sit for about 30 minutes to draw out moisture. Rinse and pat dry.
- Make the Coating: In a bowl, mix breadcrumbs, Parmesan cheese, garlic powder, Italian seasoning, salt, and pepper.
- Coat the Eggplant: Dip each eggplant slice into the breadcrumb mixture, ensuring they are well coated.
- Air Fry: Preheat the air fryer to 375°F (190°C). Place the coated eggplant slices in a single layer in the air fryer basket. Cook for about 10-12 minutes, flipping halfway through, until golden brown.
- Layer the Dish: In a baking dish, spread a layer of marinara sauce, then add a layer of air-fried eggplant. Top with mozzarella cheese. Repeat the layers until all ingredients are used, finishing with mozzarella on top.
- Bake: Place the baking dish in the air fryer and cook at 375°F (190°C) for an additional 10 minutes, or until the cheese is bubbly and golden.
- Serve: Let it cool for a few minutes, garnish with fresh basil, and enjoy your healthy Air Fryer Eggplant Parmesan!
Simple Air Fryer Vegetable Stir-Fry
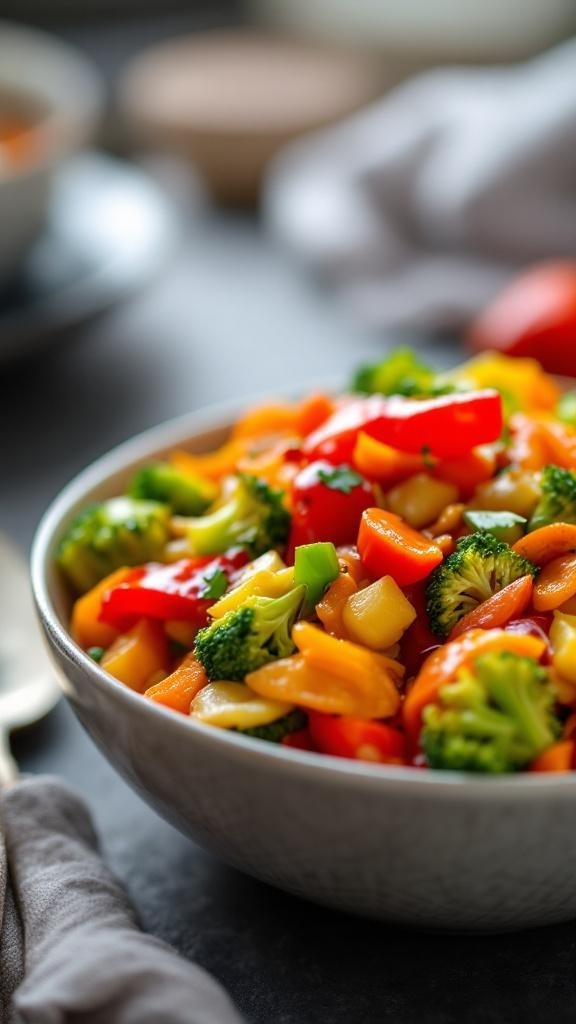
This Simple Air Fryer Vegetable Stir-Fry is a colorful and nutritious dish that’s perfect for any weeknight dinner. The image shows a vibrant mix of fresh vegetables, including bell peppers, broccoli, and corn, all tossed together in a lovely bowl. The bright colors not only make the dish appealing but also highlight the freshness of the ingredients.
Using an air fryer for this recipe means you can achieve that satisfying crispiness without the extra oil. It’s a quick and easy way to enjoy a healthy meal packed with vitamins and minerals. Plus, you can customize it with your favorite veggies!
Let’s get into the ingredients and steps to whip up this delightful stir-fry.
Ingredients
- 1 cup broccoli florets
- 1 red bell pepper, sliced
- 1 yellow bell pepper, sliced
- 1 cup corn (fresh or frozen)
- 1 green bell pepper, sliced
- 2 tablespoons soy sauce
- 1 tablespoon olive oil
- 1 teaspoon garlic powder
- Salt and pepper to taste
- Fresh parsley for garnish
Instructions
- Prepare the Vegetables: Wash and chop all the vegetables into bite-sized pieces.
- Mix the Sauce: In a bowl, combine soy sauce, olive oil, garlic powder, salt, and pepper. Stir well.
- Coat the Veggies: Add the chopped vegetables to the bowl and toss them in the sauce until well coated.
- Preheat the Air Fryer: Set your air fryer to 400°F (200°C) and let it preheat for about 5 minutes.
- Air Fry: Place the coated vegetables in the air fryer basket in a single layer. Cook for 10-12 minutes, shaking the basket halfway through for even cooking.
- Serve: Once cooked, transfer the stir-fry to a bowl, garnish with fresh parsley, and enjoy!
Crispy Air Fryer Coconut Shrimp

Crispy Air Fryer Coconut Shrimp is a delightful dish that brings a taste of the tropics right to your dinner table. These shrimp are coated in a crunchy mixture of coconut and breadcrumbs, giving them a satisfying texture. The air fryer makes them crispy without the need for deep frying, keeping things healthier.
In the image, you can see golden-brown shrimp garnished with fresh cilantro and lime wedges. The shrimp are served with two dipping sauces, adding a burst of flavor. This dish is perfect for a quick weeknight dinner or a fun appetizer for gatherings.
Let’s get cooking!
Ingredients
- 1 pound large shrimp, peeled and deveined
- 1 cup shredded coconut
- 1 cup panko breadcrumbs
- 2 large eggs
- 1/2 cup all-purpose flour
- 1 teaspoon garlic powder
- 1 teaspoon paprika
- Salt and pepper to taste
- Cooking spray
- Lime wedges for serving
Instructions
- Prepare the Shrimp: In a bowl, season the shrimp with salt, pepper, garlic powder, and paprika. Set aside.
- Set Up Breading Station: In one bowl, place the flour. In another bowl, whisk the eggs. In a third bowl, combine the shredded coconut and panko breadcrumbs.
- Bread the Shrimp: Dip each shrimp first in flour, then in the egg, and finally in the coconut mixture, pressing gently to adhere.
- Air Fry: Preheat the air fryer to 400°F (200°C). Arrange the breaded shrimp in a single layer in the air fryer basket. Lightly spray with cooking spray. Cook for 8-10 minutes, flipping halfway through, until golden and crispy.
- Serve: Remove from the air fryer and serve immediately with lime wedges and your favorite dipping sauces.
Flavor-Packed Air Fryer Chicken Fajitas

Air fryer chicken fajitas are a fantastic way to enjoy a flavorful meal without the fuss. The image showcases vibrant bell peppers, tender chicken, and fresh herbs wrapped in warm tortillas. It’s a feast for the eyes and the taste buds!
This dish is not only colorful but also packed with nutrition. The combination of chicken and veggies makes it a wholesome choice for dinner. Plus, using an air fryer means you can achieve that perfect crispiness without excess oil.
To make these delicious fajitas, you’ll need some simple ingredients. Gather chicken breast, bell peppers, onion, and your favorite spices. The air fryer will do the magic, cooking everything evenly and quickly.
Let’s get cooking!
Ingredients
- 1 pound chicken breast, sliced
- 1 red bell pepper, sliced
- 1 yellow bell pepper, sliced
- 1 green bell pepper, sliced
- 1 onion, sliced
- 2 tablespoons olive oil
- 1 tablespoon chili powder
- 1 teaspoon cumin
- 1 teaspoon garlic powder
- Salt and pepper to taste
- Tortillas for serving
- Fresh cilantro for garnish
Instructions
- Prepare the Chicken: In a bowl, combine sliced chicken with olive oil, chili powder, cumin, garlic powder, salt, and pepper. Mix well to coat the chicken evenly.
- Add Vegetables: Toss in the sliced bell peppers and onion, mixing everything together.
- Air Fry: Preheat the air fryer to 400°F (200°C). Place the chicken and vegetable mixture in the air fryer basket. Cook for 12-15 minutes, shaking the basket halfway through for even cooking.
- Warm the Tortillas: While the chicken and veggies are cooking, warm the tortillas in a skillet or microwave.
- Serve: Once cooked, remove the fajitas from the air fryer. Serve them in warm tortillas, garnished with fresh cilantro.
Struggling to Stay on Track with Your Eating?
You’re not alone. One of the biggest obstacles I see people
face is not knowing what to eat. Between busy schedules, endless diet
advice online, and trying to cook healthy meals that actually taste good—it’s
easy to feel stuck or overwhelmed.
That’s why I created my 21 Quick & Easy Custom
Low-Calorie Meal Plans Program. These plans are built specifically for
you—your goals, your lifestyle, and your food preferences. You won’t find
any cookie-cutter diets here. Just real, satisfying meals that help you stay
full, energized, and on track without the stress.
✅ No more guessing.
✅
No more skipping meals or eating “diet food” you hate.
✅
Just a clear, doable plan that fits your life.
👉 Ready to eat better,
feel better, and finally make progress? [Click here to get your custom meal plans today.]
Not Seeing the Inches Drop No Matter What You Do?
If you’re working out but still not seeing the results in
the mirror, I hear you. So many people come to me after months of doing cardio
or random workouts—and still struggling to lose inches or tone up. The truth
is, your body needs more than just movement. It needs a proven strategy.
My 8-Week Workout Program to Lose Inches is designed
to do just that—burn fat, tighten up, and give you visible results.
These workouts are fun, effective, and designed for real people with real
lives. Whether you’re getting back into fitness or ready to take it to the next
level, this program gives you a clear path to success.
✅ Just 8 weeks to build strength,
confidence, and a fitter shape.
✅
No endless cardio.
✅
No gym required (unless you want it).
👉 If you're ready to
drop inches and feel amazing in your own skin, [click here to start the 8-Week Workout Program].


Comments
Post a Comment