12 Stunning Thanksgiving Desserts That Won't Break the Bank
12 Stunning Thanksgiving Desserts That Won't Break the Bank
Thanksgiving is the perfect time to impress loved ones without breaking the bank, especially when it comes to desserts. You can whip up stunning, budget-friendly treats that look like they've come straight from a fancy bakery. Get ready to make delicious desserts that will wow your guests and keep your wallet happy!
Delight In The Simplicity Of Pumpkin Spice Cupcakes
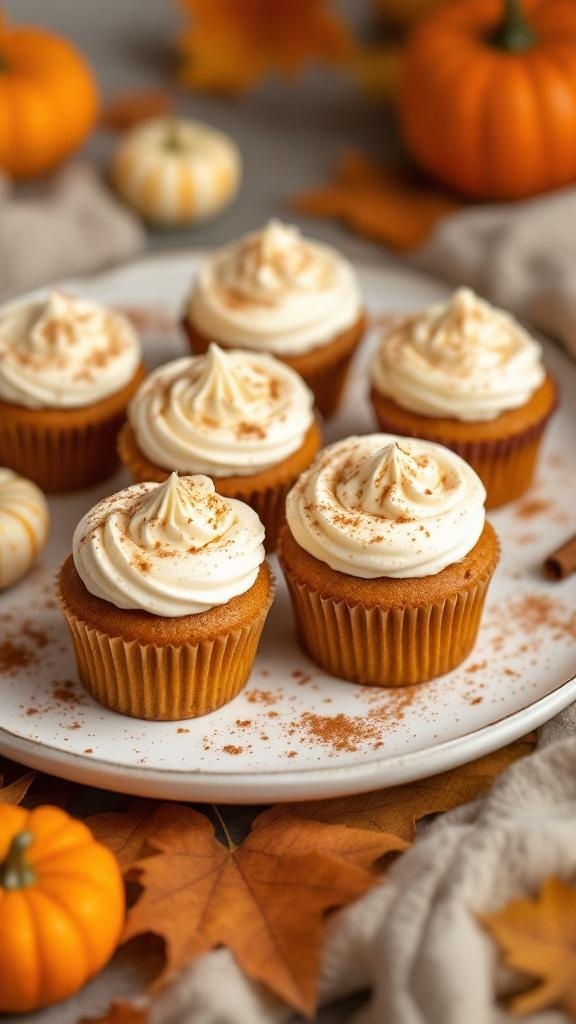
These pumpkin spice cupcakes are a delightful treat for Thanksgiving. They look fancy but are super easy to make. Topped with creamy frosting and a sprinkle of cinnamon, they bring the warmth of fall to your dessert table.
The cupcakes are moist and flavorful, thanks to the pumpkin puree and warm spices. You can easily whip them up without breaking the bank. Plus, they are sure to impress your guests!
To make these cupcakes, you will need simple ingredients that you might already have in your pantry. The best part? They come together quickly, allowing you to spend more time enjoying the holiday with family and friends.
Ingredients
- 1 cup all-purpose flour
- 1/2 teaspoon baking powder
- 1/2 teaspoon baking soda
- 1/4 teaspoon salt
- 1 teaspoon ground cinnamon
- 1/2 teaspoon ground nutmeg
- 1/4 teaspoon ground ginger
- 1/2 cup granulated sugar
- 1/2 cup brown sugar, packed
- 1/2 cup vegetable oil
- 2 large eggs
- 1 cup pumpkin puree
- 1 teaspoon vanilla extract
- 1 cup cream cheese, softened
- 2 cups powdered sugar
- 1 teaspoon vanilla extract (for frosting)
Instructions
- Preheat your oven to 350°F (175°C) and line a muffin tin with cupcake liners.
- In a bowl, mix together the flour, baking powder, baking soda, salt, cinnamon, nutmeg, and ginger.
- In another bowl, whisk together the granulated sugar, brown sugar, vegetable oil, eggs, pumpkin puree, and vanilla extract until smooth.
- Gradually add the dry ingredients to the wet ingredients, stirring until just combined.
- Fill each cupcake liner about two-thirds full with the batter. Bake for 18-20 minutes, or until a toothpick comes out clean.
- While the cupcakes cool, prepare the frosting by beating the cream cheese, powdered sugar, and vanilla extract until smooth.
- Once the cupcakes are cool, frost them generously and sprinkle with a little extra cinnamon on top.
These pumpkin spice cupcakes are sure to be a hit at your Thanksgiving gathering. Enjoy the flavors of the season!
Indulge In The Richness Of Chocolate Pecan Pie
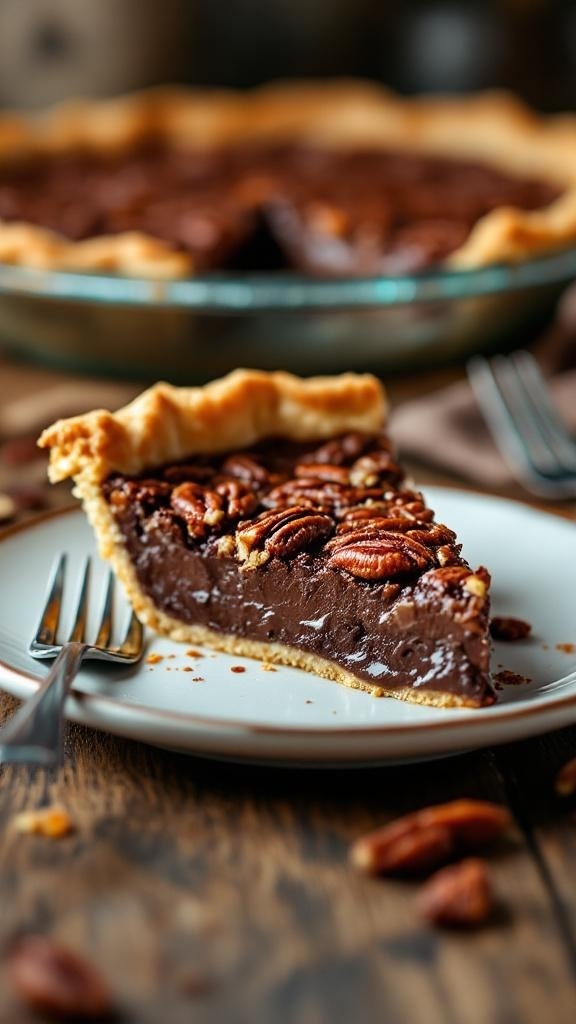
Chocolate pecan pie is a delightful twist on a classic dessert. This pie combines the rich flavors of chocolate with the nutty crunch of pecans, creating a treat that looks fancy but is easy to make. The golden crust cradles a luscious filling that is sure to impress your guests.
When you slice into this pie, you’ll see the glossy chocolate filling topped with a generous layer of pecans. The contrast of textures makes each bite a pleasure. Serve it warm with a scoop of vanilla ice cream or a dollop of whipped cream for an extra special touch.
Making this pie doesn’t require fancy ingredients or complicated techniques. It’s perfect for anyone looking to add a touch of elegance to their Thanksgiving table without breaking the bank.
Ingredients
- 1 unbaked pie crust
- 1 cup dark chocolate chips
- 1 cup corn syrup
- 3 large eggs
- 1/2 cup granulated sugar
- 1/4 cup unsalted butter, melted
- 1 teaspoon vanilla extract
- 1 1/2 cups pecans, chopped
Instructions
- Preheat the oven to 350°F (175°C).
- In a saucepan, melt the chocolate chips over low heat, stirring until smooth. Remove from heat and let cool slightly.
- In a large bowl, whisk together corn syrup, eggs, sugar, melted butter, and vanilla until well combined.
- Stir in the melted chocolate until smooth.
- Add the chopped pecans and mix well.
- Pour the filling into the unbaked pie crust.
- Bake for 50-60 minutes, or until the filling is set and the top is slightly puffed.
- Let the pie cool before slicing. Serve with whipped cream or ice cream if desired.
Savor The Comfort Of Maple Apple Crisp
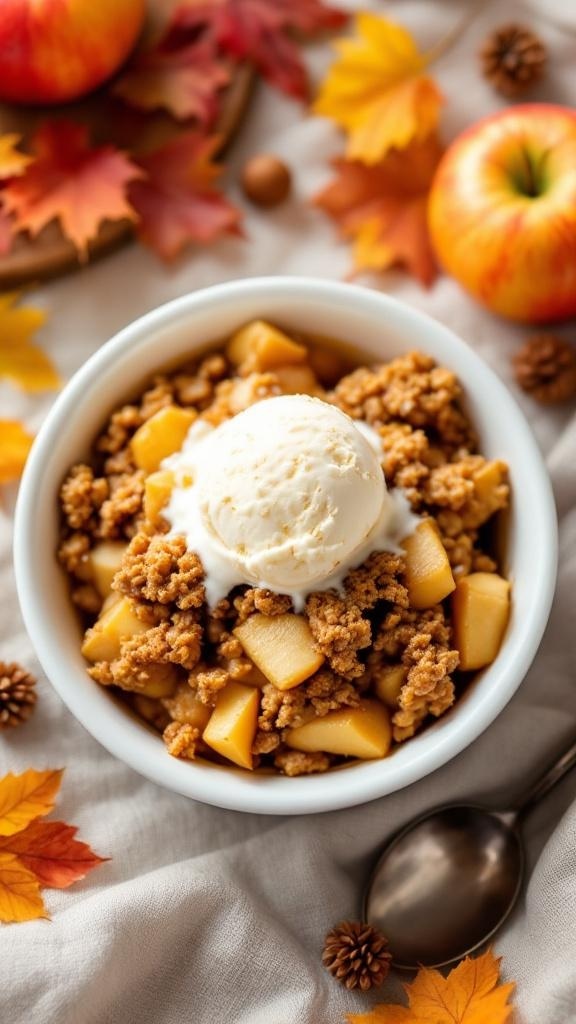
Maple apple crisp is a delightful dessert that brings warmth and comfort to any Thanksgiving table. The image shows a cozy bowl filled with tender apples, topped with a crunchy oat and brown sugar mixture. A scoop of vanilla ice cream sits atop, melting slightly into the warm filling, making it look both inviting and delicious.
This dessert is not just easy to make, but it also gives off an impressive vibe, perfect for holiday gatherings. The combination of sweet maple syrup and tart apples creates a flavor that is simply irresistible. Plus, the crunchy topping adds a satisfying texture that everyone will love.
Making maple apple crisp is a breeze. You can whip it up with simple ingredients that won’t break the bank. It’s a fantastic way to use seasonal apples, and the aroma that fills your kitchen while it bakes is sure to get everyone excited for dessert!
Ingredients
- 4 cups peeled and sliced apples (like Granny Smith or Honeycrisp)
- 1/2 cup maple syrup
- 1 teaspoon cinnamon
- 1 cup rolled oats
- 1/2 cup brown sugar, packed
- 1/2 cup all-purpose flour
- 1/2 cup unsalted butter, melted
- 1/4 teaspoon salt
Instructions
- Preheat your oven to 350°F (175°C).
- In a large bowl, combine the sliced apples, maple syrup, and cinnamon. Mix well and pour into a greased baking dish.
- In another bowl, mix the oats, brown sugar, flour, melted butter, and salt until crumbly.
- Spread the oat mixture evenly over the apples in the baking dish.
- Bake for 30-35 minutes, or until the topping is golden brown and the apples are tender.
- Serve warm, topped with a scoop of vanilla ice cream for an extra treat!
GET 21 QUICK & EASY LOW-CALORIE MEAL PLANS
Deliciously Easy No-Bake Cheesecake
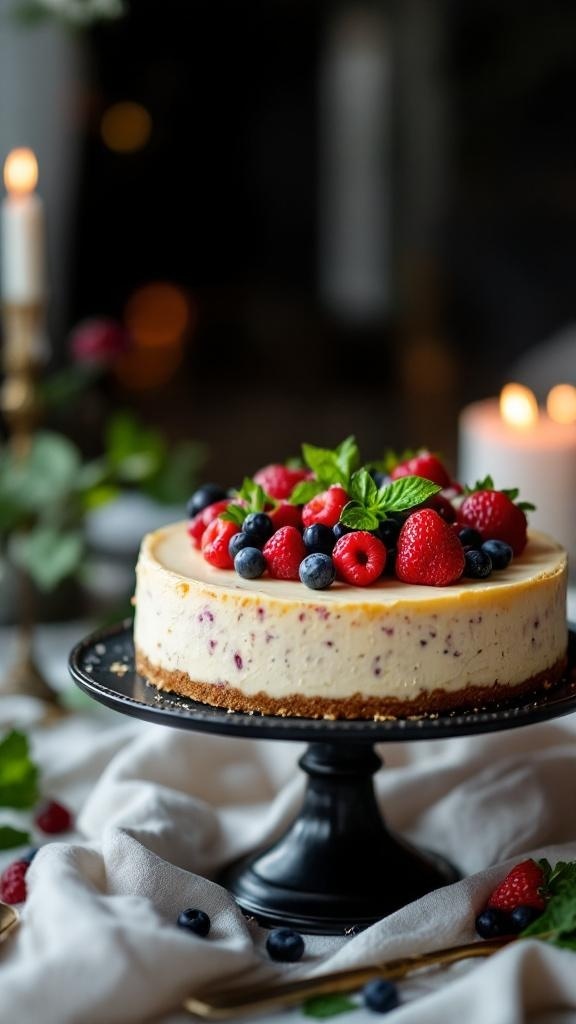
This no-bake cheesecake is a showstopper for your Thanksgiving table. It looks fancy, but it’s super simple to make. The creamy filling sits on a buttery graham cracker crust, topped with fresh berries for a pop of color. It’s a dessert that will impress your guests without breaking the bank.
The beauty of this cheesecake lies in its simplicity. You don’t need to turn on the oven, which is perfect for those busy holiday kitchens. Just mix, chill, and serve! You can even customize the toppings to suit your taste, whether you prefer chocolate drizzle or a fruit compote.
Gather your ingredients and get ready to whip up this delightful dessert. It’s a great way to end your Thanksgiving feast on a sweet note.
Ingredients
- 1 ½ cups graham cracker crumbs
- ½ cup unsalted butter, melted
- 2 cups cream cheese, softened
- 1 cup powdered sugar
- 1 teaspoon vanilla extract
- 1 cup heavy whipping cream
- Fresh berries for topping (strawberries, blueberries, raspberries)
Instructions
- Make the Crust: In a bowl, combine graham cracker crumbs and melted butter. Press the mixture into the bottom of a 9-inch springform pan to form an even layer.
- Prepare the Filling: In a large mixing bowl, beat the softened cream cheese until smooth. Gradually add powdered sugar and vanilla extract, mixing until well combined.
- Whip the Cream: In another bowl, whip the heavy cream until stiff peaks form. Gently fold the whipped cream into the cream cheese mixture until fully incorporated.
- Combine: Pour the filling over the crust in the springform pan. Smooth the top with a spatula.
- Chill: Cover the cheesecake with plastic wrap and refrigerate for at least 4 hours, or overnight for best results.
- Serve: Once set, remove the cheesecake from the springform pan. Top with fresh berries before slicing and serving.
Celebrate With An Elegant Pear Tart
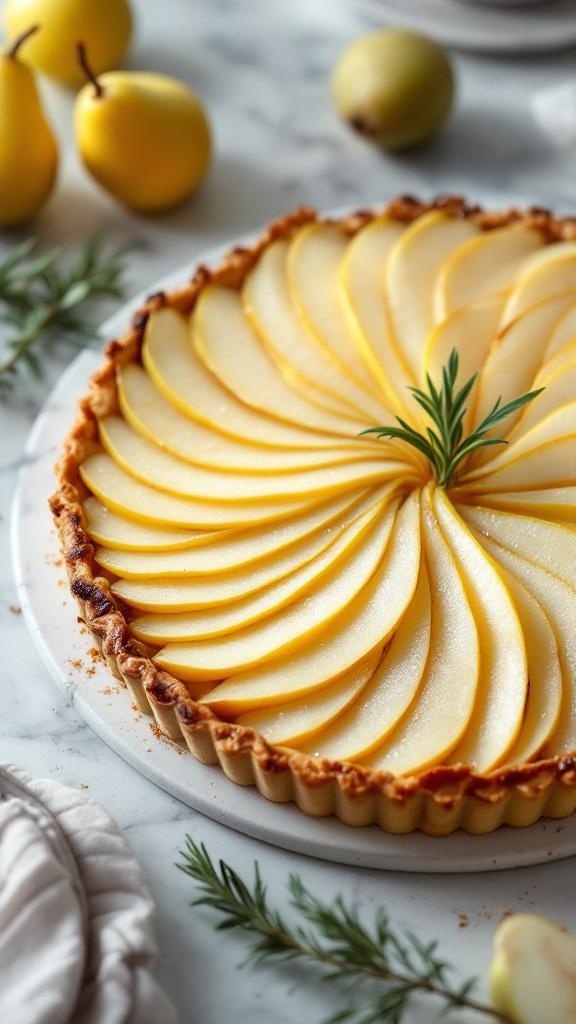
This pear tart is a stunning dessert that brings a touch of sophistication to your Thanksgiving table without breaking the bank. The golden, thinly sliced pears arranged beautifully on a crisp crust create an eye-catching centerpiece. A sprinkle of fresh herbs adds a hint of color and freshness, making it look like a dessert from a high-end bakery.
The tart is not only visually appealing but also delicious. The sweet, juicy pears complement the buttery crust perfectly. It’s a dessert that feels indulgent but is surprisingly easy to make. Your guests will be impressed, and you’ll enjoy the compliments!
Ingredients
- 1 pre-made tart crust
- 4 ripe pears, peeled and thinly sliced
- 1/4 cup granulated sugar
- 1 tablespoon lemon juice
- 1 teaspoon vanilla extract
- 1/2 teaspoon ground cinnamon
- 1 tablespoon unsalted butter, melted
- Fresh rosemary or mint for garnish
Instructions
- Preheat your oven to 375°F (190°C).
- Place the tart crust in a tart pan and prick the bottom with a fork. Bake for about 10 minutes until lightly golden.
- In a bowl, toss the sliced pears with sugar, lemon juice, vanilla extract, and cinnamon.
- Arrange the pear slices in a circular pattern on the baked crust, overlapping them slightly.
- Drizzle melted butter over the pears.
- Bake the tart for 25-30 minutes until the pears are tender and the crust is golden brown.
- Let it cool slightly before garnishing with fresh herbs. Serve warm or at room temperature.
Enjoy A Classic Pumpkin Roll Cake
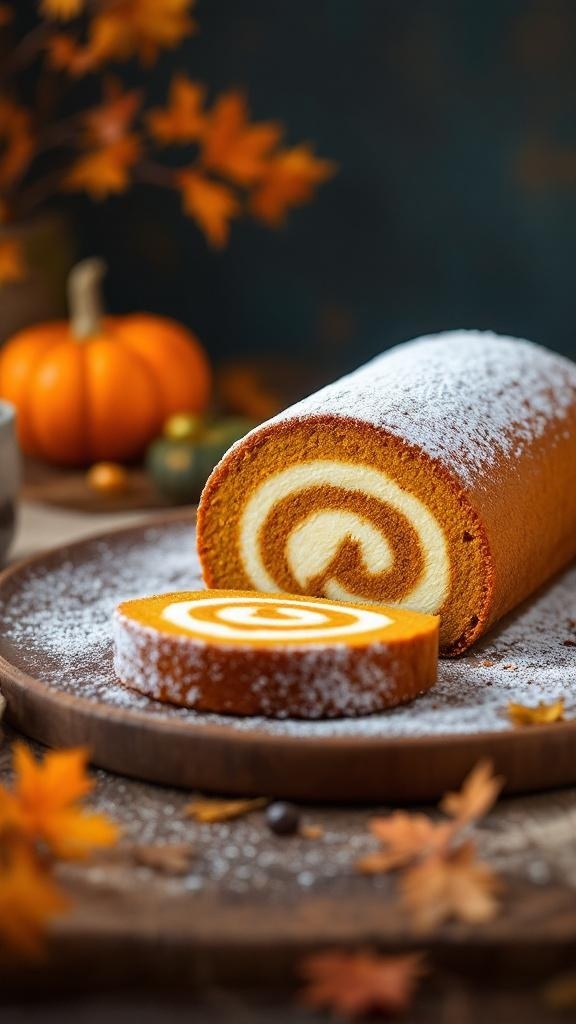
The pumpkin roll cake is a stunning dessert that brings warmth and nostalgia to any Thanksgiving table. Its vibrant orange hue, paired with the creamy filling, creates a delightful contrast that is sure to impress your guests. The cake is rolled into a log shape, making it not only delicious but also visually appealing.
This dessert is surprisingly easy to make, and it won’t break the bank. With simple ingredients, you can create a dish that looks fancy and tastes incredible. The combination of pumpkin and spices gives it that classic fall flavor, while the cream cheese filling adds a rich, smooth texture.
To serve, dust the cake with powdered sugar for a touch of elegance. It’s perfect for sharing, and everyone will want a slice of this beautiful treat!
Ingredients
- 3 large eggs
- 1 cup granulated sugar
- 2/3 cup canned pumpkin puree
- 1 teaspoon vanilla extract
- 1 cup all-purpose flour
- 1 teaspoon baking powder
- 1 teaspoon ground cinnamon
- 1/2 teaspoon ground ginger
- 1/4 teaspoon ground nutmeg
- 1/4 teaspoon salt
- 8 ounces cream cheese, softened
- 2 cups powdered sugar
- 1/4 cup unsalted butter, softened
Instructions
- Preheat the oven to 375°F (190°C). Grease a 15x10-inch jelly roll pan and line it with parchment paper.
- In a large bowl, beat the eggs and sugar until thick and pale. Stir in the pumpkin and vanilla.
- In another bowl, whisk together the flour, baking powder, cinnamon, ginger, nutmeg, and salt. Gradually add this mixture to the pumpkin mixture, stirring until just combined.
- Spread the batter evenly in the prepared pan. Bake for 13-15 minutes, or until the cake springs back when touched.
- While the cake is baking, prepare a clean kitchen towel by dusting it with powdered sugar. Once the cake is done, immediately invert it onto the towel. Carefully peel off the parchment paper.
- Starting at one end, roll the cake up in the towel and let it cool completely.
- For the filling, beat together the cream cheese, powdered sugar, and butter until smooth. Once the cake is cool, unroll it and spread the filling evenly over the surface.
- Roll the cake back up without the towel, wrap it in plastic wrap, and refrigerate for at least an hour before slicing.
- When ready to serve, slice the cake into rounds and dust with additional powdered sugar if desired.
Discover The Charm Of Cranberry Orange Muffins
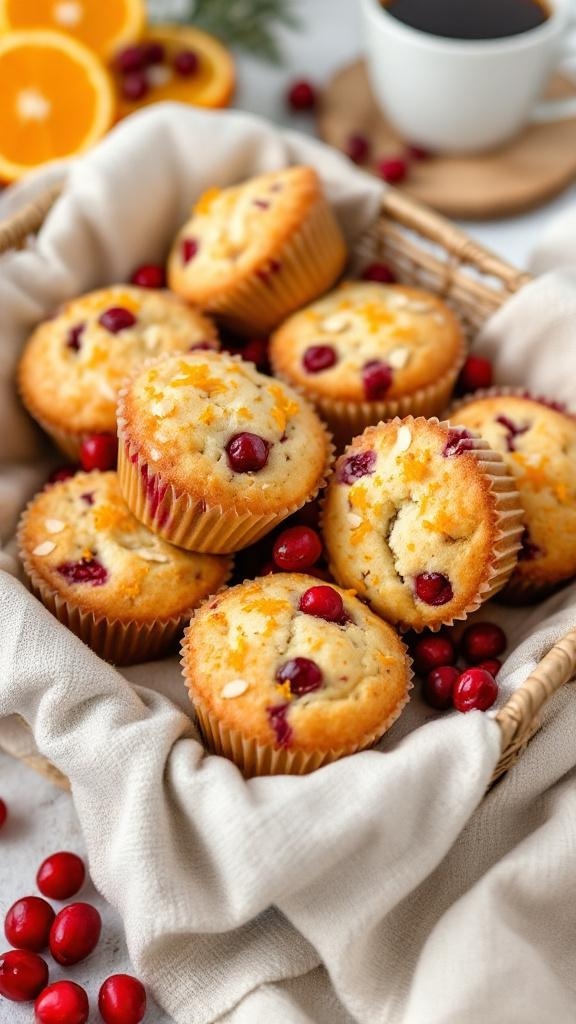
Cranberry orange muffins are a delightful treat that brings a burst of flavor to your Thanksgiving table. These muffins are not only visually appealing but also easy on the wallet. The bright red cranberries and zesty orange create a beautiful contrast that makes them look fancy without the hefty price tag.
Imagine serving these muffins warm, with their golden tops glistening. They are perfect for breakfast or as a sweet snack during the holiday festivities. Plus, they fill your kitchen with a wonderful aroma that everyone will love.
Making these muffins is simple and requires just a few ingredients. You can whip them up quickly, making them a great addition to your Thanksgiving spread.
Ingredients
- 1 1/2 cups all-purpose flour
- 1/2 cup granulated sugar
- 1 tablespoon baking powder
- 1/2 teaspoon salt
- 1/2 cup unsalted butter, melted
- 1/2 cup milk
- 2 large eggs
- 1 cup fresh cranberries, chopped
- 1 tablespoon orange zest
- 1/2 teaspoon vanilla extract
Instructions
- Preheat the oven to 375°F (190°C) and line a muffin tin with paper liners.
- In a large bowl, mix together flour, sugar, baking powder, and salt.
- In another bowl, whisk together melted butter, milk, eggs, orange zest, and vanilla extract.
- Pour the wet ingredients into the dry ingredients and stir until just combined. Gently fold in the chopped cranberries.
- Spoon the batter into the prepared muffin tin, filling each cup about 2/3 full.
- Bake for 18-20 minutes or until a toothpick inserted into the center comes out clean.
- Let the muffins cool in the tin for a few minutes before transferring them to a wire rack to cool completely.
Delight In The Richness Of Caramel Flan
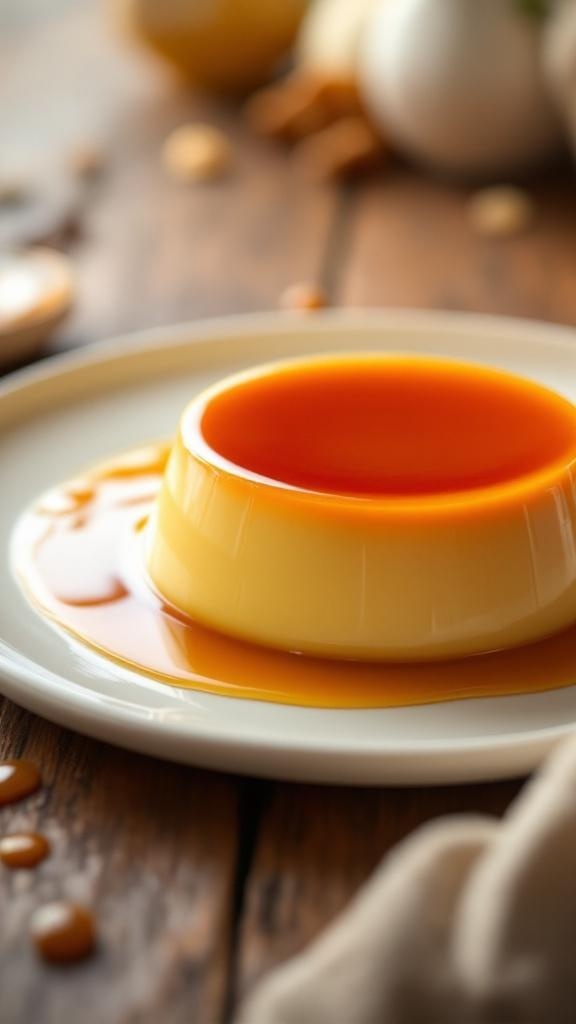
Caramel flan is a classic dessert that brings a touch of elegance to any table. Its smooth texture and rich caramel flavor make it a favorite among many. This dessert looks fancy, but it’s surprisingly easy to make, making it perfect for Thanksgiving or any gathering.
The flan sits beautifully on a plate, glistening with a golden caramel sauce that drips around its base. The contrast of the creamy custard with the sweet caramel is simply delightful. Plus, it’s budget-friendly, allowing you to impress your guests without breaking the bank.
Making caramel flan is straightforward. You’ll need just a few ingredients like eggs, milk, sugar, and vanilla. The process involves creating a caramel sauce, mixing the custard, and baking it in a water bath. The result is a stunning dessert that tastes as good as it looks!
Ingredients
- 1 cup granulated sugar
- 6 large eggs
- 1 can (14 ounces) sweetened condensed milk
- 1 can (12 ounces) evaporated milk
- 1 tablespoon vanilla extract
Instructions
- Preheat your oven to 350°F (175°C).
- In a saucepan over medium heat, melt the sugar until it turns golden brown. Quickly pour the caramel into a round baking dish, tilting to coat the bottom evenly.
- In a blender, combine eggs, sweetened condensed milk, evaporated milk, and vanilla. Blend until smooth.
- Pour the mixture over the caramel in the baking dish.
- Place the baking dish in a larger pan filled with hot water (water bath). Bake for about 50-60 minutes, or until set.
- Let it cool, then refrigerate for at least 4 hours before serving. To serve, run a knife around the edges and invert onto a plate.
GET 8-WEEKS OF WORKOUTS TO LOSE INCHES
Relish In The Layered Delight Of Tiramisu Cups
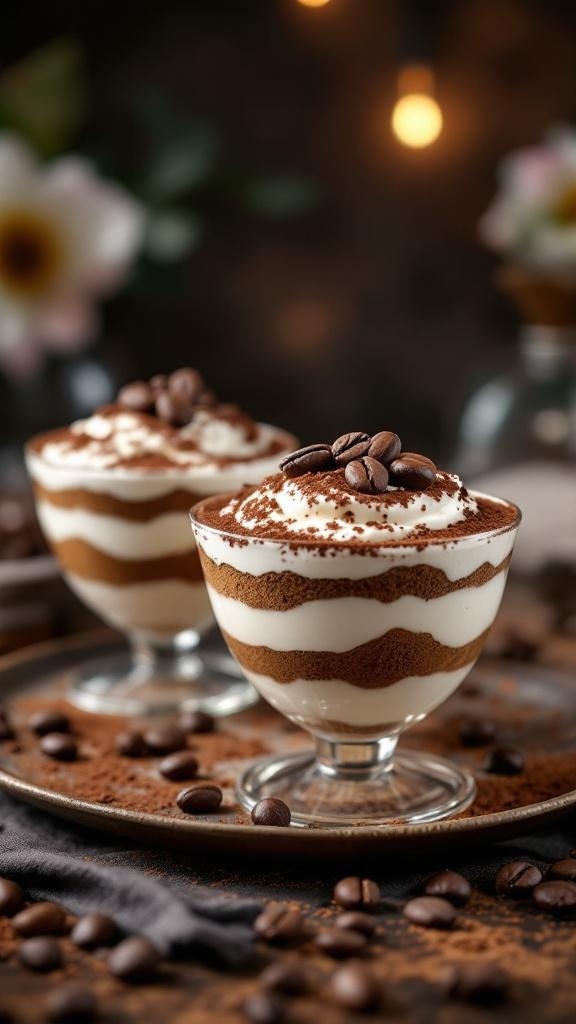
Looking for a dessert that feels fancy without breaking the bank? Tiramisu cups are the perfect solution! These delightful layers of coffee-soaked ladyfingers and creamy mascarpone bring a touch of elegance to your Thanksgiving table. The best part? They’re easy to make and can be prepared ahead of time, letting you enjoy the holiday with your loved ones.
The image showcases these beautiful tiramisu cups, topped with a sprinkle of cocoa powder and coffee beans. The layers are visually appealing, making them a showstopper for any gathering. Each spoonful offers a delightful mix of flavors and textures that everyone will love.
Let’s get into how you can whip up these tasty treats!
Ingredients
- 1 cup strong brewed coffee, cooled
- 2 tablespoons coffee liqueur (optional)
- 1 cup mascarpone cheese
- 1 cup heavy cream
- 1/2 cup powdered sugar
- 1 teaspoon vanilla extract
- 1 package ladyfingers (savoiardi)
- Cocoa powder for dusting
- Chocolate shavings or coffee beans for garnish
Instructions
- Prepare the Coffee: Brew your coffee and let it cool. If using, mix in the coffee liqueur.
- Make the Cream Mixture: In a bowl, combine mascarpone cheese, heavy cream, powdered sugar, and vanilla extract. Whip until soft peaks form.
- Assemble the Cups: Dip each ladyfinger briefly in the coffee mixture, then layer them in serving cups. Add a layer of the cream mixture on top.
- Repeat Layers: Continue layering until you fill the cups, finishing with the cream mixture on top.
- Chill: Refrigerate for at least 4 hours, or overnight for best results.
- Serve: Before serving, dust with cocoa powder and add chocolate shavings or coffee beans for garnish.
Enjoy The Simplicity Of Rice Pudding With Cinnamon
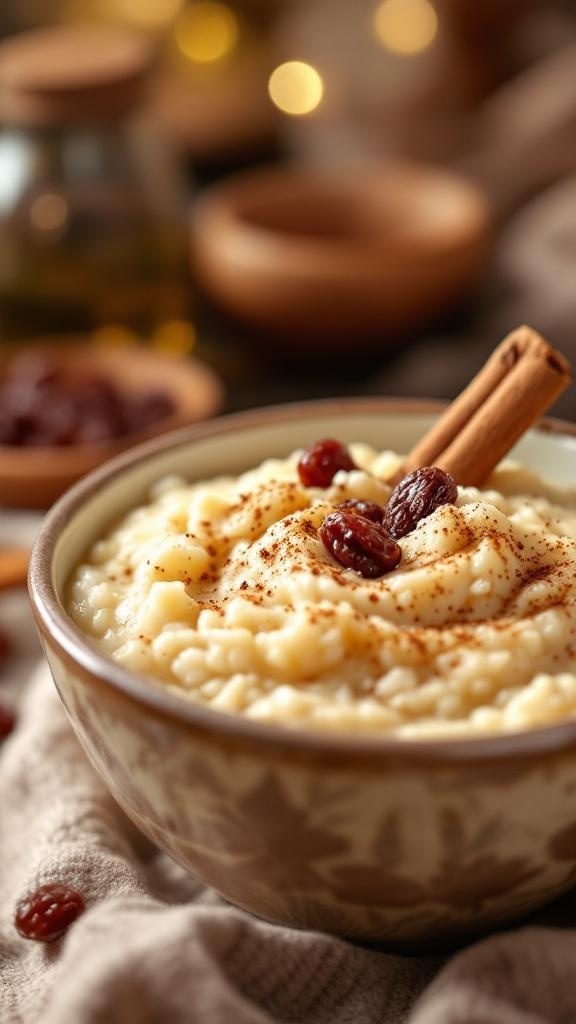
Rice pudding is a classic dessert that brings warmth and comfort to any table. It’s simple to make and can be dressed up to look fancy without breaking the bank. The creamy texture and sweet flavor make it a favorite, especially during the holiday season.
This dish is often topped with a sprinkle of cinnamon and a few raisins, adding a touch of elegance. The combination of flavors is delightful, making it a perfect choice for Thanksgiving. Plus, it’s budget-friendly, allowing you to impress your guests without overspending.
Making rice pudding is straightforward. You only need a few ingredients, and the steps are easy to follow. Let’s get into the recipe so you can whip up this delicious dessert!
Ingredients
- 1 cup Arborio rice
- 4 cups whole milk
- 1/2 cup granulated sugar
- 1 teaspoon vanilla extract
- 1 teaspoon ground cinnamon
- 1/4 teaspoon salt
- 1/2 cup raisins (optional)
Instructions
- Combine the rice, milk, sugar, and salt in a medium saucepan. Bring to a boil over medium heat, stirring occasionally.
- Once boiling, reduce the heat to low and let it simmer. Stir frequently to prevent sticking. Cook for about 25-30 minutes until the rice is tender and the mixture thickens.
- Remove from heat and stir in the vanilla extract and half of the cinnamon. If using raisins, add them now.
- Let the pudding cool slightly before serving. You can serve it warm or chilled, topped with the remaining cinnamon.
Indulge In The Decadence Of Chocolate Mousse
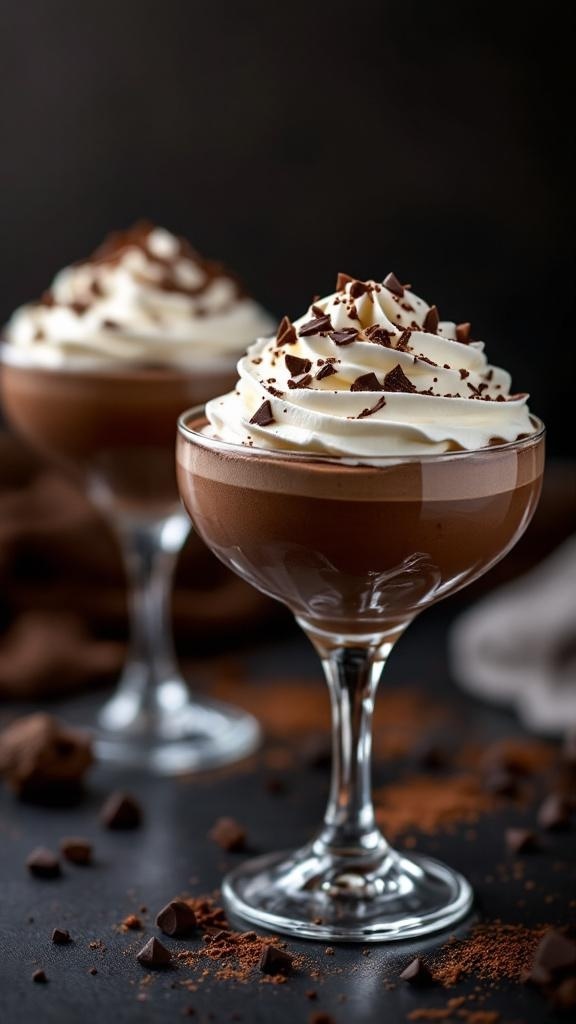
Chocolate mousse is a classic dessert that brings a touch of luxury to any table. This rich and creamy treat looks fancy but can be made on a budget. The image shows beautifully presented chocolate mousse topped with whipped cream and chocolate shavings, making it a feast for the eyes as well as the taste buds.
Making chocolate mousse at home is easier than you might think. With just a few simple ingredients, you can whip up a dessert that impresses your guests. The combination of chocolate and cream creates a light yet indulgent texture that melts in your mouth.
To make this dessert, you’ll need high-quality chocolate, eggs, sugar, and heavy cream. The key is to fold the whipped cream gently into the chocolate mixture, ensuring it stays airy and fluffy. This dessert can be prepared ahead of time, allowing you to enjoy your Thanksgiving gathering without stress.
Serve the mousse in elegant glasses for that upscale look. A sprinkle of chocolate shavings or a dollop of whipped cream on top adds the finishing touch. Your guests will think you spent hours in the kitchen, but you’ll know the secret to this delightful dessert!
Ingredients
- 8 ounces semi-sweet chocolate, chopped
- 3 tablespoons unsalted butter
- 3 large eggs, separated
- 1/4 cup granulated sugar
- 1 cup heavy cream
- 1 teaspoon vanilla extract
- Chocolate shavings for garnish
Instructions
- Melt the chocolate and butter together in a heatproof bowl over simmering water. Stir until smooth and let it cool slightly.
- In a separate bowl, whisk the egg yolks and sugar until pale and thick. Stir this mixture into the melted chocolate.
- In another bowl, whip the heavy cream and vanilla until soft peaks form. Gently fold the whipped cream into the chocolate mixture.
- In a clean bowl, beat the egg whites until stiff peaks form. Carefully fold the egg whites into the chocolate mixture until no white streaks remain.
- Divide the mousse into serving glasses and refrigerate for at least 2 hours before serving. Top with chocolate shavings before enjoying!
Experience The Comfort Of Gingerbread Cookies

Gingerbread cookies bring a warm, cozy feeling to any holiday gathering. The image captures a delightful spread of these festive treats, beautifully arranged with a cup of coffee and seasonal decorations. The cookies, shaped like gingerbread men, snowflakes, and candy canes, are not just tasty but also visually appealing, making them perfect for your Thanksgiving dessert table.
Making gingerbread cookies is a fun activity that can involve the whole family. The aroma of spices like ginger, cinnamon, and nutmeg fills the kitchen, creating a welcoming atmosphere. These cookies are not only budget-friendly but also look elegant, making them a great choice for impressing your guests.
Here’s a simple recipe to create your own gingerbread cookies. Enjoy the process and the delicious results!
Ingredients
- 3 cups all-purpose flour
- 1 tablespoon ground ginger
- 1 tablespoon ground cinnamon
- 1/2 teaspoon ground cloves
- 1 teaspoon baking soda
- 1/2 teaspoon salt
- 3/4 cup unsalted butter, softened
- 3/4 cup brown sugar, packed
- 1 large egg
- 1/2 cup unsulfured molasses
- 1 teaspoon vanilla extract
Instructions
- Mix Dry Ingredients: In a bowl, whisk together flour, ginger, cinnamon, cloves, baking soda, and salt.
- Cream Butter and Sugar: In another bowl, beat the softened butter and brown sugar until fluffy. Add the egg, molasses, and vanilla, mixing until combined.
- Combine Mixtures: Gradually add the dry ingredients to the wet mixture, stirring until a dough forms. Wrap in plastic and chill for at least 1 hour.
- Preheat Oven: Preheat your oven to 350°F (175°C). Line baking sheets with parchment paper.
- Roll and Cut: Roll out the chilled dough on a floured surface to about 1/4 inch thick. Use cookie cutters to create shapes and place them on the prepared baking sheets.
- Bake: Bake for 8-10 minutes until the edges are firm. Let cool on the baking sheets for a few minutes before transferring to wire racks.
- Decorate: Once cooled, feel free to decorate with icing or enjoy them plain!
Struggling to Stay on Track with Your Eating?
You’re not alone. One of the biggest obstacles I see people
face is not knowing what to eat. Between busy schedules, endless diet
advice online, and trying to cook healthy meals that actually taste good—it’s
easy to feel stuck or overwhelmed.
That’s why I created my 21 Quick & Easy Custom
Low-Calorie Meal Plans Program. These plans are built specifically for
you—your goals, your lifestyle, and your food preferences. You won’t find
any cookie-cutter diets here. Just real, satisfying meals that help you stay
full, energized, and on track without the stress.
✅ No more guessing.
✅
No more skipping meals or eating “diet food” you hate.
✅
Just a clear, doable plan that fits your life.
👉 Ready to eat better,
feel better, and finally make progress? [Click here to get your custom meal plans today.]
Not Seeing the Inches Drop No Matter What You Do?
If you’re working out but still not seeing the results in
the mirror, I hear you. So many people come to me after months of doing cardio
or random workouts—and still struggling to lose inches or tone up. The truth
is, your body needs more than just movement. It needs a proven strategy.
My 8-Week Workout Program to Lose Inches is designed
to do just that—burn fat, tighten up, and give you visible results.
These workouts are fun, effective, and designed for real people with real
lives. Whether you’re getting back into fitness or ready to take it to the next
level, this program gives you a clear path to success.
✅ Just 8 weeks to build strength,
confidence, and a fitter shape.
✅
No endless cardio.
✅
No gym required (unless you want it).
👉 If you're ready to
drop inches and feel amazing in your own skin, [click here to start the 8-Week Workout Program].


Comments
Post a Comment