13 No-Cook Appetizer Recipes for Perfect Summer BBQs and Picnics
13 No-Cook Appetizer Recipes for Perfect Summer BBQs and Picnics
Summer BBQs and picnics are all about enjoying good food with friends and family, without the hassle of cooking. These no-cook appetizer recipes are perfect for warm days, allowing you to whip up delicious bites in no time. From fresh veggies to easy dips, these options will keep your gatherings tasty and stress-free!
Refreshing Summer Salsa Variations
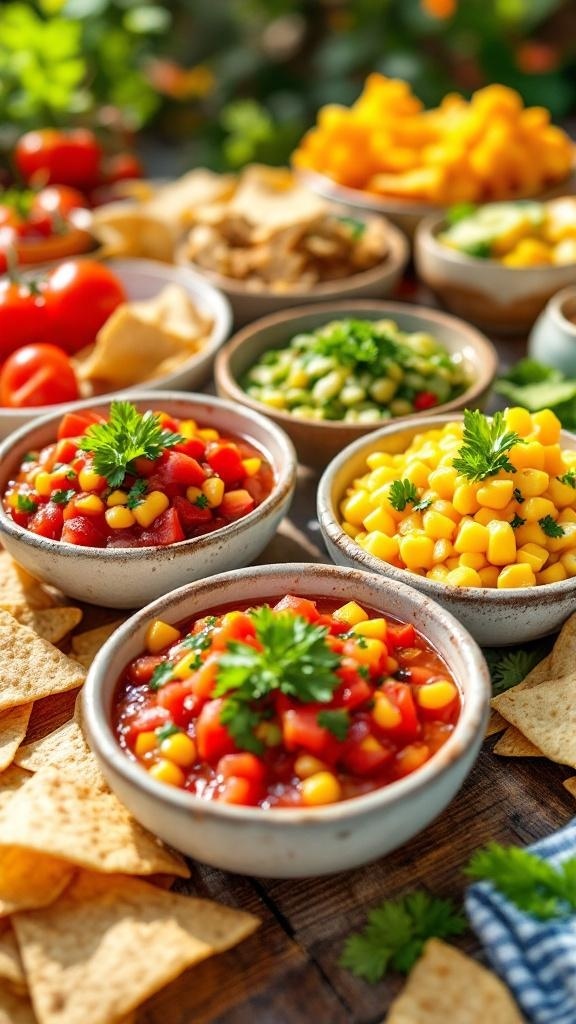
Summer is the perfect time to enjoy fresh, vibrant flavors, and what better way to do that than with a variety of salsas? The image showcases a colorful spread of different salsa options, each bursting with ingredients that scream summer. From classic tomato salsa to sweet corn salsa, these dips are not only delicious but also incredibly easy to prepare.
Each salsa can be paired with crunchy tortilla chips, making them a fantastic appetizer for your summer BBQ or picnic. The bright colors and fresh ingredients invite everyone to dig in and enjoy. Whether you prefer something spicy or a bit sweeter, there’s a salsa here for everyone.
Ingredients
- 2 cups diced tomatoes
- 1 cup corn kernels (fresh or canned)
- 1/2 cup diced red onion
- 1/4 cup chopped cilantro
- 1 jalapeño, finely chopped (optional)
- Juice of 2 limes
- Salt and pepper to taste
Instructions
- In a large bowl, combine diced tomatoes, corn, red onion, cilantro, and jalapeño.
- Pour lime juice over the mixture and season with salt and pepper.
- Toss everything together until well mixed.
- Let the salsa sit for at least 30 minutes to allow the flavors to meld.
- Serve with tortilla chips and enjoy!
Zesty Caprese Skewers For Easy Snacking
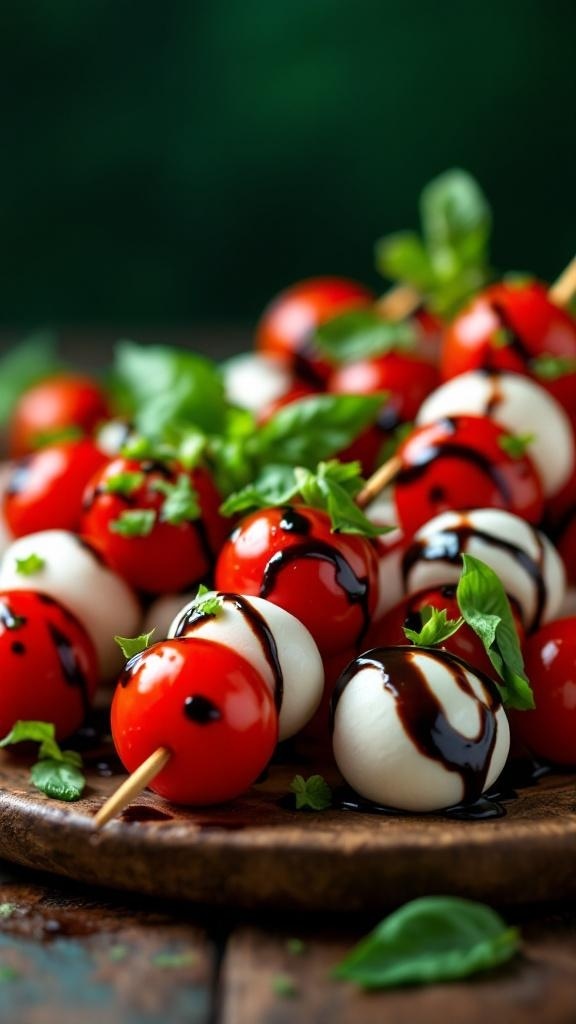
Summer BBQs and picnics are the perfect time to enjoy fresh flavors without spending hours in the kitchen. Zesty Caprese skewers are a fantastic choice for easy snacking. These colorful bites are not only visually appealing but also bursting with flavor. The combination of juicy cherry tomatoes, creamy mozzarella balls, and fragrant basil makes for a delightful treat.
To make these skewers, simply thread a cherry tomato, a basil leaf, and a mozzarella ball onto a skewer. Repeat until the skewer is filled. Drizzle with balsamic glaze for that extra zing. These skewers are light, refreshing, and sure to impress your guests!
Ingredients
- 1 pint cherry tomatoes
- 8 ounces mozzarella balls
- Fresh basil leaves
- Balsamic glaze
- Skewers
Instructions
- Prepare the Skewers: Take a skewer and thread one cherry tomato, followed by a basil leaf, and then a mozzarella ball. Repeat this until the skewer is filled.
- Drizzle: Once all the skewers are assembled, place them on a serving platter and drizzle with balsamic glaze.
- Serve: Enjoy these delicious Caprese skewers fresh, perfect for any summer gathering!
Savory Antipasto Platter With A Twist
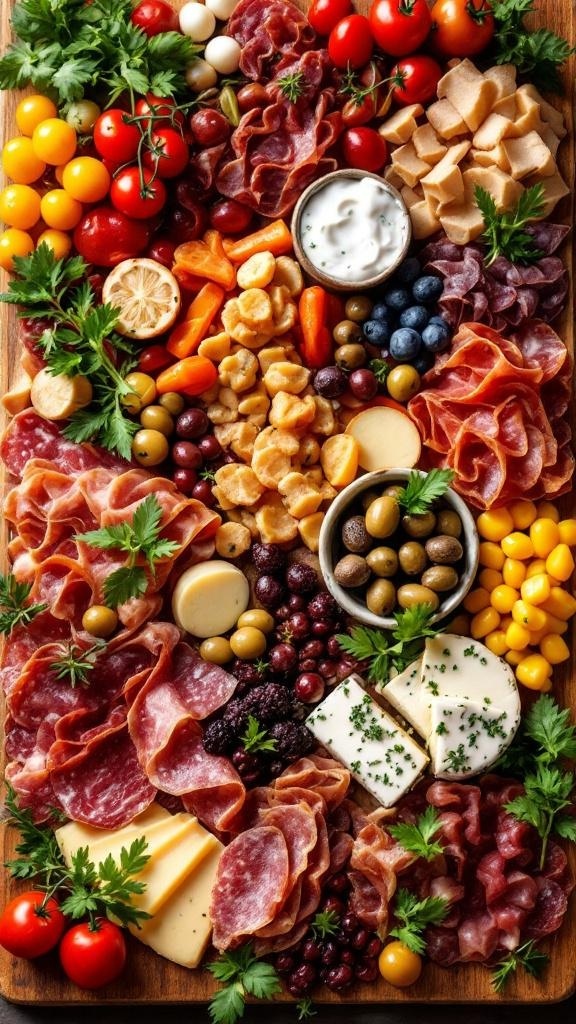
Summer BBQs and picnics are the perfect time to bring out a savory antipasto platter. This colorful spread is not just a feast for the eyes but also a delight for the taste buds. Imagine a wooden board filled with an array of cured meats, cheeses, fresh vegetables, and olives. The vibrant colors of cherry tomatoes, olives, and herbs create a beautiful display that invites everyone to dig in.
To give your antipasto platter a twist, mix traditional ingredients with some unexpected flavors. For instance, add some fresh blueberries or a tangy yogurt dip to balance the saltiness of the meats. The combination of textures and tastes makes this platter a hit at any gathering.
Creating your antipasto platter is easy. Start with a base of meats like salami and prosciutto, then layer in various cheeses, such as mozzarella and aged cheddar. Toss in some crunchy vegetables like carrots and bell peppers, and finish with a handful of fresh herbs for that extra pop of flavor.
Ingredients
- 8 oz salami, sliced
- 8 oz prosciutto, sliced
- 6 oz mozzarella cheese, cubed
- 6 oz aged cheddar cheese, cubed
- 1 cup cherry tomatoes, halved
- 1 cup mixed olives
- 1 cup baby carrots
- 1 cup blueberries
- 1/2 cup plain yogurt
- 1 tablespoon fresh herbs (like parsley or basil)
Instructions
- Prepare the Base: On a large wooden board, arrange the sliced salami and prosciutto in a circular pattern.
- Add Cheese: Place the cubed mozzarella and cheddar cheese in between the meats.
- Incorporate Vegetables: Scatter the halved cherry tomatoes and baby carrots around the board for color and crunch.
- Mix in Fruits: Add the blueberries for a sweet twist that complements the savory elements.
- Make the Dip: In a small bowl, serve the plain yogurt as a dip. You can add herbs to the yogurt for extra flavor.
- Garnish: Sprinkle fresh herbs over the platter for a finishing touch.
GET 21 QUICK & EASY LOW-CALORIE MEAL PLANS
Delicious Deviled Eggs With Creative Toppings

Deviled eggs are a classic appetizer that never goes out of style. They are easy to make and can be dressed up in so many ways. The image shows a beautiful platter of deviled eggs, topped with crispy bacon bits and fresh chives. The vibrant yellow filling is piped high, making them look as delicious as they taste.
This dish is perfect for summer BBQs and picnics. You can prepare them ahead of time, and they’re always a hit with guests. The combination of creamy yolk and tangy mustard creates a flavor that’s hard to resist. Plus, the added toppings give each egg a unique twist.
Feel free to get creative with your toppings! You can use anything from smoked paprika to pickled jalapeños. Each variation adds a new layer of flavor and fun to your deviled eggs.
Ingredients
- 6 large eggs
- 1/4 cup mayonnaise
- 1 teaspoon Dijon mustard
- 1 teaspoon white vinegar
- Salt and pepper to taste
- 2 tablespoons crispy bacon bits
- 1 tablespoon chopped fresh chives
- Smoked paprika for garnish
Instructions
- Hard Boil the Eggs: Place the eggs in a pot and cover with water. Bring to a boil, then cover and remove from heat. Let sit for 12 minutes. Transfer to cold water to cool.
- Prepare the Filling: Once cooled, peel the eggs and slice them in half. Remove the yolks and place them in a bowl. Mash the yolks with mayonnaise, Dijon mustard, vinegar, salt, and pepper until smooth.
- Fill the Eggs: Spoon or pipe the yolk mixture back into the egg whites.
- Add Toppings: Sprinkle crispy bacon bits, chopped chives, and a dash of smoked paprika on top of each egg.
- Serve: Arrange on a platter and enjoy your delicious deviled eggs!
Chilled Shrimp Cocktail With Zesty Sauce
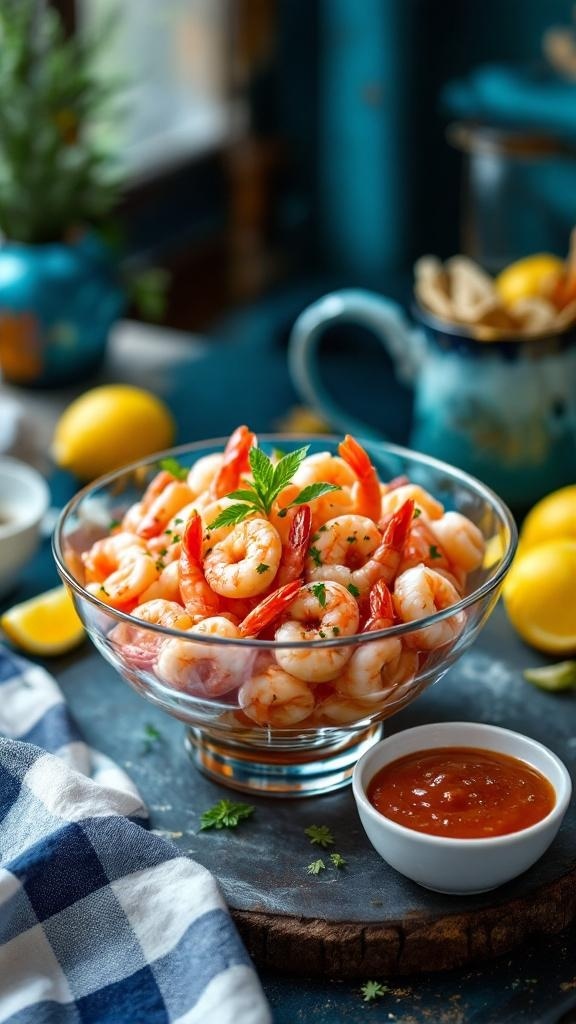
Chilled shrimp cocktail is a classic appetizer that shines at summer BBQs and picnics. The vibrant colors of the shrimp, paired with a zesty sauce, make it not only delicious but also visually appealing. Imagine a clear glass bowl filled with plump, juicy shrimp, garnished with fresh herbs and served alongside a tangy dipping sauce. The bright reds of the shrimp contrast beautifully with the greens of the garnish and the deep colors of the sauce.
This dish is super easy to prepare, requiring no cooking at all. Just boil or steam the shrimp beforehand and chill them in the fridge. The zesty sauce can be whipped up in no time, adding a refreshing kick to each bite. It’s perfect for those hot summer days when you want something light and satisfying.
Gather your friends and family around, and watch how quickly this appetizer disappears. It’s a crowd-pleaser that pairs well with drinks and complements any outdoor gathering.
Ingredients
- 1 pound large shrimp, peeled and deveined
- 1 cup cocktail sauce
- 1 tablespoon lemon juice
- 1 teaspoon Worcestershire sauce
- 1 tablespoon horseradish (adjust to taste)
- Fresh parsley for garnish
- Lemon wedges for serving
Instructions
- Prepare the Shrimp: In a large pot, bring water to a boil. Add the shrimp and cook for about 2-3 minutes until they turn pink and opaque. Drain and transfer them to an ice bath to cool.
- Make the Zesty Sauce: In a small bowl, mix together the cocktail sauce, lemon juice, Worcestershire sauce, and horseradish. Adjust the horseradish to your preferred spice level.
- Assemble: Once the shrimp are chilled, arrange them in a serving bowl. Garnish with fresh parsley and serve with lemon wedges and the zesty sauce on the side.
- Enjoy: Dig in and enjoy this refreshing appetizer with your loved ones!
GET 8-WEEKS OF WORKOUTS TO LOSE INCHES
Tasty Hummus Variations For Dipping

Summer BBQs and picnics are the perfect time to bring out some tasty appetizers. Hummus is a crowd-pleaser that can be made in many flavors. The image shows a colorful spread of hummus varieties, each with its unique twist. From classic chickpea to vibrant beet and zesty roasted red pepper, there’s a flavor for everyone.
Pairing these hummus dips with fresh veggies, pita chips, or even crackers makes for a delightful snacking experience. The bright colors and textures in the image invite you to dig in and enjoy. It’s easy to whip up a batch of hummus and customize it to your taste.
Here’s a simple recipe for a classic hummus with a twist. You can easily adapt it by adding your favorite ingredients!
Ingredients
- 1 can (15 oz) chickpeas, drained and rinsed
- 1/4 cup tahini
- 2 tablespoons olive oil
- 2 tablespoons lemon juice
- 1 garlic clove, minced
- 1/2 teaspoon ground cumin
- Salt to taste
- Water as needed for consistency
- Optional: 1/2 cup roasted red peppers or 1/2 cup cooked beets for variations
Instructions
- Blend Ingredients: In a food processor, combine chickpeas, tahini, olive oil, lemon juice, garlic, cumin, and salt.
- Adjust Consistency: Blend until smooth. If the mixture is too thick, add water a tablespoon at a time until you reach your desired consistency.
- Add Variations: For roasted red pepper hummus, add the peppers and blend until smooth. For beet hummus, add cooked beets and blend.
- Serve: Transfer to a bowl, drizzle with olive oil, and serve with pita chips and fresh veggies.
Fruit Skewers: A Sweet Summer Treat
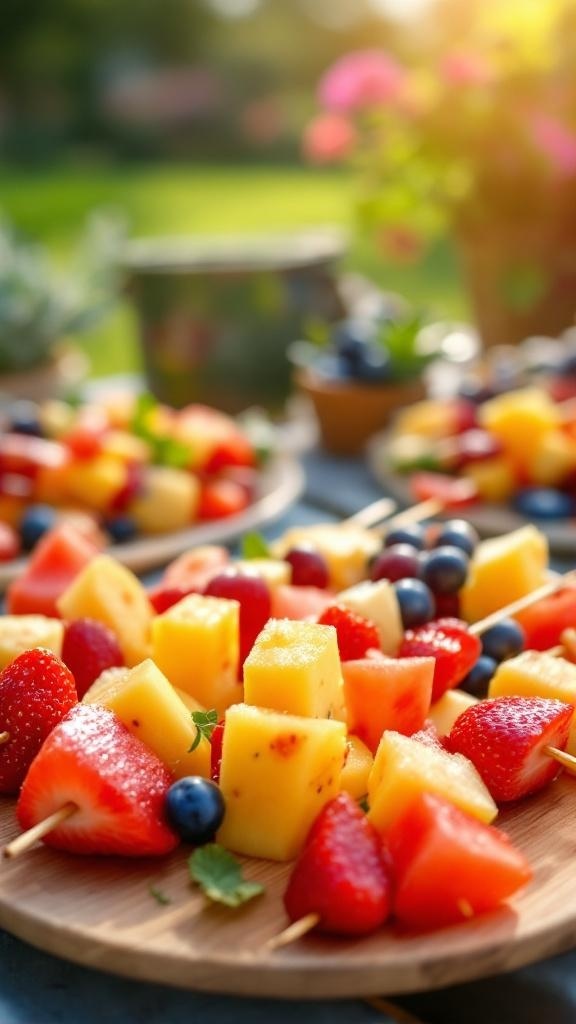
Fruit skewers are a colorful and refreshing addition to any summer BBQ or picnic. They are easy to make and can be customized with your favorite fruits. Imagine juicy strawberries, sweet pineapple, and plump blueberries all on a stick, ready to be enjoyed. These vibrant skewers not only look great but also taste amazing!
To prepare, simply chop your chosen fruits into bite-sized pieces. Then, thread them onto wooden skewers, alternating between different types for a fun mix. You can even add a sprig of mint for a pop of color and flavor. Serve them chilled for a delightful treat on a hot day.
These fruit skewers are perfect for sharing and can be made ahead of time. They are a hit with kids and adults alike, making them a must-have for your summer gatherings. Plus, they are healthy and packed with vitamins!
Ingredients
- 1 cup strawberries, hulled and halved
- 1 cup pineapple, cut into chunks
- 1 cup watermelon, cut into cubes
- 1 cup blueberries
- Fresh mint leaves (optional)
- Wooden skewers
Instructions
- Prepare the Fruit: Wash and cut the strawberries, pineapple, and watermelon into bite-sized pieces.
- Assemble the Skewers: Take a wooden skewer and start threading the fruit pieces. Alternate between strawberries, pineapple, watermelon, and blueberries for a colorful display.
- Add Mint: If desired, tuck a mint leaf between the fruit pieces for added flavor.
- Chill and Serve: Place the skewers in the refrigerator for about 30 minutes before serving. Enjoy them cold!
Cheesy Bruschetta With Fresh Ingredients
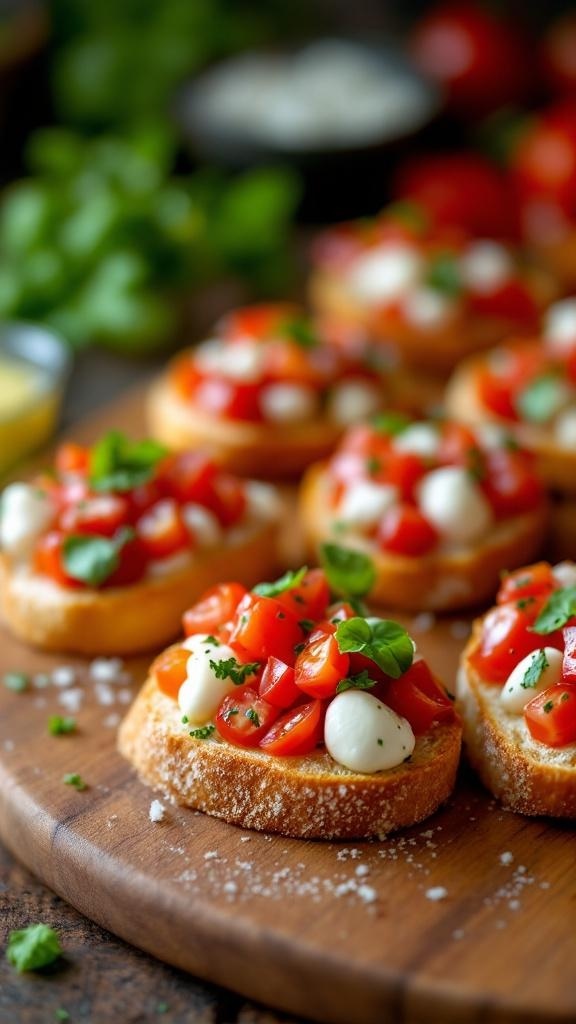
Cheesy bruschetta is a delightful appetizer that brings together fresh flavors and simple ingredients. Imagine crispy toasted bread topped with juicy tomatoes, creamy mozzarella, and a sprinkle of fresh herbs. This dish is perfect for summer BBQs and picnics, where you want something light yet satisfying.
The vibrant colors of the tomatoes and herbs make this dish visually appealing. The combination of textures—from the crunchy bread to the soft cheese—creates a delicious bite. Plus, it’s a no-cook recipe, making it easy to prepare in advance.
To make cheesy bruschetta, you’ll need fresh ingredients that are in season. The tomatoes should be ripe and flavorful, while the mozzarella adds a creamy touch. A drizzle of olive oil and a sprinkle of salt enhance the flavors beautifully. This appetizer is sure to impress your guests and keep them coming back for more!
Ingredients
- 1 baguette, sliced
- 2 cups cherry tomatoes, diced
- 1 cup fresh mozzarella balls, halved
- 1/4 cup fresh basil, chopped
- 2 tablespoons olive oil
- Salt and pepper to taste
- Balsamic glaze (optional)
Instructions
- Toast the Bread: Preheat your oven to 400°F (200°C). Arrange the baguette slices on a baking sheet and drizzle with olive oil. Toast for about 5-7 minutes until golden brown.
- Prepare the Topping: In a bowl, combine the diced tomatoes, mozzarella balls, chopped basil, olive oil, salt, and pepper. Mix well to combine.
- Assemble the Bruschetta: Once the bread is toasted, spoon the tomato mixture generously onto each slice.
- Finish and Serve: Drizzle with balsamic glaze if desired. Serve immediately and enjoy the fresh flavors!
Savory Spinach And Feta Phyllo Cups

These savory spinach and feta phyllo cups are a fantastic addition to any summer BBQ or picnic. They are light, crispy, and packed with flavor, making them a perfect finger food. The golden phyllo pastry holds a delicious filling of sautéed spinach and creamy feta cheese, topped with fresh herbs for an extra burst of taste.
To make these delightful bites, you’ll need just a few simple ingredients. They are easy to prepare and require no cooking, which means you can whip them up in no time. Plus, they look great on a platter, making them a hit at any gathering.
Ingredients
- 1 package of phyllo pastry cups
- 2 cups fresh spinach, chopped
- 1 cup feta cheese, crumbled
- 1/4 cup cream cheese, softened
- 1/4 cup fresh parsley, chopped
- 1 clove garlic, minced
- 1 tablespoon olive oil
- Salt and pepper to taste
Instructions
- Preheat your oven to 350°F (175°C).
- In a skillet, heat olive oil over medium heat. Add minced garlic and sauté for about a minute until fragrant.
- Add the chopped spinach and cook until wilted, about 2-3 minutes. Remove from heat and let it cool slightly.
- In a bowl, mix the cooked spinach with feta cheese, cream cheese, parsley, salt, and pepper until well combined.
- Fill each phyllo cup with the spinach mixture, pressing down gently to pack it in.
- Place the filled cups on a baking sheet and bake for 10-12 minutes, or until the phyllo is golden brown.
- Remove from the oven and let cool slightly before serving. Enjoy your tasty phyllo cups!
Tangy Cucumber Bites With Cream Cheese
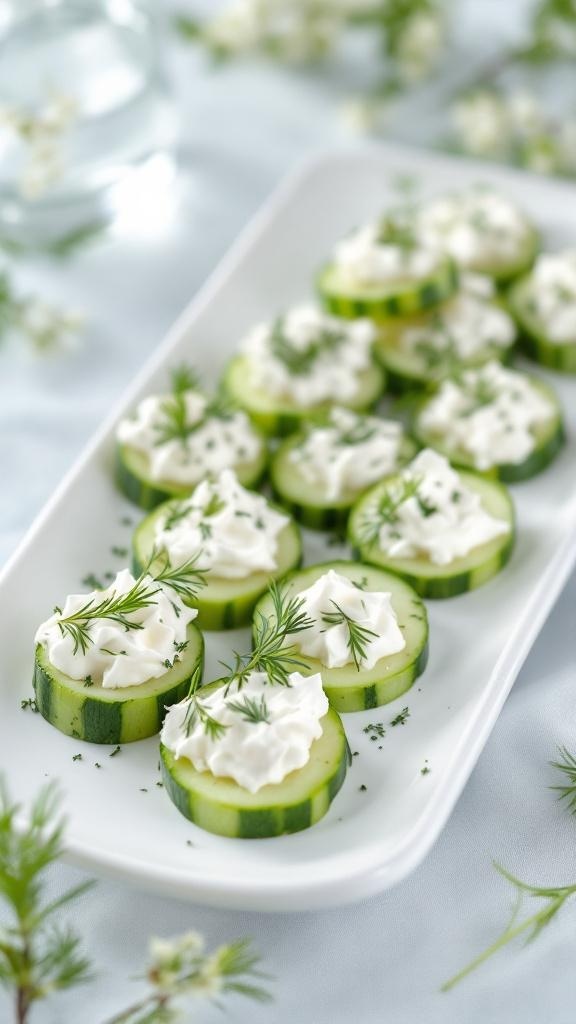
These tangy cucumber bites are a refreshing treat perfect for summer BBQs and picnics. The vibrant green cucumber slices topped with creamy cheese create a delightful contrast that is both tasty and visually appealing. Each bite is a burst of flavor, making them a hit among guests.
The preparation is simple, requiring no cooking at all. Just slice the cucumbers, spread the cream cheese, and garnish with fresh herbs. It’s a quick appetizer that doesn’t skimp on taste!
Ingredients
- 1 large cucumber
- 8 oz cream cheese, softened
- 1 tablespoon fresh dill, chopped
- 1 tablespoon lemon juice
- Salt and pepper to taste
- Additional dill for garnish
Instructions
- Prepare the Cucumber: Wash the cucumber and slice it into thick rounds, about 1/2 inch each.
- Mix the Cream Cheese: In a bowl, combine the softened cream cheese, chopped dill, lemon juice, salt, and pepper. Mix until smooth.
- Assemble the Bites: Spread a generous amount of the cream cheese mixture on each cucumber slice.
- Garnish: Top each bite with a sprig of dill for a fresh touch.
- Serve: Arrange the cucumber bites on a platter and enjoy!
Delightful Cheese And Charcuterie Board
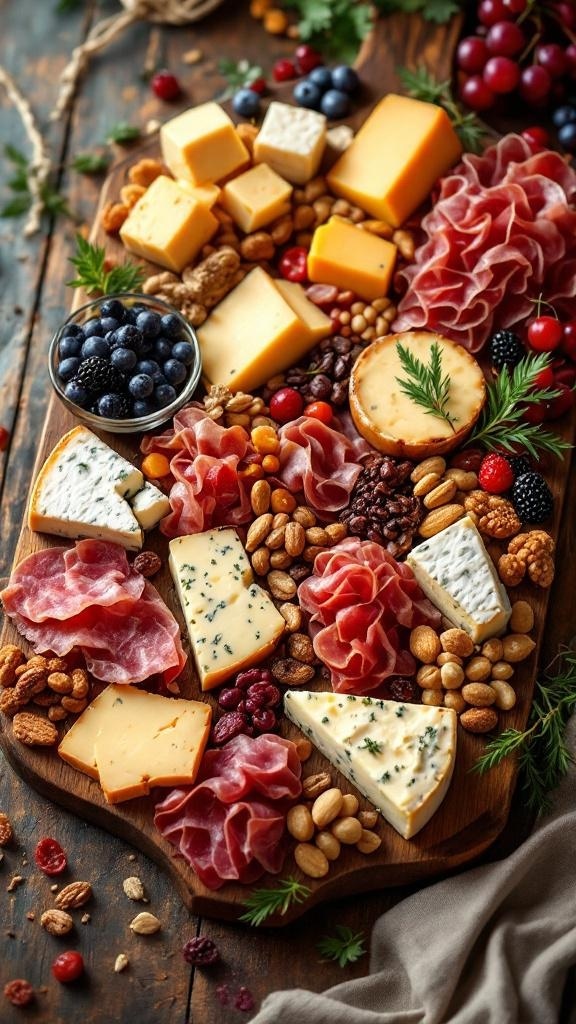
A cheese and charcuterie board is a perfect addition to any summer BBQ or picnic. It’s colorful, inviting, and requires no cooking, making it a hassle-free choice for entertaining. This board features a variety of cheeses, cured meats, nuts, and fresh fruits, all beautifully arranged to catch the eye.
Start with a selection of cheeses. You can mix soft cheeses like Brie and goat cheese with firmer options like cheddar and gouda. Pair these with thinly sliced cured meats, such as prosciutto and salami, which add a savory touch.
Don’t forget the accompaniments! Nuts, dried fruits, and fresh berries bring texture and sweetness to the board. They also provide a nice contrast to the saltiness of the meats and the creaminess of the cheeses. Use a wooden board or a large platter to display everything together.
For a finishing touch, add some herbs or edible flowers for color. This board not only tastes great but also looks stunning, making it a centerpiece for your gathering.
Ingredients
- 1 cup Brie cheese
- 1 cup cheddar cheese
- 1 cup goat cheese
- 1 cup prosciutto
- 1 cup salami
- 1 cup mixed nuts
- 1 cup dried cranberries
- 1 cup fresh blueberries
- 1 cup fresh strawberries
- Fresh herbs for garnish
Instructions
- Choose a large wooden board or platter for your arrangement.
- Cut the cheeses into bite-sized pieces and arrange them on the board.
- Layer the cured meats around the cheeses, folding them for a nice presentation.
- Scatter the nuts and dried fruits in between the cheeses and meats.
- Add fresh berries for a pop of color and sweetness.
- Garnish with fresh herbs for a beautiful finish.
- Serve with crackers or bread on the side for added texture.
Tropical Fruit Salsa For A Unique Flavor

Brighten up your summer BBQs and picnics with a refreshing tropical fruit salsa. This dish combines sweet and tangy flavors, making it a perfect appetizer. The vibrant colors of mango, kiwi, and red bell pepper create an eye-catching presentation that’s sure to impress your guests.
Pair this salsa with crispy tortilla chips for a delightful crunch. The combination of fresh fruits and a hint of lime juice makes it a unique twist on traditional salsa. It’s easy to prepare, requiring no cooking, which is ideal for those hot summer days.
Here’s how to make this delicious tropical fruit salsa:
Ingredients
- 2 ripe mangoes, diced
- 2 kiwis, peeled and sliced
- 1 red bell pepper, finely chopped
- 1/4 cup red onion, finely chopped
- 1/4 cup fresh cilantro, chopped
- Juice of 1 lime
- Salt to taste
- Tortilla chips for serving
Instructions
- In a large bowl, combine the diced mangoes, sliced kiwis, chopped red bell pepper, and red onion.
- Add the chopped cilantro and lime juice. Mix everything gently to combine.
- Season with salt to taste. Adjust lime juice or salt as needed.
- Serve immediately with tortilla chips or refrigerate for up to an hour to let the flavors meld.
Quick And Easy Pesto Pasta Salad
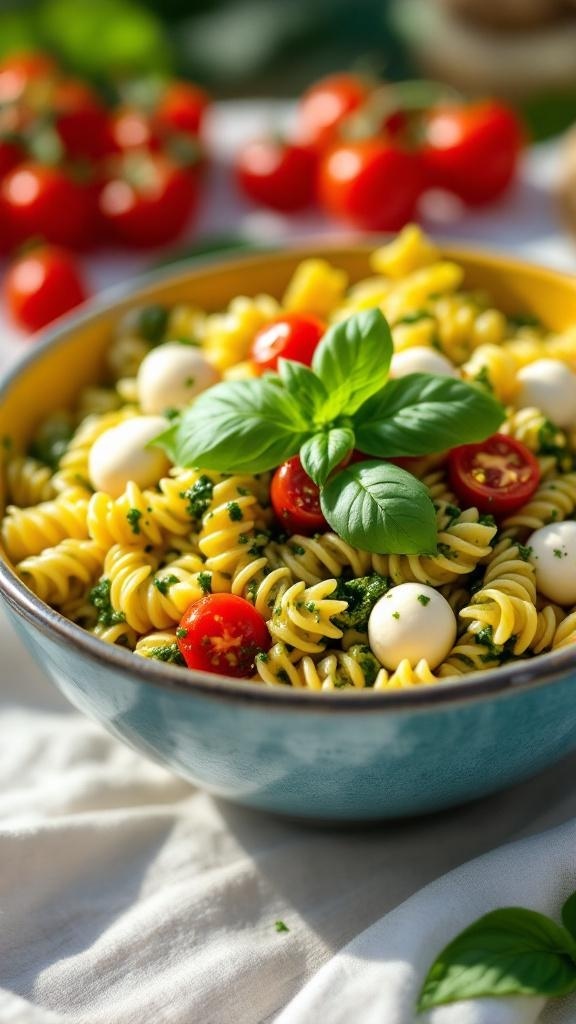
This Quick and Easy Pesto Pasta Salad is a perfect dish for summer BBQs and picnics. The vibrant colors of the pasta, cherry tomatoes, and fresh basil make it visually appealing and inviting. The combination of flavors is refreshing and satisfying, making it a great choice for outdoor gatherings.
The salad features rotini pasta, which holds onto the pesto beautifully, along with juicy cherry tomatoes and creamy mozzarella balls. Tossed together with a homemade or store-bought pesto, this dish is not only quick to prepare but also a crowd-pleaser.
What’s great about this recipe is its versatility. You can add in other ingredients like olives, bell peppers, or even grilled chicken if you want to make it heartier. It’s a dish that can be made ahead of time, allowing the flavors to meld together, making it even tastier.
So, if you’re looking for a no-cook appetizer that’s easy to whip up and perfect for summer, this pesto pasta salad is the way to go!
Ingredients
- 12 ounces rotini pasta
- 1 cup cherry tomatoes, halved
- 8 ounces mozzarella balls
- 1 cup basil pesto
- 1/4 cup fresh basil leaves, chopped
- Salt and pepper to taste
Instructions
- Cook the Pasta: In a large pot, bring salted water to a boil. Add the rotini pasta and cook according to package instructions until al dente. Drain and rinse under cold water to cool.
- Combine Ingredients: In a large bowl, combine the cooled pasta, cherry tomatoes, mozzarella balls, and basil pesto. Toss until everything is well coated.
- Season: Add chopped basil leaves, salt, and pepper to taste. Mix gently.
- Chill and Serve: Cover and refrigerate for at least 30 minutes before serving to let the flavors develop.
Struggling to Stay on Track with Your Eating?
You’re not alone. One of the biggest obstacles I see people
face is not knowing what to eat. Between busy schedules, endless diet
advice online, and trying to cook healthy meals that actually taste good—it’s
easy to feel stuck or overwhelmed.
That’s why I created my 21 Quick & Easy Custom
Low-Calorie Meal Plans Program. These plans are built specifically for
you—your goals, your lifestyle, and your food preferences. You won’t find
any cookie-cutter diets here. Just real, satisfying meals that help you stay
full, energized, and on track without the stress.
✅ No more guessing.
✅
No more skipping meals or eating “diet food” you hate.
✅
Just a clear, doable plan that fits your life.
👉 Ready to eat better,
feel better, and finally make progress? [Click here to get your custom meal plans today.]
Not Seeing the Inches Drop No Matter What You Do?
If you’re working out but still not seeing the results in
the mirror, I hear you. So many people come to me after months of doing cardio
or random workouts—and still struggling to lose inches or tone up. The truth
is, your body needs more than just movement. It needs a proven strategy.
My 8-Week Workout Program to Lose Inches is designed
to do just that—burn fat, tighten up, and give you visible results.
These workouts are fun, effective, and designed for real people with real
lives. Whether you’re getting back into fitness or ready to take it to the next
level, this program gives you a clear path to success.
✅ Just 8 weeks to build strength,
confidence, and a fitter shape.
✅
No endless cardio.
✅
No gym required (unless you want it).
👉 If you're ready to
drop inches and feel amazing in your own skin, [click here to start the 8-Week Workout Program].


Comments
Post a Comment