9 Meal Prep Finger Foods for Easy Grab-and-Go Weekdays
9 Meal Prep Finger Foods for Easy Grab-and-Go Weekdays
When life gets busy, meal prep can feel like a chore, but it doesn't have to be boring! Grab-and-go finger foods are the perfect solution for those hectic weekdays, making healthy eating effortlessly enjoyable. From bite-sized snacks to satisfying mini meals, this guide offers simple, tasty ideas that will keep you fueled and satisfied without any fuss.
Savory Mini Quiches For A Quick Breakfast

Mini quiches are a fantastic grab-and-go breakfast option. They are not only easy to make but also versatile. You can fill them with your favorite ingredients, making them perfect for busy weekdays. Picture a platter of golden-brown quiches, each filled with a delightful mix of eggs, cheese, and fresh veggies. They look inviting and are sure to please everyone in the family.
These mini quiches can be made ahead of time and stored in the fridge. Just pop them in the microwave for a quick warm-up, and you’re ready to start your day. Serve them with a cup of coffee or tea for a delightful morning treat.
Ingredients
- 1 package of pre-made phyllo pastry cups
- 6 large eggs
- 1 cup milk
- 1 cup shredded cheese (cheddar or your choice)
- 1 cup chopped spinach
- 1/2 cup diced tomatoes
- Salt and pepper to taste
- Fresh parsley for garnish
Instructions
- Preheat your oven to 375°F (190°C).
- In a large bowl, whisk together the eggs and milk until well combined. Season with salt and pepper.
- Add in the cheese, spinach, and tomatoes, mixing until evenly distributed.
- Place the phyllo pastry cups on a baking sheet. Carefully fill each cup with the egg mixture, about 3/4 full.
- Bake for 20-25 minutes, or until the egg is set and the tops are lightly golden.
- Remove from the oven and let cool slightly. Garnish with fresh parsley before serving.
Delicious Caprese Skewers For Fresh Flavor
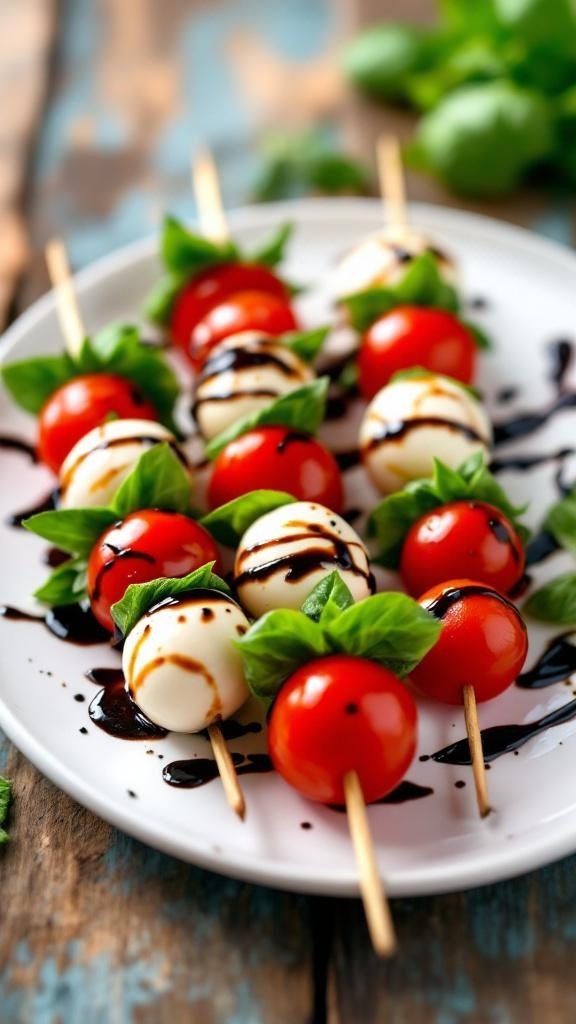
Caprese skewers are a fantastic option for busy weekdays. They are simple, fresh, and bursting with flavor. These little bites are perfect for meal prep, allowing you to grab and go when you need a quick snack or appetizer.
Each skewer features juicy cherry tomatoes, creamy mozzarella balls, and fragrant basil leaves. Drizzled with balsamic glaze, they not only taste great but also look beautiful on a plate. They are a hit at parties or a delightful addition to your lunchbox.
Making these skewers is easy. Just thread the ingredients onto small skewers or toothpicks, and you’re set. You can prepare them in advance and store them in the fridge for a refreshing snack anytime.
Ingredients
- 1 pint cherry tomatoes
- 1 pound fresh mozzarella balls
- 1 bunch fresh basil leaves
- Balsamic glaze
- Salt and pepper to taste
- Skewers or toothpicks
Instructions
- Prepare the Ingredients: Rinse the cherry tomatoes and basil leaves. Drain the mozzarella balls.
- Assemble the Skewers: Take a skewer and thread one cherry tomato, followed by a basil leaf, then a mozzarella ball. Repeat until the skewer is filled, leaving space at the ends for handling.
- Season: Once all skewers are assembled, drizzle with balsamic glaze and sprinkle with salt and pepper.
- Serve: Enjoy immediately or store in the fridge for later. They taste great cold!
Zesty Hummus And Veggie Cups For Healthy Munching
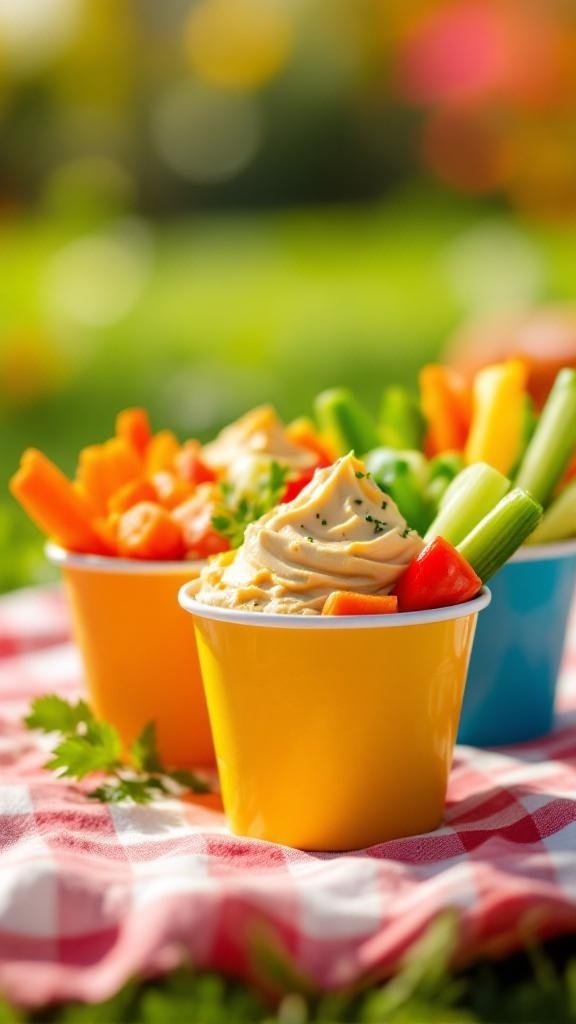
Looking for a quick snack that’s both healthy and delicious? Zesty hummus and veggie cups are the perfect solution! These colorful cups are filled with fresh veggies and creamy hummus, making them ideal for busy weekdays. Just grab one and go!
The vibrant colors of the veggies make these cups visually appealing. You’ll find crunchy carrots, crisp celery, and sweet bell peppers peeking out from the cups. The hummus adds a creamy texture that pairs perfectly with the fresh veggies. This snack is not only tasty but also packed with nutrients.
Making these cups is super easy. You can prepare them ahead of time and store them in the fridge for a quick grab-and-go option. They’re great for lunchboxes, picnics, or even as a light snack at home. Plus, they’re a hit with kids and adults alike!
Ingredients
- 1 cup hummus (store-bought or homemade)
- 1 cup baby carrots
- 1 cup celery sticks
- 1 cup bell pepper strips (any color)
- 1 tablespoon olive oil (optional)
- Salt and pepper to taste
- Fresh herbs for garnish (like parsley or cilantro)
Instructions
- Prepare the Veggies: Wash and cut the veggies into sticks or bite-sized pieces. Arrange them in small cups.
- Add Hummus: Spoon hummus into the bottom of each cup, leaving some space for the veggies to stand.
- Season: Drizzle with olive oil if desired, and sprinkle with salt and pepper.
- Garnish: Add fresh herbs on top for a pop of color and flavor.
- Chill: Store in the refrigerator until ready to serve.
GET 21 QUICK & EASY LOW-CALORIE MEAL PLANS
Savory Meatballs For A Protein-Packed Bite
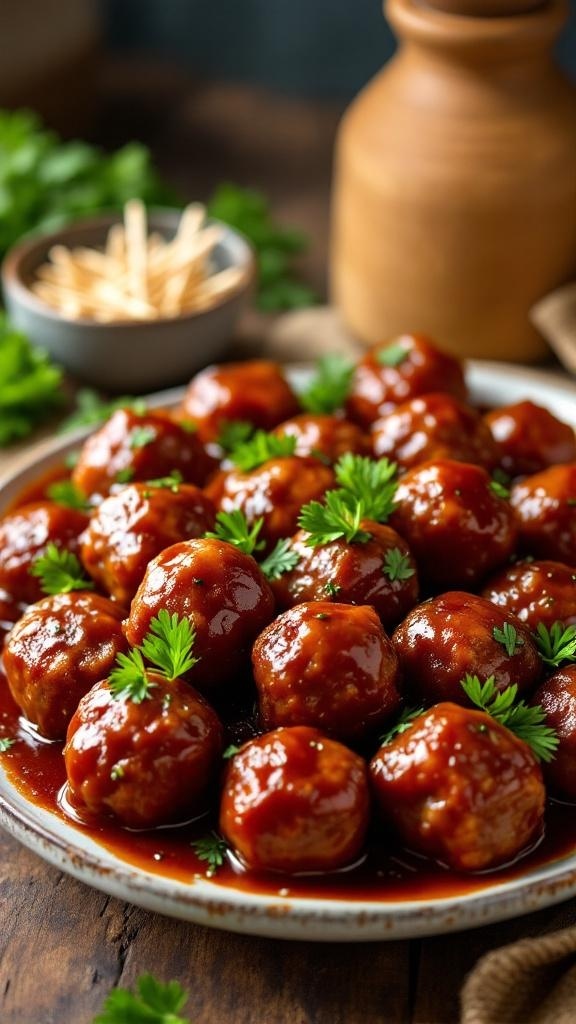
Meatballs are a fantastic option for meal prep, especially when you need something quick and satisfying. These little bites are packed with protein and flavor, making them perfect for busy weekdays. You can easily grab a few and enjoy them on the go. Plus, they pair well with various sauces, so you can switch things up each week!
In the image, you can see a beautiful platter of meatballs, glistening with a rich sauce and garnished with fresh parsley. They look so inviting and are sure to be a hit at any meal. Whether you’re having them as a snack or adding them to a salad or wrap, they’re versatile and delicious.
Making meatballs is simple and fun. You can customize them with your favorite spices and herbs. They also freeze well, so you can make a big batch and have them ready whenever you need a quick meal.
Ingredients
- 1 pound ground beef (or turkey)
- 1/2 cup breadcrumbs
- 1/4 cup grated Parmesan cheese
- 1/4 cup chopped parsley
- 1 clove garlic, minced
- 1 egg
- 1 teaspoon salt
- 1/2 teaspoon black pepper
- 1/2 teaspoon Italian seasoning
- 1 cup marinara sauce (for serving)
Instructions
- Preheat your oven to 400°F (200°C).
- In a large bowl, combine ground beef, breadcrumbs, Parmesan cheese, parsley, garlic, egg, salt, pepper, and Italian seasoning. Mix until well combined.
- Shape the mixture into small meatballs, about 1 inch in diameter, and place them on a baking sheet lined with parchment paper.
- Bake for 20-25 minutes, or until cooked through and browned.
- While the meatballs are baking, heat the marinara sauce in a saucepan over low heat.
- Once the meatballs are done, serve them with the warm marinara sauce. Enjoy!
Refreshing Fruit Cups For A Sweet Pick-Me-Up
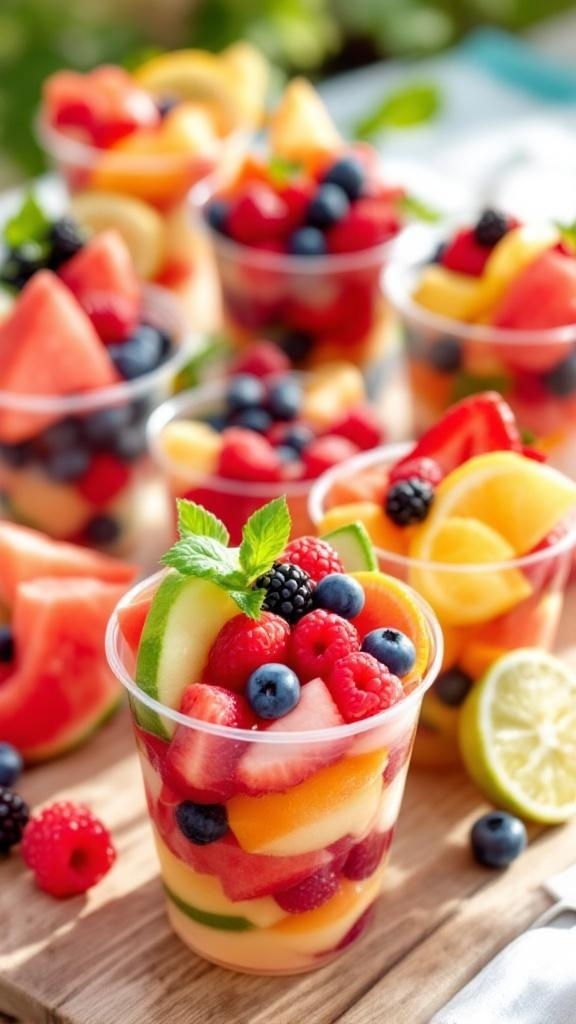
Fruit cups are a fantastic way to enjoy a burst of flavor and nutrition on busy weekdays. These colorful cups are filled with a variety of fresh fruits, making them not only visually appealing but also a healthy snack option. The combination of berries, melons, and citrus provides a refreshing pick-me-up that can brighten any hectic day.
Preparing these fruit cups is simple and quick. You can mix and match your favorite fruits to create a blend that suits your taste. Plus, they are perfect for meal prep! Just grab a cup from the fridge, and you’re ready to go.
Here’s a quick recipe to make your own refreshing fruit cups:
Ingredients
- 1 cup watermelon, diced
- 1 cup cantaloupe, diced
- 1 cup honeydew melon, diced
- 1 cup strawberries, sliced
- 1 cup blueberries
- 1 cup raspberries
- 1 lime, juiced
- Fresh mint leaves for garnish
Instructions
- Prepare the Fruits: Wash all the fruits thoroughly. Dice the watermelon, cantaloupe, and honeydew into bite-sized pieces. Slice the strawberries.
- Mix the Fruits: In a large bowl, combine all the diced fruits and berries. Gently toss them together to mix.
- Add Lime Juice: Squeeze the juice of one lime over the fruit mixture. This adds a zesty flavor and helps keep the fruits fresh.
- Portion into Cups: Divide the fruit mixture into individual cups. You can use clear plastic cups for a fun presentation.
- Garnish: Top each cup with a mint leaf for a touch of freshness.
- Chill and Serve: Refrigerate the cups for at least 30 minutes before serving. Enjoy your refreshing fruit cups!
Nutty Energy Bites For A Quick Boost
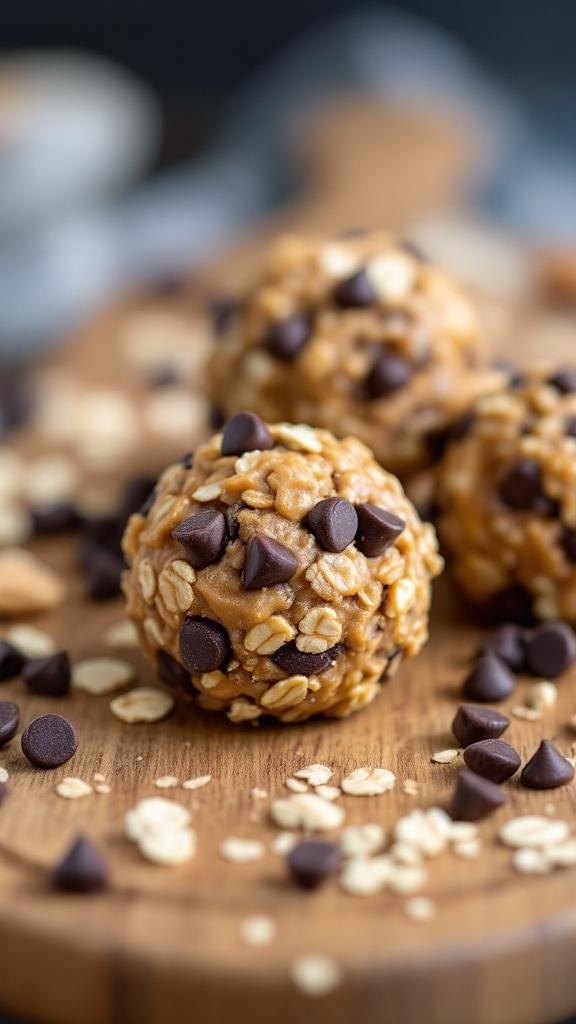
Nutty energy bites are the perfect solution for busy weekdays. These little snacks pack a punch of flavor and energy, making them ideal for a quick boost. They’re easy to grab and go, fitting perfectly into your hectic schedule.
In the image, you can see delicious energy bites rolled into perfect little balls. They are studded with chocolate chips and oats, giving them a delightful texture. These bites are not only tasty but also nutritious, combining the goodness of nuts, oats, and a hint of sweetness.
Making these energy bites is simple and requires just a few ingredients. You can customize them with your favorite nuts or seeds, making them versatile for any taste preference. They store well in the fridge, so you can prepare a batch at the start of the week and have them ready for whenever hunger strikes.
Ingredients
- 1 cup rolled oats
- 1/2 cup peanut butter (or any nut butter)
- 1/3 cup honey or maple syrup
- 1/2 cup chocolate chips
- 1/4 cup chopped nuts (like almonds or walnuts)
- 1 teaspoon vanilla extract
Instructions
- In a large bowl, mix together the rolled oats, peanut butter, honey, and vanilla extract until well combined.
- Add in the chocolate chips and chopped nuts, stirring until everything is evenly distributed.
- Using your hands, roll the mixture into small balls, about 1 inch in diameter.
- Place the energy bites on a baking sheet lined with parchment paper and refrigerate for at least 30 minutes to firm up.
- Once set, store them in an airtight container in the fridge for up to a week.
GET 8-WEEKS OF WORKOUTS TO LOSE INCHES
Greek Yogurt Parfaits For A Wholesome Treat
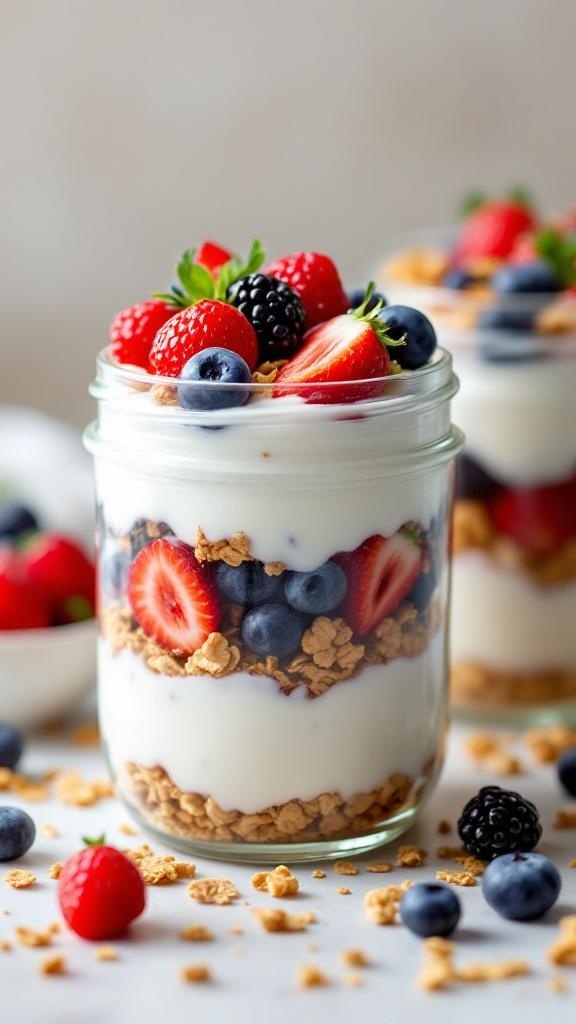
Greek yogurt parfaits are a fantastic grab-and-go option for busy weekdays. They combine creamy yogurt, crunchy granola, and fresh fruits, making them a delicious and nutritious snack. The layers of flavors and textures create a delightful experience in every bite.
To prepare these parfaits, you can use a variety of fruits like strawberries, blueberries, and raspberries. The yogurt provides protein, while the granola adds a satisfying crunch. You can customize these parfaits with your favorite ingredients, making them perfect for everyone.
These parfaits are not just easy to make; they’re also visually appealing. Layering the ingredients in a jar creates a beautiful presentation. You can even prepare them the night before and store them in the fridge for a quick breakfast or snack.
Ingredients
- 2 cups Greek yogurt
- 1 cup granola
- 1 cup mixed berries (strawberries, blueberries, raspberries)
- 1 tablespoon honey (optional)
- Mint leaves for garnish (optional)
Instructions
- In a clean jar or bowl, start with a layer of Greek yogurt at the bottom.
- Add a layer of granola on top of the yogurt.
- Next, add a layer of mixed berries.
- Repeat the layers until the jar is full, finishing with a layer of berries on top.
- If desired, drizzle honey over the top and garnish with mint leaves.
- Cover and refrigerate until ready to enjoy.
Crunchy Granola Bars For On-The-Go Energy
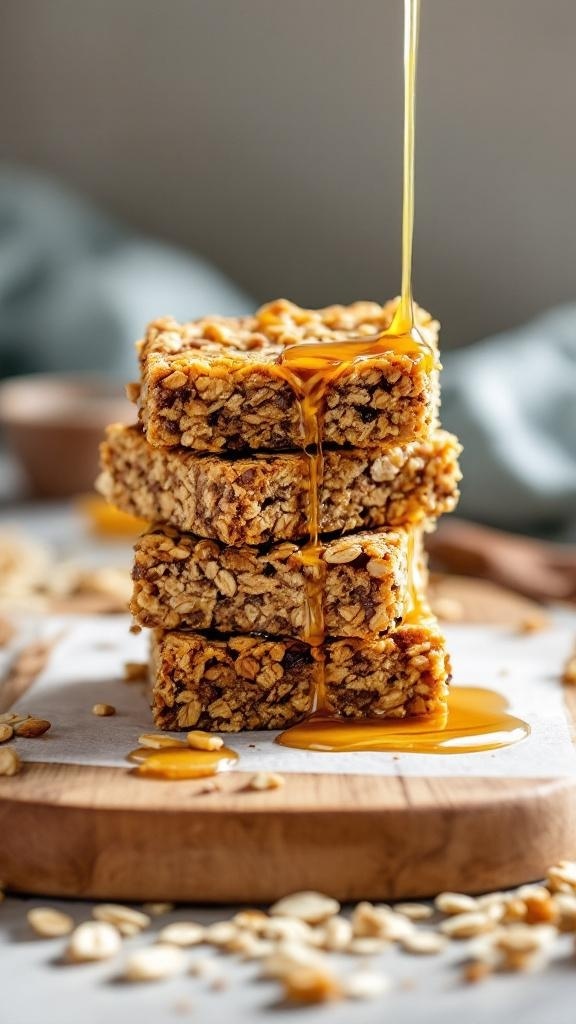
Granola bars are a fantastic choice for busy weekdays. They’re easy to grab and provide a quick energy boost. The image shows a stack of crunchy granola bars drizzled with honey, making them look irresistible. These bars are not just tasty; they’re packed with nutrients to keep you going throughout the day.
Making your own granola bars at home is simple and allows you to customize them to your liking. You can add nuts, seeds, or dried fruits for extra flavor and nutrition. Plus, they’re perfect for snacking on the go, whether you’re heading to work or hitting the gym.
Let’s get into a quick recipe for these delicious bars!
Ingredients
- 2 cups rolled oats
- 1 cup nut butter (like almond or peanut butter)
- 1/2 cup honey or maple syrup
- 1/2 cup nuts (chopped)
- 1/2 cup dried fruit (like cranberries or raisins)
- 1/2 teaspoon vanilla extract
- 1/4 teaspoon salt
Instructions
- Preheat your oven to 350°F (175°C). Line a baking dish with parchment paper.
- In a large bowl, mix together the rolled oats, nut butter, honey, nuts, dried fruit, vanilla extract, and salt until well combined.
- Spread the mixture evenly in the prepared baking dish, pressing it down firmly.
- Bake for about 20-25 minutes, or until the edges are golden brown.
- Let it cool completely before cutting into bars. Drizzle with extra honey if desired.
- Store in an airtight container for up to a week.
Vegetable Spring Rolls For A Fresh Crunch

Vegetable spring rolls are a fantastic option for busy weekdays. These light and refreshing bites are packed with colorful veggies, making them not only healthy but also visually appealing. The crisp lettuce, vibrant carrots, and crunchy bell peppers create a delightful mix of textures and flavors.
These rolls are perfect for meal prep. You can make a batch ahead of time and store them in the fridge for quick snacks or lunches. Pair them with a tasty dipping sauce, and you have a grab-and-go meal that’s sure to satisfy.
Making vegetable spring rolls is simple. Start by gathering your ingredients and laying out your rice paper wrappers. Fill each wrapper with a mix of your favorite vegetables, roll them up tightly, and they’re ready to enjoy!
Ingredients
- 8 rice paper wrappers
- 1 cup lettuce, shredded
- 1/2 cup carrots, julienned
- 1/2 cup bell peppers, thinly sliced
- 1/2 cup cucumber, julienned
- 1/4 cup fresh herbs (like mint or cilantro)
- 1/4 cup dipping sauce (like peanut or hoisin sauce)
Instructions
- Prepare the Vegetables: Wash and cut all the vegetables into thin strips. Set aside.
- Soften the Rice Paper: Fill a shallow dish with warm water. Dip one rice paper wrapper into the water for about 10-15 seconds until it becomes soft.
- Fill the Wrapper: Lay the softened wrapper on a clean surface. Place a small handful of lettuce, carrots, bell peppers, cucumber, and herbs in the center.
- Roll It Up: Fold the sides of the wrapper over the filling, then roll from the bottom up to enclose the filling completely.
- Repeat: Continue with the remaining wrappers and filling. Serve with your favorite dipping sauce.
Struggling to Stay on Track with Your Eating?
You’re not alone. One of the biggest obstacles I see people
face is not knowing what to eat. Between busy schedules, endless diet
advice online, and trying to cook healthy meals that actually taste good—it’s
easy to feel stuck or overwhelmed.
That’s why I created my 21 Quick & Easy Custom
Low-Calorie Meal Plans Program. These plans are built specifically for
you—your goals, your lifestyle, and your food preferences. You won’t find
any cookie-cutter diets here. Just real, satisfying meals that help you stay
full, energized, and on track without the stress.
✅ No more guessing.
✅
No more skipping meals or eating “diet food” you hate.
✅
Just a clear, doable plan that fits your life.
👉 Ready to eat better,
feel better, and finally make progress? [Click here to get your custom meal plans today.]
Not Seeing the Inches Drop No Matter What You Do?
If you’re working out but still not seeing the results in
the mirror, I hear you. So many people come to me after months of doing cardio
or random workouts—and still struggling to lose inches or tone up. The truth
is, your body needs more than just movement. It needs a proven strategy.
My 8-Week Workout Program to Lose Inches is designed
to do just that—burn fat, tighten up, and give you visible results.
These workouts are fun, effective, and designed for real people with real
lives. Whether you’re getting back into fitness or ready to take it to the next
level, this program gives you a clear path to success.
✅ Just 8 weeks to build strength,
confidence, and a fitter shape.
✅
No endless cardio.
✅
No gym required (unless you want it).
👉 If you're ready to
drop inches and feel amazing in your own skin, [click here to start the 8-Week Workout Program].


Comments
Post a Comment