10 Creative Healthy No-Bake Baking ideas to Satisfy Your Sweet Tooth
10 Creative Healthy No-Bake Baking ideas to Satisfy Your Sweet Tooth
No-bake treats can be a fantastic way to enjoy delicious desserts without the hassle of ovens and long prep times. These healthy ideas are easy to whip up, require minimal ingredients, and are perfect for satisfying your sweet tooth while keeping things nutritious. Get ready to enjoy some guilt-free indulgence!
Deliciously Simple Chocolate Energy Bites

Chocolate energy bites are a fantastic way to satisfy your sweet tooth while keeping things healthy. These little treats are packed with energy-boosting ingredients that make them perfect for a quick snack or a post-workout boost. The image shows a plate filled with these delightful bites, sprinkled with coconut flakes and surrounded by almonds and chocolate chips. The rustic wooden background adds a cozy touch, making these bites even more inviting.
Making chocolate energy bites is super easy. You can whip them up in no time, and they require no baking! Just mix your ingredients, roll them into balls, and you’re good to go. They’re great for meal prep, too. You can store them in the fridge for a quick grab-and-go snack throughout the week.
These bites are versatile. Feel free to swap in your favorite nuts or seeds. You can even add a scoop of protein powder for an extra boost. The combination of flavors and textures makes each bite a delightful experience.
Ingredients
- 1 cup rolled oats
- 1/2 cup nut butter (like almond or peanut)
- 1/3 cup honey or maple syrup
- 1/2 cup dark chocolate chips
- 1/4 cup shredded coconut
- 1/4 cup chopped almonds
- 1 teaspoon vanilla extract
Instructions
- In a large bowl, combine rolled oats, nut butter, honey, and vanilla extract. Mix until well combined.
- Add in chocolate chips, shredded coconut, and chopped almonds. Stir until everything is evenly distributed.
- Using your hands, roll the mixture into small balls, about 1 inch in diameter.
- Place the energy bites on a baking sheet lined with parchment paper and refrigerate for at least 30 minutes to firm up.
- Once set, enjoy immediately or store in an airtight container in the fridge for up to a week.
Refreshing No-Bake Berry Cheesecake Cups
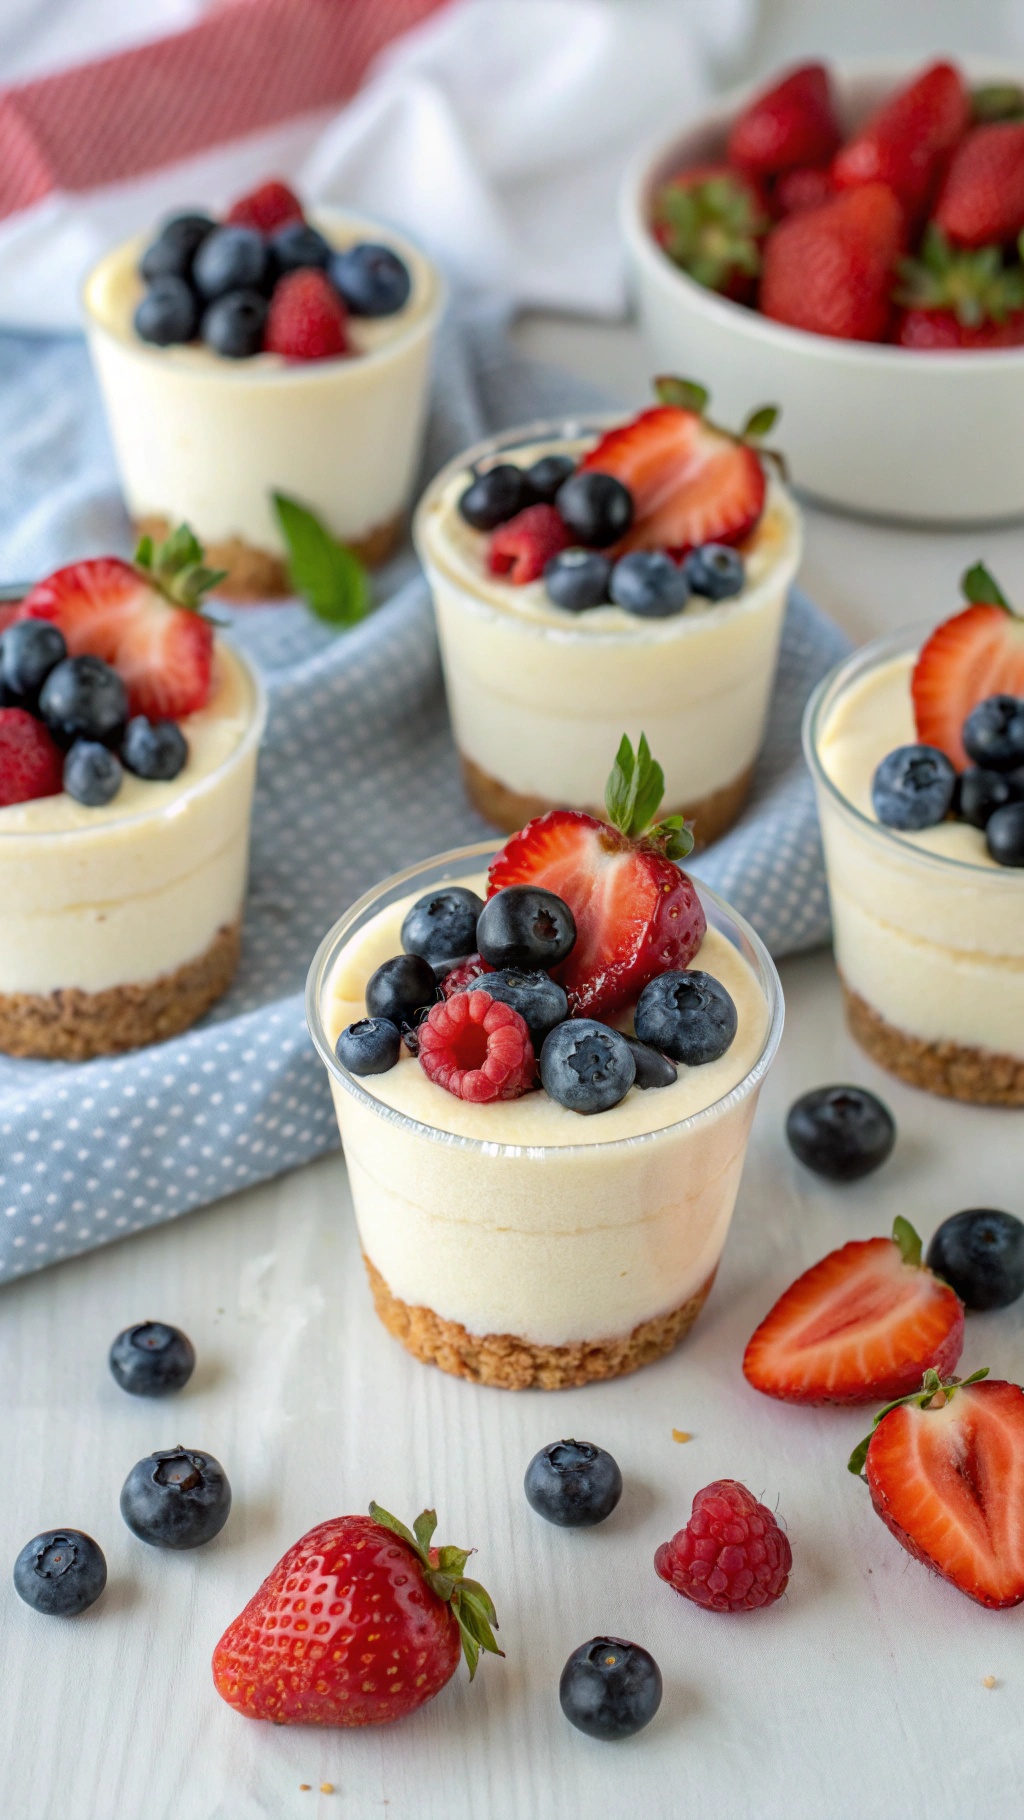
These no-bake berry cheesecake cups are a delightful treat that’s perfect for any occasion. The image showcases individual cups filled with a creamy cheesecake mixture, topped with vibrant berries. You can see fresh strawberries, blueberries, and raspberries adding a pop of color and freshness. The crumbly base peeking through the clear cups hints at the delicious texture that awaits.
Making these cups is simple and fun. They are light, refreshing, and a great way to enjoy seasonal berries. Plus, they require no baking, making them a perfect dessert for warm days or when you want something quick and easy.
Gather your ingredients and let’s whip up these tasty treats!
Ingredients
- 1 cup graham cracker crumbs
- 1/4 cup unsalted butter, melted
- 2 cups cream cheese, softened
- 1/2 cup powdered sugar
- 1 teaspoon vanilla extract
- 1 cup heavy cream
- 1 cup mixed berries (strawberries, blueberries, raspberries)
Instructions
- Prepare the Base: In a bowl, mix graham cracker crumbs and melted butter until combined. Press the mixture into the bottom of each cup to form a base.
- Make the Cheesecake Filling: In another bowl, beat the cream cheese until smooth. Gradually add powdered sugar and vanilla extract, mixing until well combined.
- Whip the Cream: In a separate bowl, whip the heavy cream until stiff peaks form. Gently fold the whipped cream into the cream cheese mixture until fully combined.
- Assemble the Cups: Spoon the cheesecake filling over the graham cracker base in each cup. Smooth the top with a spatula.
- Add the Berries: Top each cup with a generous amount of mixed berries. You can arrange them however you like for a beautiful presentation.
- Chill: Place the cups in the refrigerator for at least 2 hours to set before serving.
Creamy Avocado Chocolate Mousse
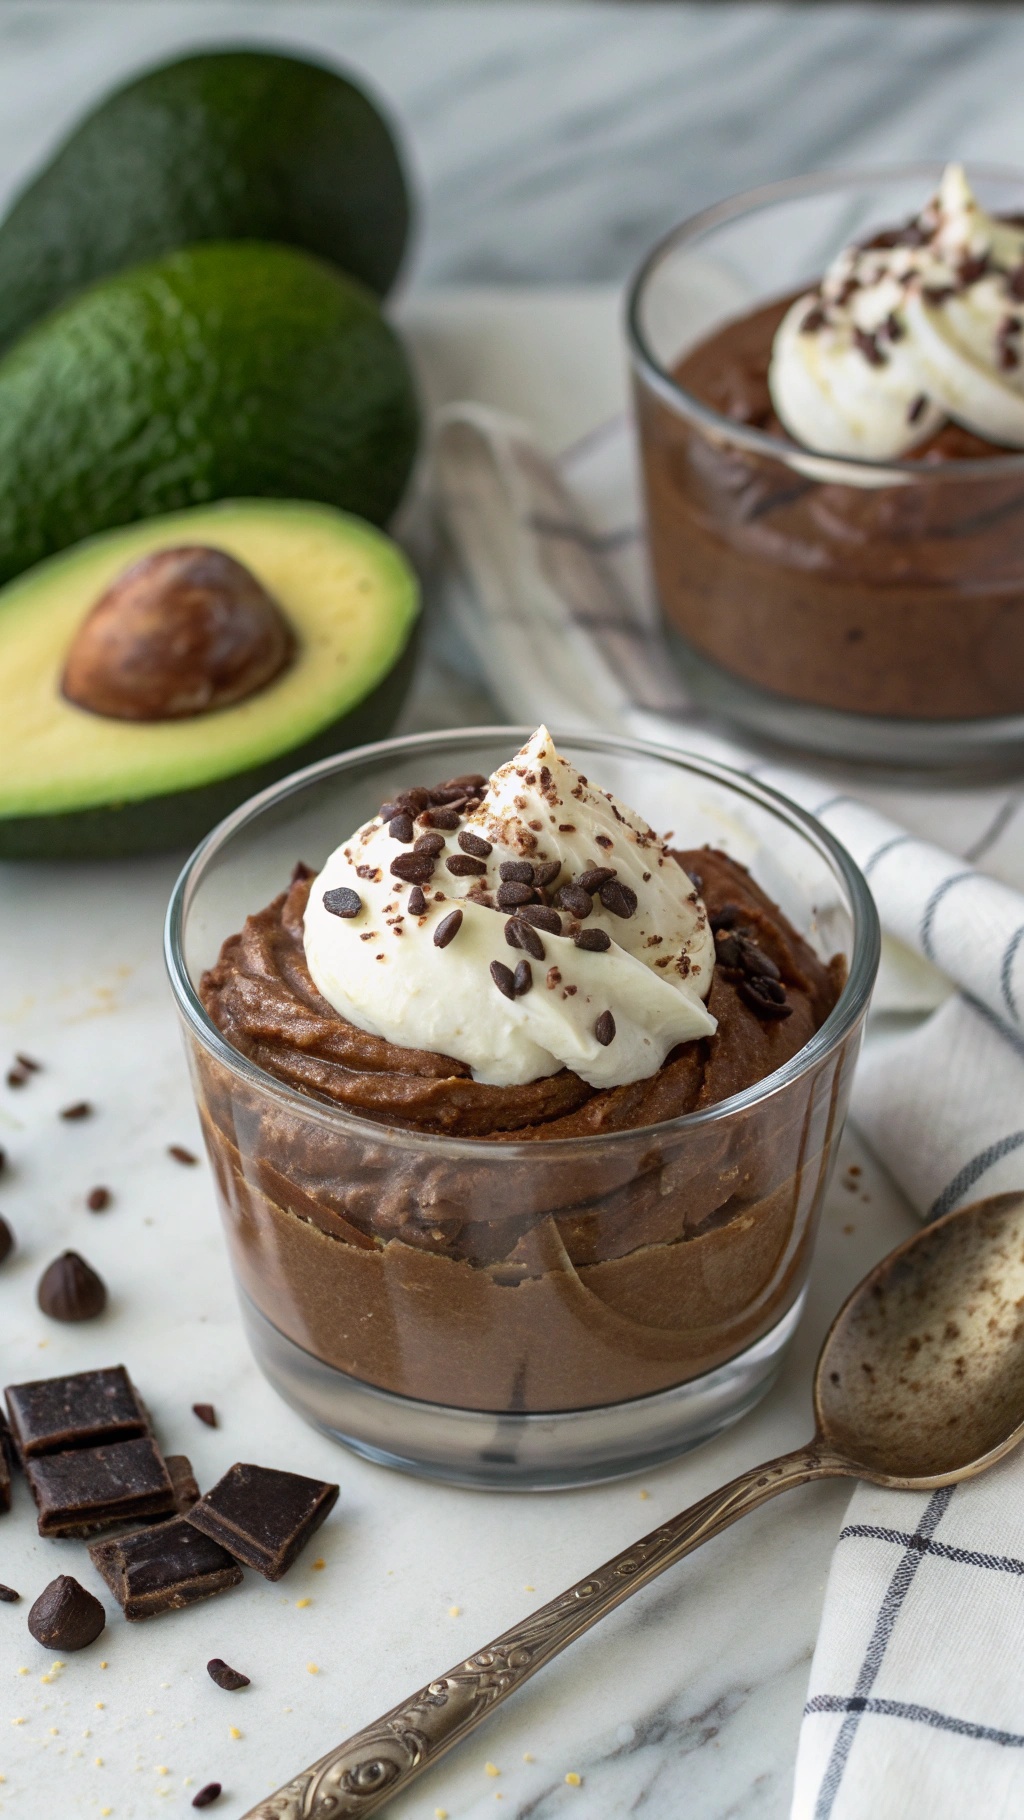
This creamy avocado chocolate mousse is a delightful treat that’s both healthy and satisfying. The rich, velvety texture comes from ripe avocados, which blend perfectly with cocoa powder and a touch of sweetness. You can see the mousse beautifully presented in glass cups, topped with whipped cream and chocolate shavings, making it look as good as it tastes.
Using avocados in desserts might sound unusual, but they add creaminess without the need for heavy cream. This mousse is not only delicious but also packed with healthy fats, making it a guilt-free indulgence. Plus, it’s super easy to whip up!
To make this mousse, you’ll need just a few simple ingredients. Let’s get started!
Ingredients
- 2 ripe avocados
- 1/2 cup unsweetened cocoa powder
- 1/4 cup maple syrup or honey
- 1/4 cup almond milk (or any milk of choice)
- 1 teaspoon vanilla extract
- A pinch of salt
- Whipped cream and chocolate shavings for topping (optional)
Instructions
- Prepare the Avocados: Cut the avocados in half, remove the pit, and scoop the flesh into a blender or food processor.
- Add Ingredients: Add cocoa powder, maple syrup, almond milk, vanilla extract, and a pinch of salt to the blender.
- Blend Until Smooth: Blend everything together until the mixture is completely smooth and creamy. You may need to scrape down the sides to ensure everything is well combined.
- Taste and Adjust: Taste the mousse and add more sweetener if desired. Blend again if you add anything.
- Chill: Transfer the mousse into serving cups and refrigerate for at least 30 minutes to let it set.
- Serve: Top with whipped cream and chocolate shavings before serving, if you like.
Tasty Coconut Almond Energy Bars
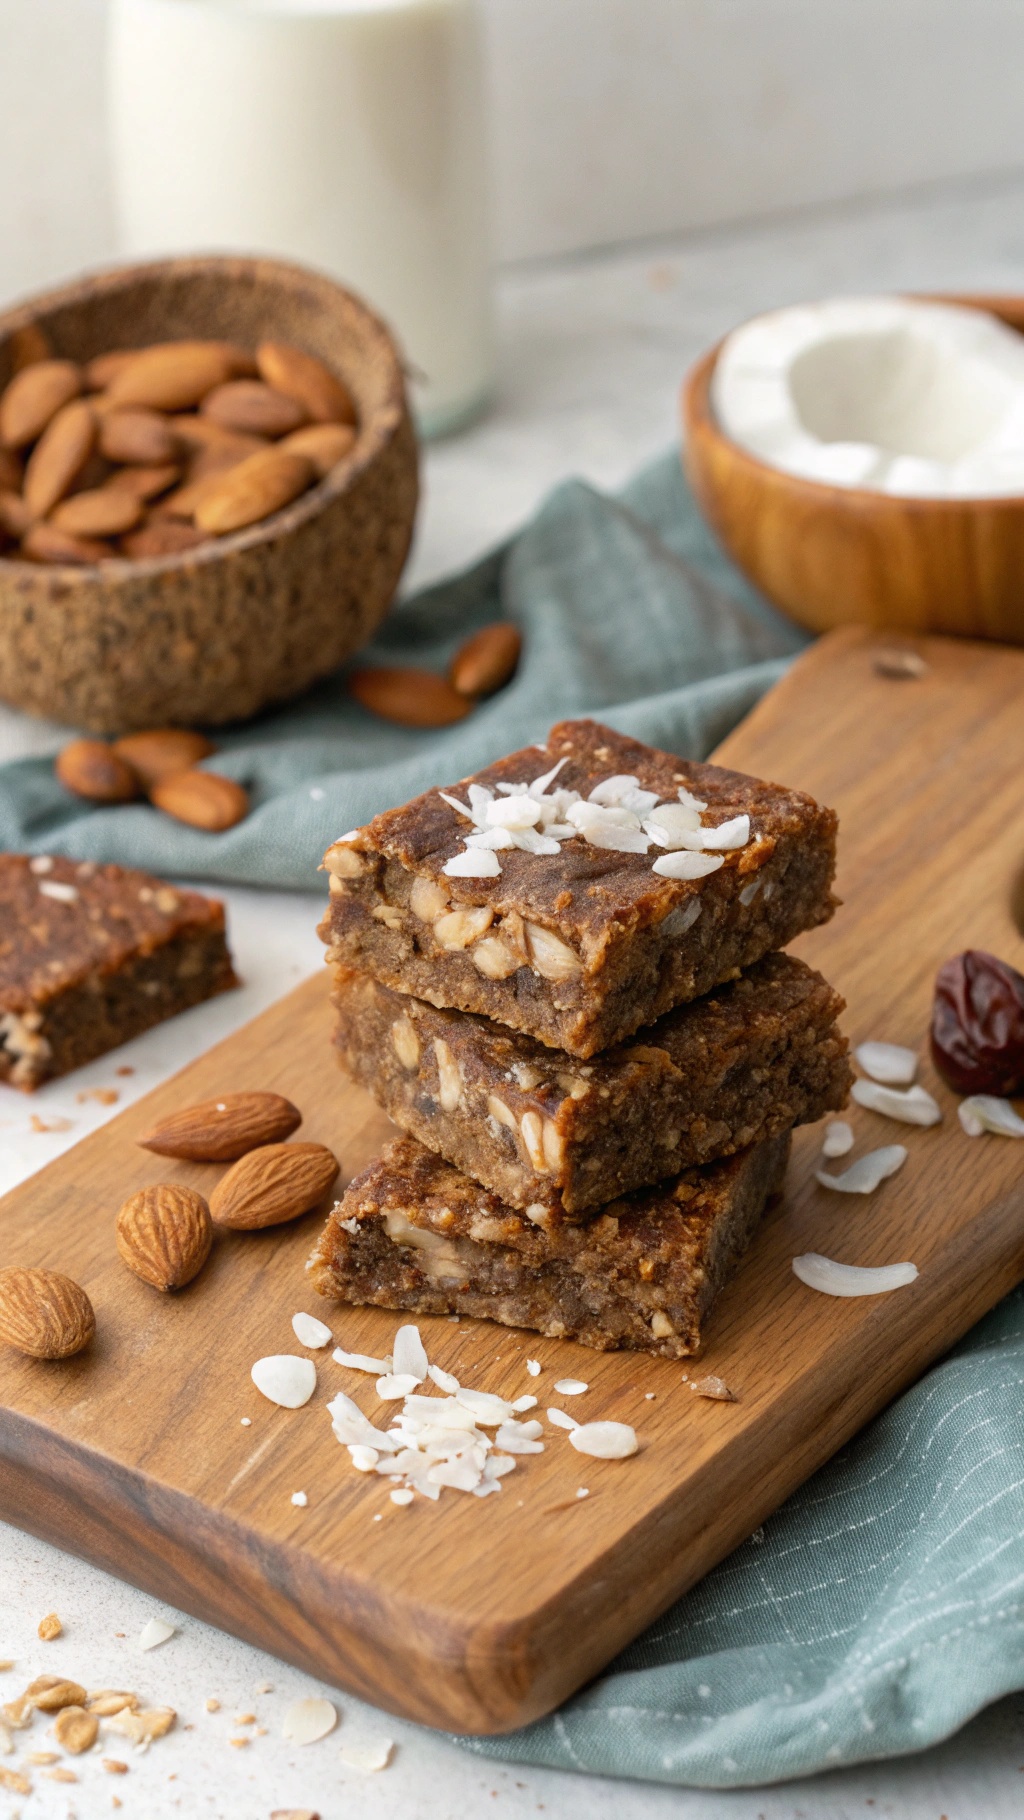
If you're looking for a healthy snack that’s easy to make, these Coconut Almond Energy Bars are a fantastic choice. They’re packed with wholesome ingredients that provide energy and satisfy your sweet tooth without the guilt. The image shows a delicious stack of these bars, topped with a sprinkle of coconut flakes, surrounded by almonds and a cozy setting.
These bars are not only tasty but also super simple to whip up. You can enjoy them as a quick breakfast or a mid-afternoon pick-me-up. The combination of almonds and coconut gives them a delightful crunch and a hint of tropical flavor. Plus, they require no baking, making them perfect for any skill level in the kitchen.
Let’s get started on making your own batch of these energy bars!
Ingredients
- 1 cup dates, pitted
- 1 cup rolled oats
- 1/2 cup almond butter
- 1/2 cup shredded coconut
- 1/4 cup chopped almonds
- 1/4 cup honey or maple syrup
- 1 teaspoon vanilla extract
- 1/4 teaspoon salt
Instructions
- Blend the Dates: In a food processor, pulse the pitted dates until they form a sticky paste.
- Add Ingredients: Add rolled oats, almond butter, shredded coconut, chopped almonds, honey or maple syrup, vanilla extract, and salt. Blend until well combined.
- Press Mixture: Line an 8x8 inch baking dish with parchment paper. Pour the mixture into the dish and press it down firmly with your hands or a spatula.
- Chill: Place the dish in the refrigerator for at least 1 hour to set.
- Cut and Serve: Once set, lift the bars out of the dish and cut into squares. Enjoy your homemade Coconut Almond Energy Bars!
Nutty No-Bake Granola Bites
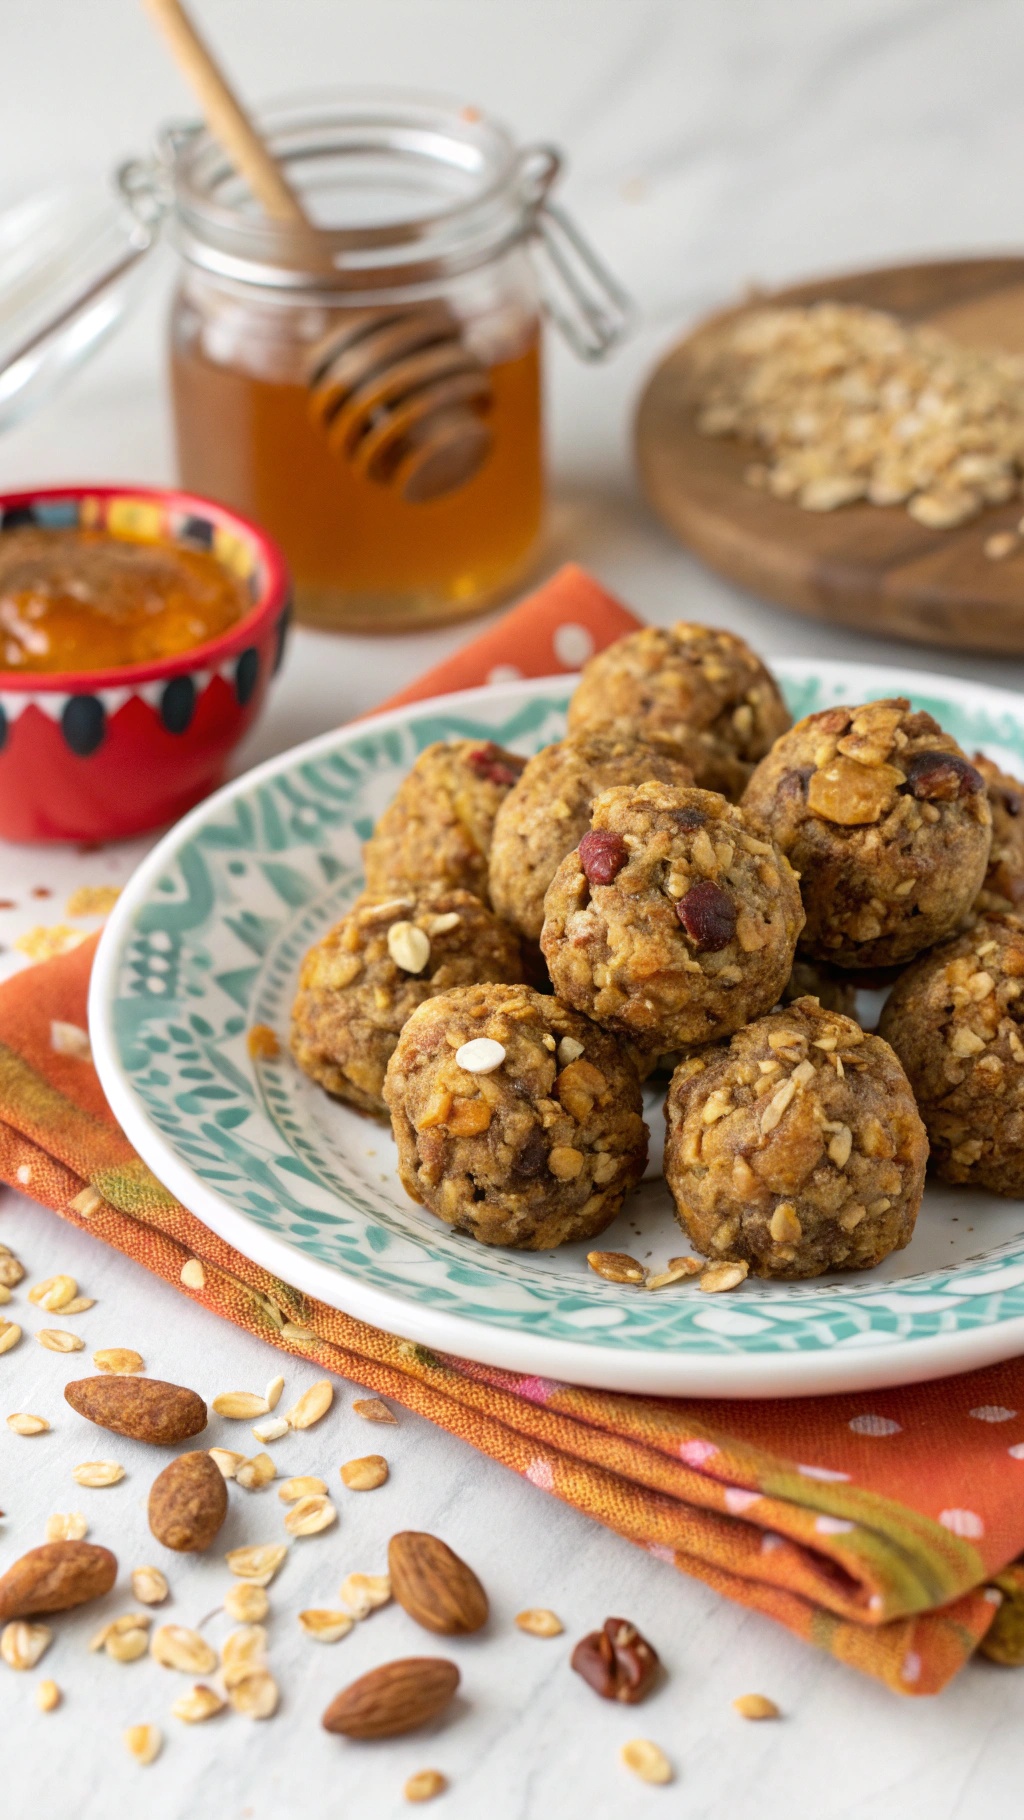
Nutty no-bake granola bites are a fantastic snack option that’s both healthy and easy to make. These little bites are packed with oats, nuts, and a touch of honey, making them a perfect energy booster for any time of the day.
The image shows a delightful plate of these granola bites, showcasing their round shape and golden-brown color. They sit on a decorative plate, surrounded by scattered almonds and oats, hinting at the wholesome ingredients inside. A jar of honey and a small bowl of jam in the background add a sweet touch, emphasizing the natural flavors of the recipe.
Making these bites is simple and requires no baking. Just mix your ingredients, roll them into balls, and they’re ready to enjoy. They make for a great snack for kids and adults alike, perfect for lunchboxes or a quick pick-me-up during the day.
Ingredients
- 2 cups rolled oats
- 1 cup nut butter (like almond or peanut butter)
- 1/2 cup honey or maple syrup
- 1/2 cup chopped nuts (like almonds or walnuts)
- 1/4 cup mini chocolate chips (optional)
- 1 teaspoon vanilla extract
Instructions
- In a large bowl, combine the rolled oats, nut butter, honey, chopped nuts, chocolate chips, and vanilla extract. Mix well until everything is evenly coated.
- Using your hands, roll the mixture into small balls, about 1 inch in diameter.
- Place the granola bites on a baking sheet lined with parchment paper.
- Refrigerate for at least 30 minutes to firm up.
- Once set, enjoy your nutty no-bake granola bites! Store any leftovers in an airtight container in the fridge.
Heavenly Chocolate-Covered Banana Bites
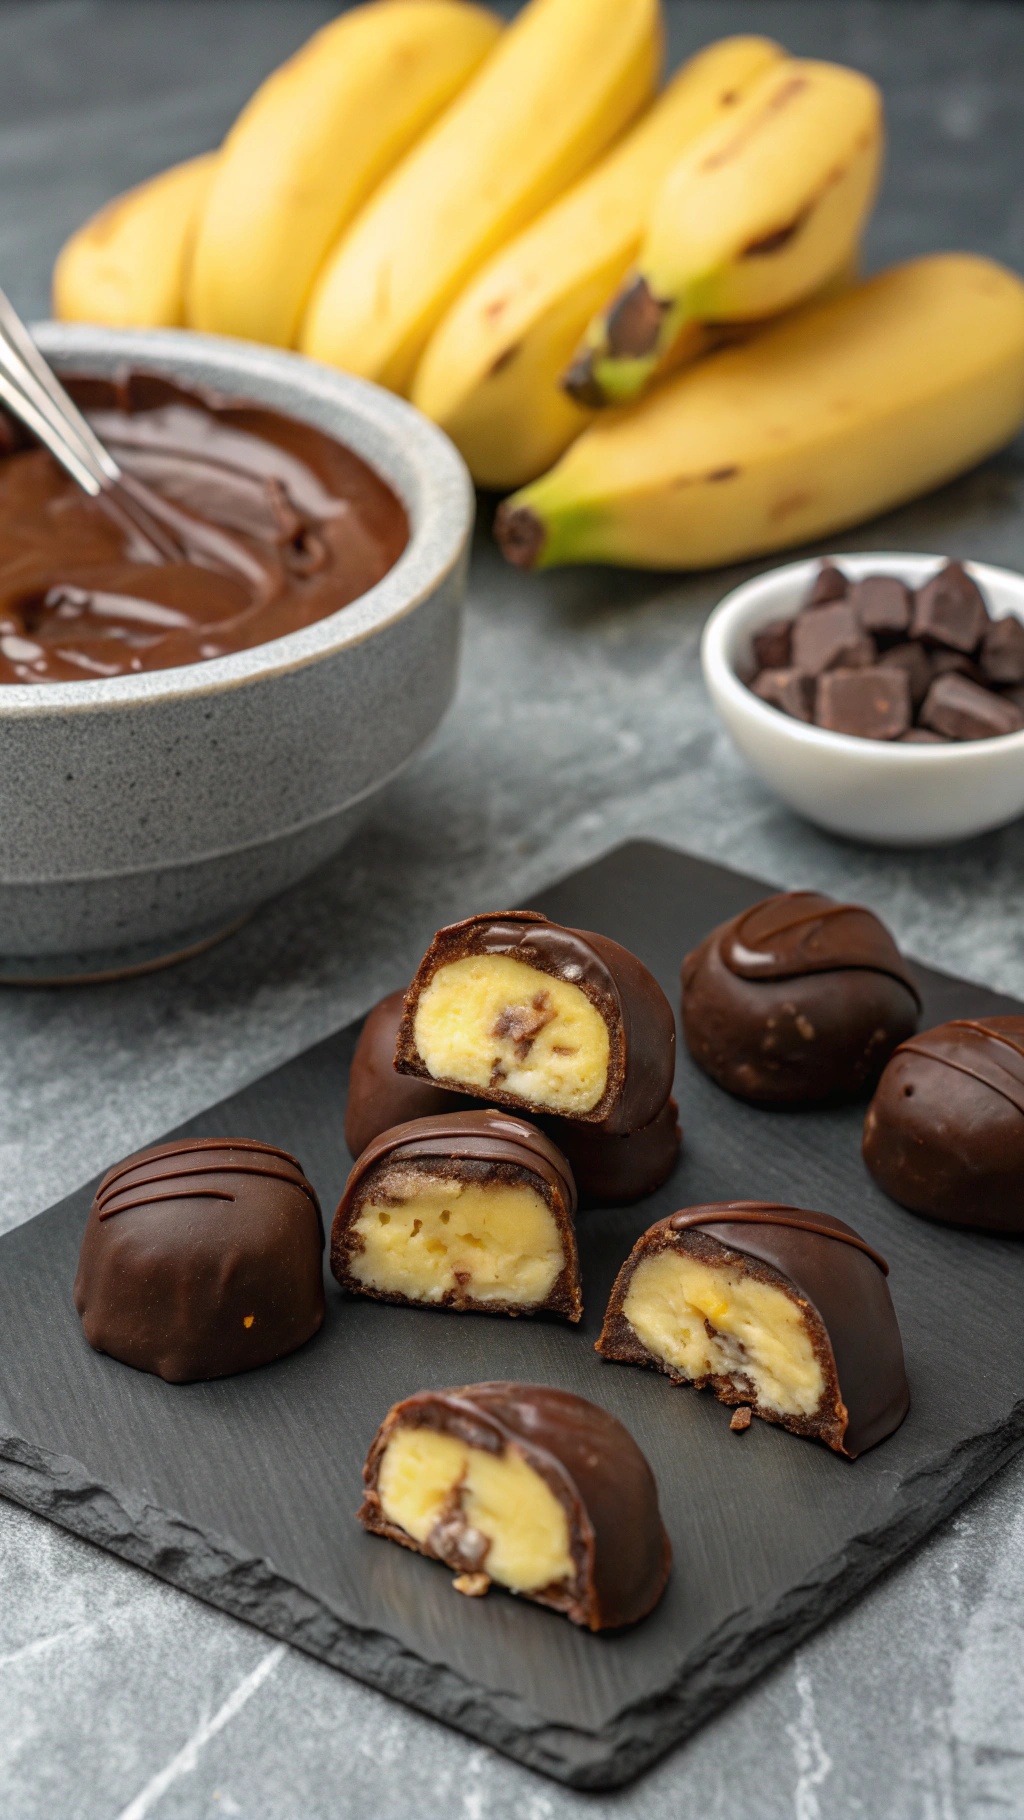
Chocolate-covered banana bites are a fun and healthy treat that everyone will love. These little delights combine the sweetness of ripe bananas with rich chocolate, making them a perfect snack or dessert. The image shows these bites beautifully arranged, showcasing their glossy chocolate coating and creamy banana filling. They are not only delicious but also easy to make, requiring no baking at all!
To create these heavenly bites, you’ll need just a few simple ingredients. Start with ripe bananas, as they provide the best flavor. Melt some chocolate for coating, and you can even add nuts or sprinkles for extra crunch and color. These bites are perfect for parties or a quick treat at home.
Here’s how you can whip up your own batch of chocolate-covered banana bites:
Ingredients
- 2 ripe bananas
- 1 cup chocolate chips (dark or milk chocolate)
- 1 tablespoon coconut oil (optional, for smooth melting)
- Chopped nuts or sprinkles (optional, for topping)
Instructions
- Prepare the Bananas: Peel the bananas and slice them into thick rounds.
- Melt the Chocolate: In a microwave-safe bowl, combine chocolate chips and coconut oil. Microwave in 30-second intervals, stirring in between, until smooth.
- Coat the Banana Slices: Dip each banana slice into the melted chocolate, ensuring it’s fully coated. Use a fork to lift it out and let the excess chocolate drip off.
- Add Toppings: If desired, sprinkle chopped nuts or sprinkles on top of the chocolate before it sets.
- Chill: Place the coated banana bites on a parchment-lined tray and refrigerate for about 30 minutes, or until the chocolate hardens.
- Serve: Enjoy your chocolate-covered banana bites as a delightful snack!
Nutritious No-Bake Oatmeal Cookies
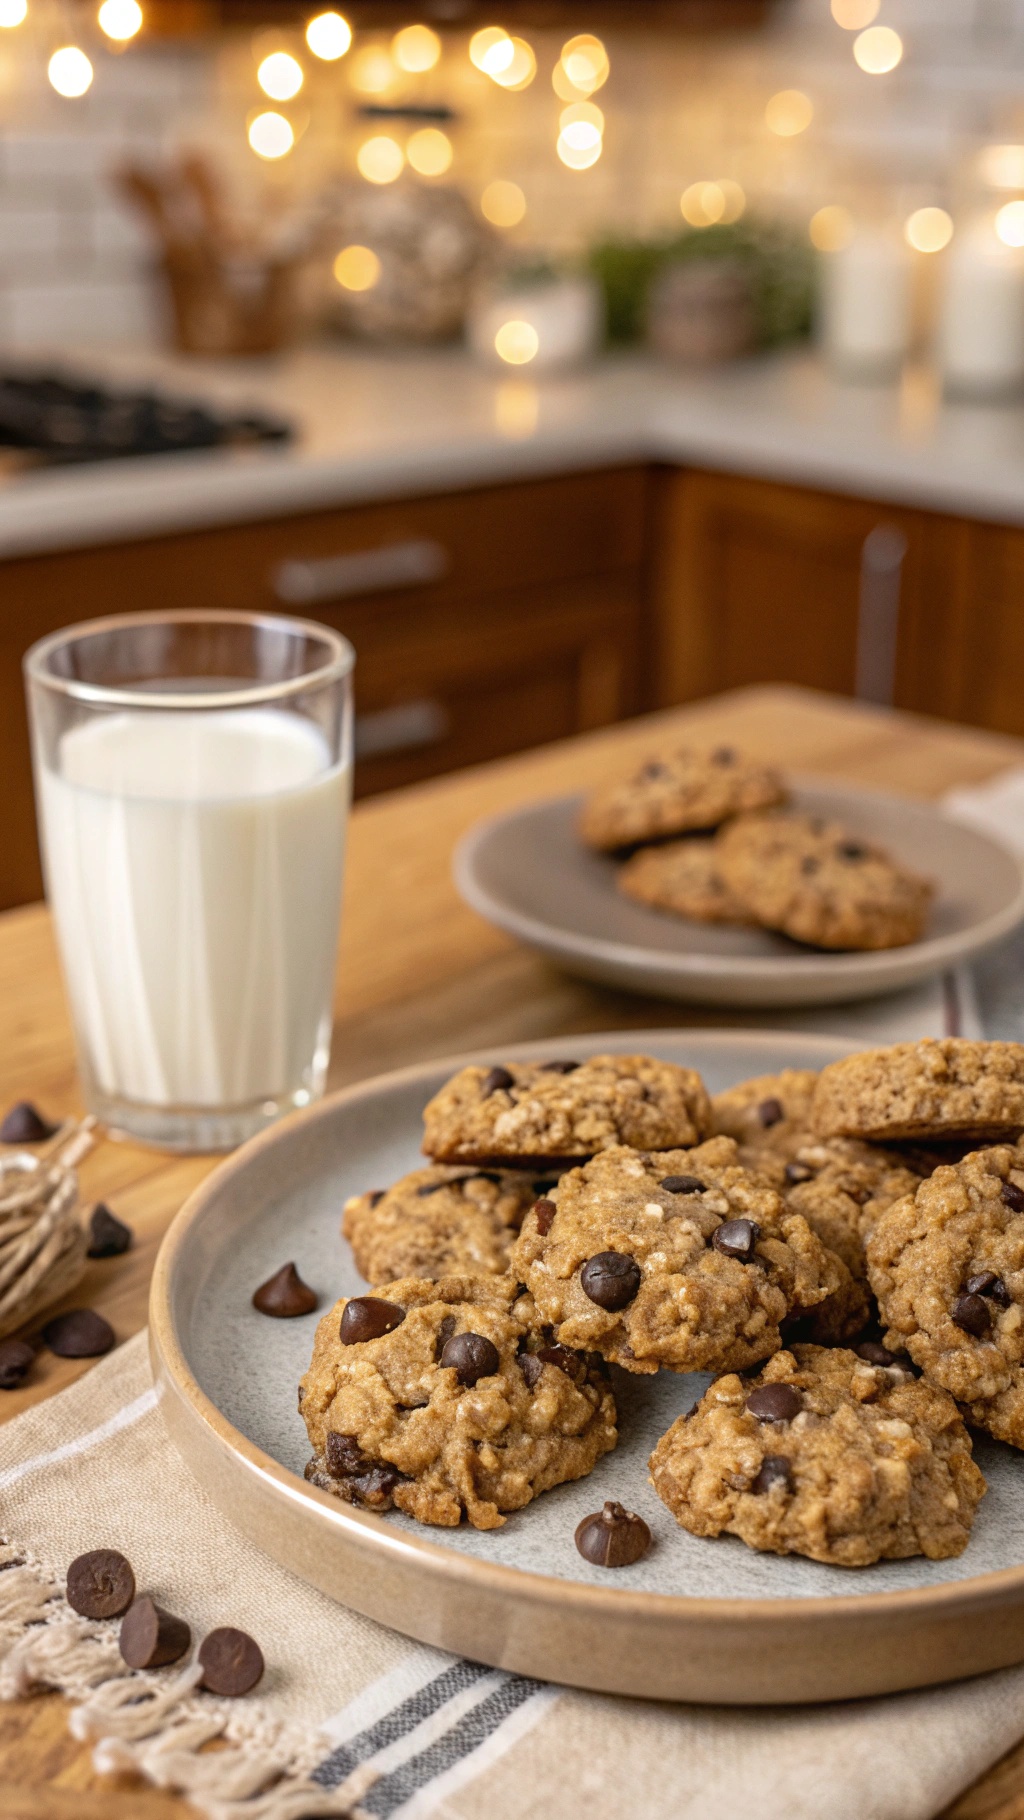
No-bake oatmeal cookies are a fantastic treat that combines nutrition and flavor. They are easy to make and perfect for satisfying your sweet tooth without turning on the oven. The image shows a delightful plate of these cookies, with a glass of milk nearby, making it an inviting snack option.
These cookies are packed with wholesome ingredients like oats, nut butter, and chocolate chips. They are great for a quick breakfast or a midday snack. Plus, you can customize them with your favorite add-ins like nuts or dried fruit.
Making these cookies is simple and requires no baking. Just mix your ingredients, scoop them onto a plate, and let them set. They are perfect for kids and adults alike!
Ingredients
- 2 cups rolled oats
- 1/2 cup natural peanut butter or almond butter
- 1/3 cup honey or maple syrup
- 1/4 cup unsweetened cocoa powder
- 1/2 cup chocolate chips
- 1 teaspoon vanilla extract
- 1/4 teaspoon salt
Instructions
- In a large bowl, combine the oats, cocoa powder, and salt.
- In a separate bowl, mix the peanut butter, honey, and vanilla until smooth.
- Pour the wet mixture into the dry ingredients and stir until well combined.
- Fold in the chocolate chips.
- Using a spoon or cookie scoop, drop the mixture onto a lined baking sheet.
- Refrigerate for about 30 minutes to set.
- Enjoy your delicious no-bake oatmeal cookies!
Fruity No-Bake Nut Bars
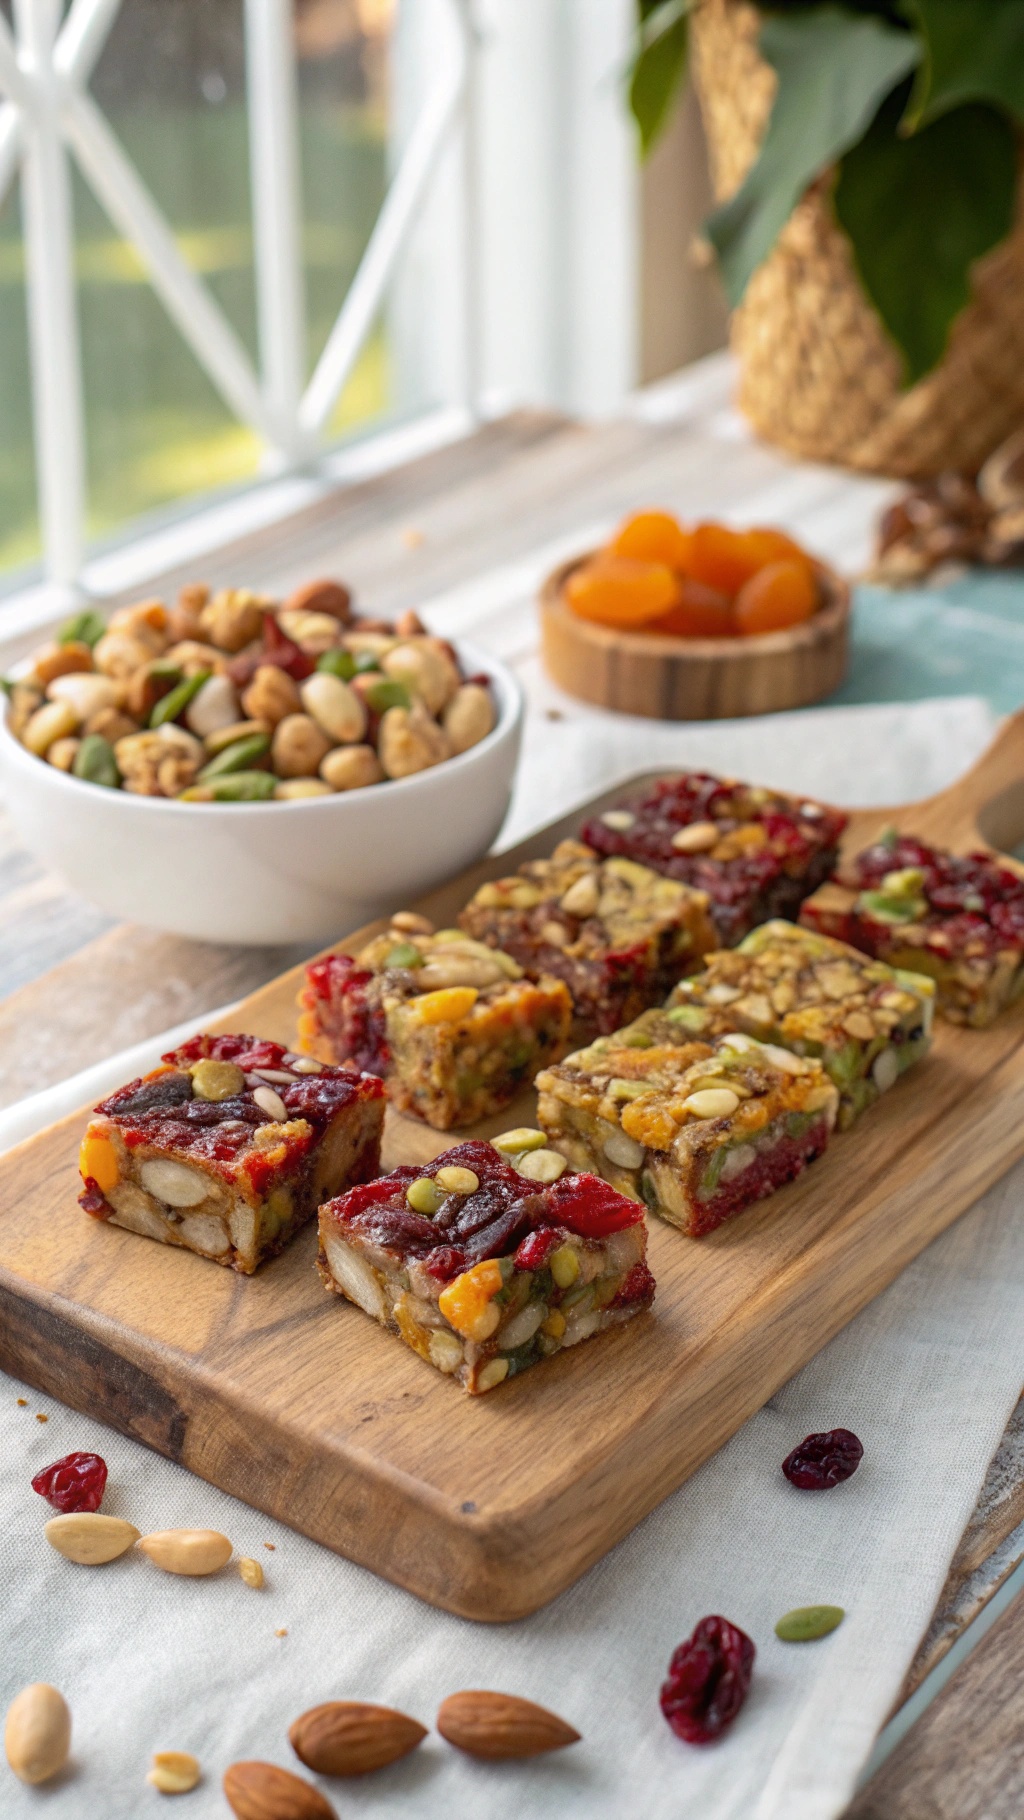
Fruity no-bake nut bars are a fantastic snack option that combines the goodness of nuts and dried fruits. These bars are not only easy to make but also packed with nutrients. You can see the vibrant colors of the dried fruits and the crunchiness of the nuts in the image. They look inviting and delicious!
These bars are perfect for a quick energy boost or a healthy dessert. The combination of nuts, seeds, and fruits provides a satisfying texture and a burst of flavor. Plus, they require no baking, making them a simple treat to whip up any time.
Here’s how you can make your own fruity no-bake nut bars:
Ingredients
- 1 cup mixed nuts (almonds, cashews, walnuts)
- 1 cup dried fruits (cranberries, apricots, raisins)
- 1/2 cup pumpkin seeds
- 1/4 cup honey or maple syrup
- 1/4 cup nut butter (peanut or almond)
- 1 teaspoon vanilla extract
- 1/2 teaspoon cinnamon (optional)
Instructions
- Prepare the Base: In a food processor, combine the mixed nuts and pulse until they are coarsely chopped.
- Add the Fruits: Add the dried fruits and pumpkin seeds to the processor. Pulse a few times until everything is mixed.
- Mix Wet Ingredients: In a small bowl, combine honey, nut butter, vanilla extract, and cinnamon. Stir until smooth.
- Combine: Pour the wet mixture into the food processor with the nut and fruit mix. Pulse until everything is well combined.
- Form the Bars: Line an 8x8 inch baking dish with parchment paper. Press the mixture firmly into the dish, spreading it evenly.
- Chill: Place the dish in the refrigerator for at least 2 hours to set. Once firm, cut into bars.
- Enjoy: Store the bars in an airtight container in the fridge for a quick snack anytime!
Tangy No-Bake Key Lime Pie
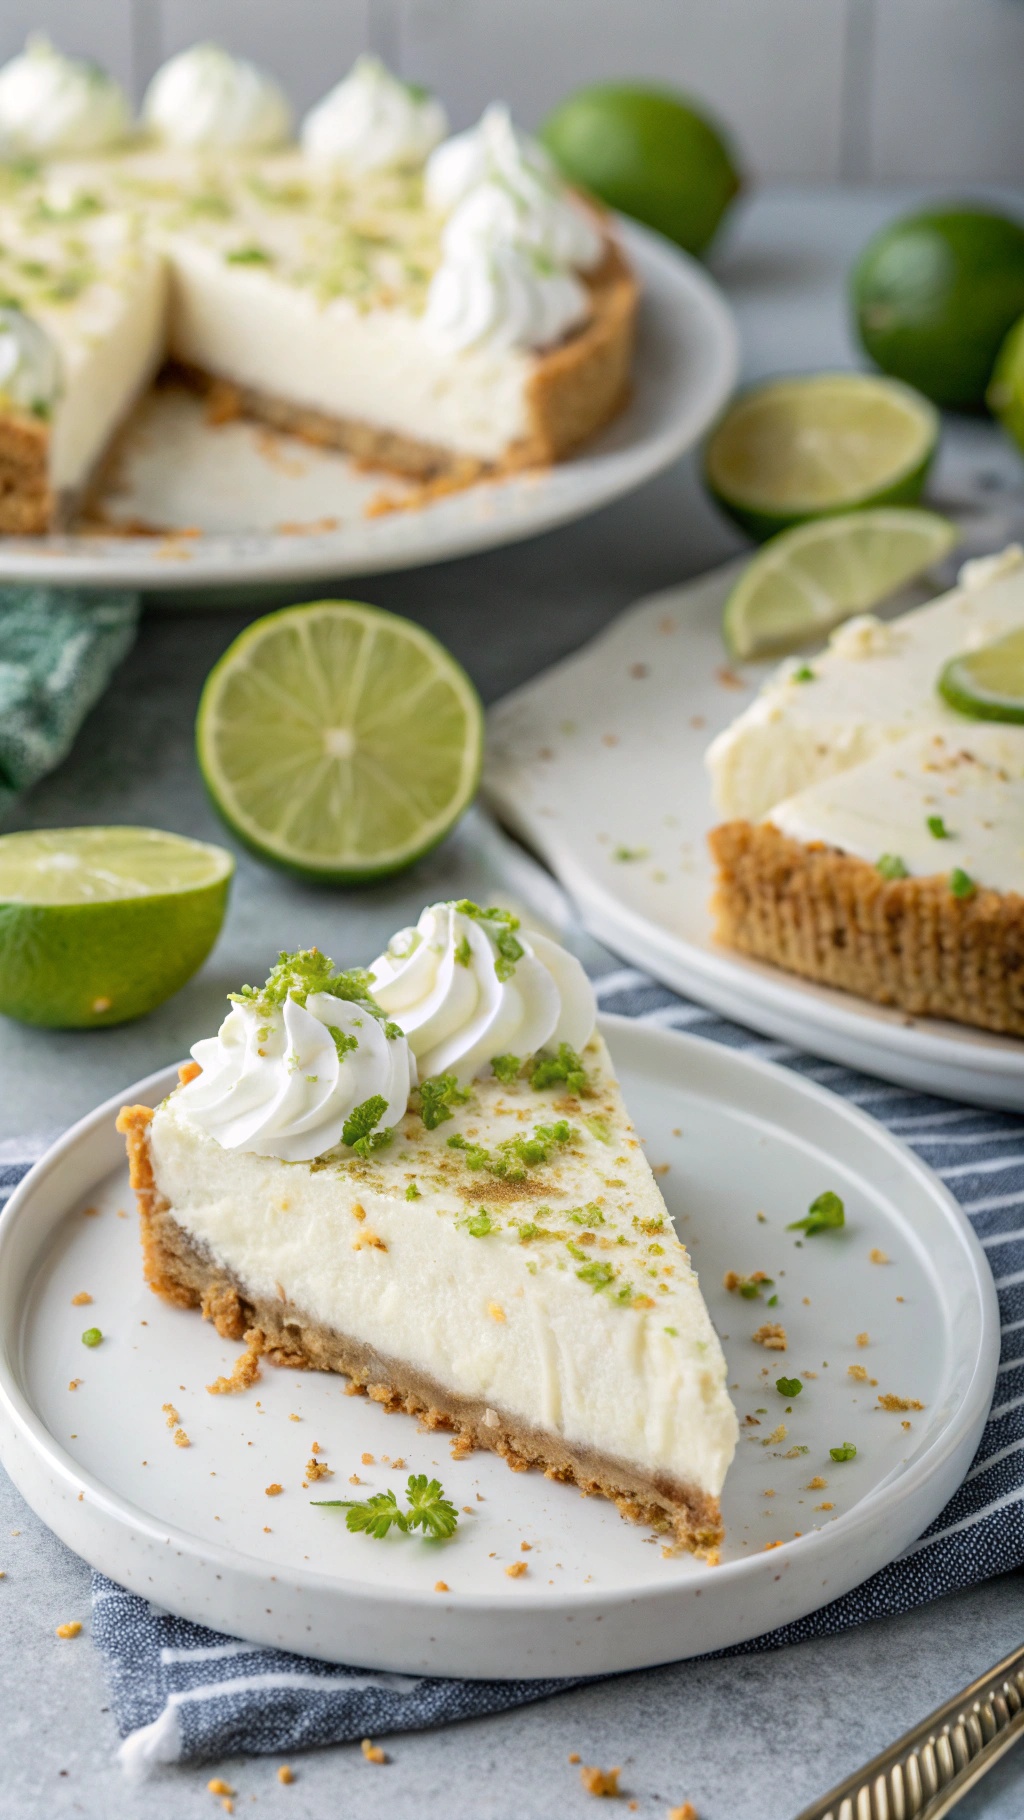
No-bake key lime pie is a refreshing treat that's perfect for any occasion. The creamy filling, combined with the tangy lime flavor, makes it a favorite among dessert lovers. The crust, made from crushed graham crackers, adds a delightful crunch that balances the smooth filling.
This pie is not only easy to make but also requires no baking, making it a great option for warm days when you want something sweet without heating up the kitchen. Top it with whipped cream and lime zest for a beautiful presentation that will impress your friends and family.
Here’s how to make your own tangy no-bake key lime pie:
Ingredients
- 1 ½ cups graham cracker crumbs
- ½ cup unsalted butter, melted
- 1 cup sweetened condensed milk
- ½ cup sour cream
- ¾ cup fresh lime juice
- 1 tablespoon lime zest
- 1 teaspoon vanilla extract
- Whipped cream for topping
- Lime slices for garnish
Instructions
- Prepare the Crust: In a bowl, mix graham cracker crumbs with melted butter until well combined. Press the mixture into the bottom of a pie dish to form a crust.
- Make the Filling: In another bowl, whisk together sweetened condensed milk, sour cream, lime juice, lime zest, and vanilla extract until smooth.
- Combine: Pour the filling into the prepared crust, spreading it evenly.
- Chill: Cover the pie and refrigerate for at least 4 hours, or until set.
- Serve: Top with whipped cream and garnish with lime slices before serving.
Elegant No-Bake Chocolate Tart
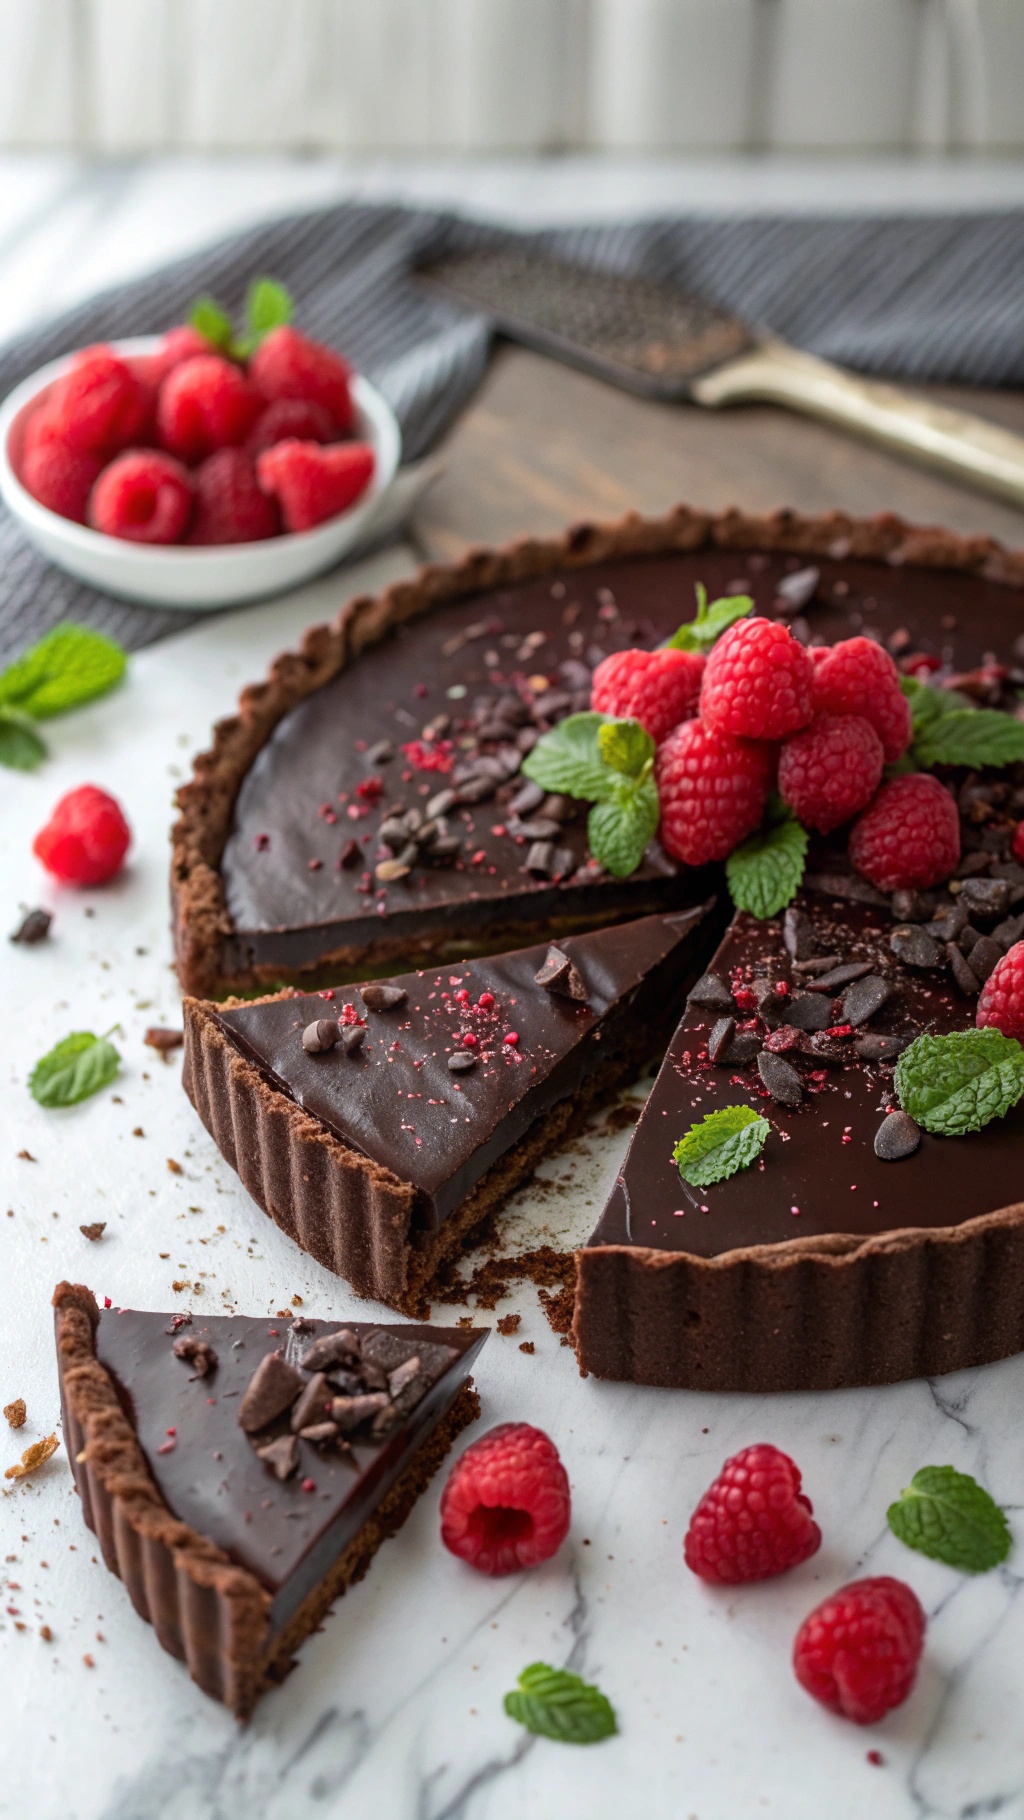
This no-bake chocolate tart is a showstopper! With its rich, glossy chocolate filling and a crumbly crust, it’s perfect for any occasion. The tart is topped with fresh raspberries and mint leaves, adding a pop of color and a refreshing touch. The combination of chocolate and berries makes it a delightful treat.
Making this tart is simple and requires no baking, which means you can whip it up quickly. The crust is made from crushed cookies mixed with melted butter, creating a delicious base. The filling is a blend of chocolate, cream, and a hint of vanilla, making it smooth and indulgent.
Serve this tart chilled for the best experience. It’s a great dessert for gatherings or a special treat for yourself. Enjoy every bite!
Ingredients
- 1 ½ cups chocolate cookies, crushed
- ½ cup unsalted butter, melted
- 1 cup heavy cream
- 8 oz dark chocolate, chopped
- 1 teaspoon vanilla extract
- Fresh raspberries, for topping
- Mint leaves, for garnish
Instructions
- Prepare the Crust: In a bowl, mix the crushed cookies with melted butter until well combined. Press the mixture into the bottom and sides of a tart pan. Chill in the refrigerator for about 15 minutes.
- Make the Filling: In a saucepan, heat the heavy cream over medium heat until it starts to simmer. Remove from heat and add the chopped chocolate. Stir until smooth and fully melted. Add the vanilla extract and mix well.
- Assemble the Tart: Pour the chocolate filling into the chilled crust. Spread it evenly and smooth the top. Refrigerate for at least 2 hours until set.
- Serve: Once set, remove the tart from the pan. Top with fresh raspberries and mint leaves before slicing and serving.


Comments
Post a Comment