13 Delicious Low-Sugar Baking Ideas for Sweet-Loving Families
13 Delicious Low-Sugar Baking Ideas for Sweet-Loving Families
Looking to satisfy your family's sweet tooth without all the sugar? This guide is packed with low-sugar baking ideas that are fun and easy to make together. From cookies to cakes, you'll find delicious recipes that keep the taste while cutting down on sugar. Let's get baking!
Deliciously Sweet Yet Low In Sugar: Classic Peach Cobbler
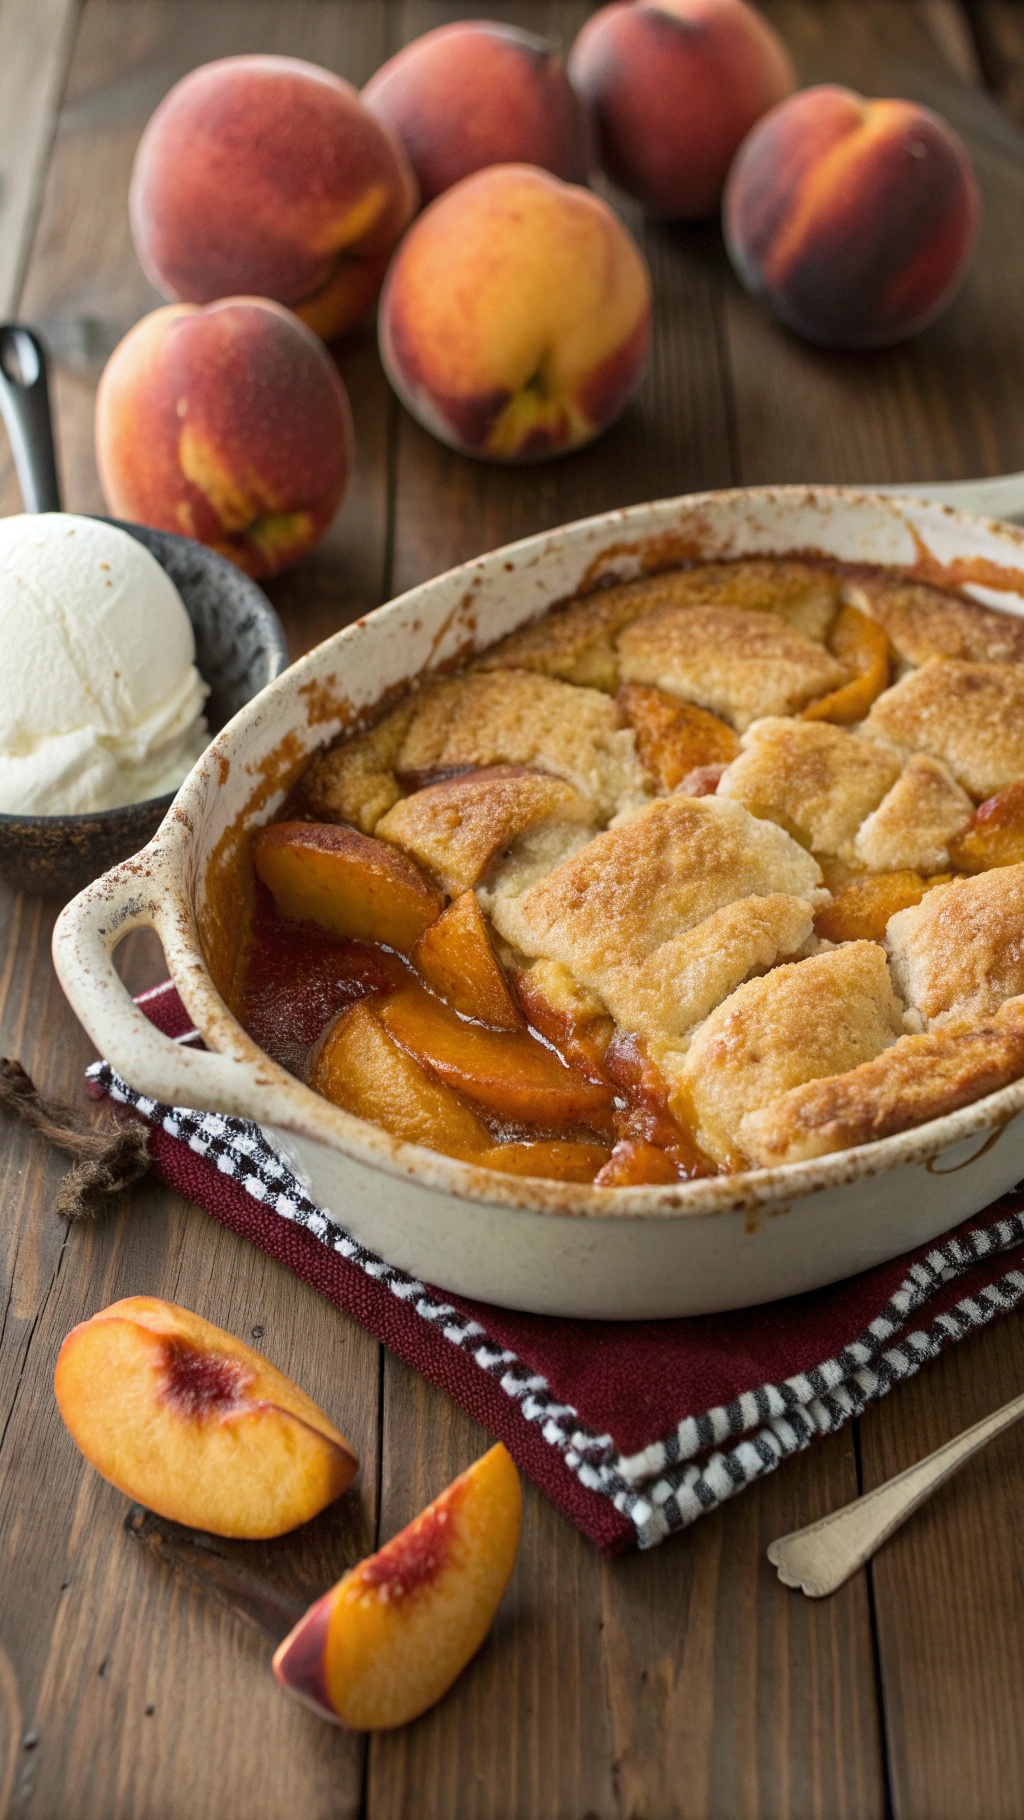
Peach cobbler is a timeless dessert that brings warmth and comfort to any table. This version is low in sugar, making it a great choice for families who love sweets without the extra guilt. The image showcases a beautifully baked peach cobbler, with golden-brown crust and juicy peach slices peeking through. It’s served warm, with a scoop of vanilla ice cream on the side, perfect for those sunny afternoons.
The cobbler's crust is soft and slightly crispy, while the peaches are tender and bursting with flavor. Using fresh peaches adds a natural sweetness, reducing the need for added sugar. This dessert is not just a treat; it’s a delightful way to enjoy seasonal fruits.
Making peach cobbler is simple and fun, especially with kids. They can help slice the peaches and mix the batter. It’s a wonderful family activity that results in a delicious reward. Serve it at gatherings or enjoy it as a cozy dessert after dinner. Everyone will love this sweet yet healthier option!
Ingredients
- 4 cups fresh peaches, sliced
- 1/4 cup honey or maple syrup
- 1 tablespoon lemon juice
- 1 cup all-purpose flour
- 1 teaspoon baking powder
- 1/2 teaspoon salt
- 1/4 cup unsalted butter, melted
- 1/2 cup milk
- 1 teaspoon vanilla extract
Instructions
- Preheat the oven to 350°F (175°C).
- In a bowl, combine sliced peaches, honey (or maple syrup), and lemon juice. Pour this mixture into a greased baking dish.
- In another bowl, mix flour, baking powder, and salt. Stir in melted butter, milk, and vanilla extract until just combined.
- Pour the batter over the peaches, spreading it evenly.
- Bake for 30-35 minutes, or until the top is golden brown and a toothpick comes out clean.
- Let it cool slightly before serving. Enjoy warm with a scoop of ice cream!
A Guilt-Free Delight: Easy Low-Sugar Banana Bread
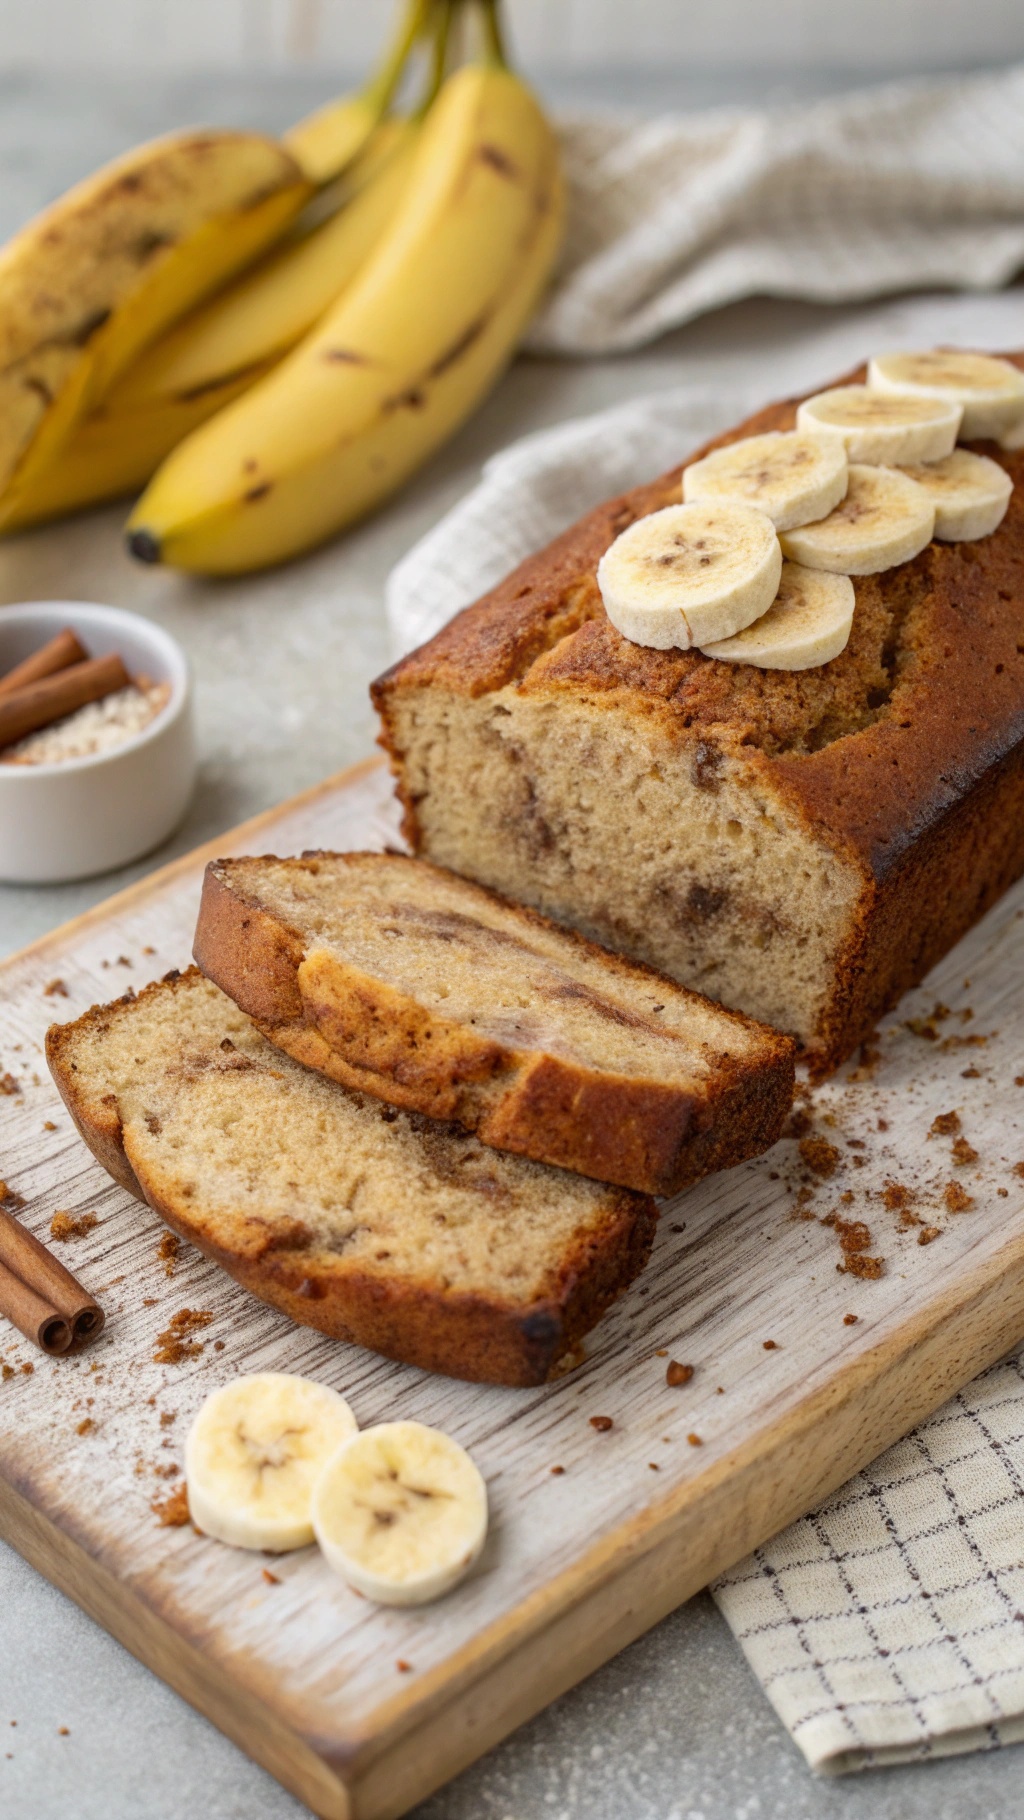
Banana bread is a classic favorite, and making it low-sugar means everyone can enjoy it without the guilt. This easy recipe is perfect for families who love sweets but want to keep things healthier. Imagine a warm loaf, sliced and ready to share, with the sweet aroma of bananas filling your kitchen.
The image shows a beautifully baked banana bread topped with fresh banana slices. The golden crust looks inviting, and the soft, moist interior is just waiting to be enjoyed. With a sprinkle of cinnamon and a hint of sweetness, this banana bread is sure to become a family favorite.
Using ripe bananas not only adds natural sweetness but also keeps the bread moist. This recipe is simple enough for kids to help with, making it a fun family activity. Plus, it’s a great way to use up those overripe bananas sitting on your counter!
Ingredients
- 3 ripe bananas, mashed
- 1/3 cup unsweetened applesauce
- 1/4 cup honey or maple syrup
- 1 teaspoon vanilla extract
- 1 teaspoon baking soda
- 1/2 teaspoon salt
- 1 teaspoon ground cinnamon
- 1 1/2 cups whole wheat flour
- 1/2 cup chopped nuts (optional)
Instructions
- Preheat your oven to 350°F (175°C) and grease a loaf pan.
- In a large bowl, mix the mashed bananas, applesauce, honey, and vanilla until well combined.
- Add the baking soda, salt, and cinnamon, stirring to combine.
- Gradually add the whole wheat flour, mixing until just incorporated. If you’re using nuts, fold them in at this stage.
- Pour the batter into the prepared loaf pan and smooth the top.
- Bake for 50-60 minutes, or until a toothpick inserted into the center comes out clean.
- Let the bread cool in the pan for about 10 minutes, then transfer it to a wire rack to cool completely.
Indulge Without The Sugar: Rich Chocolate Avocado Brownies
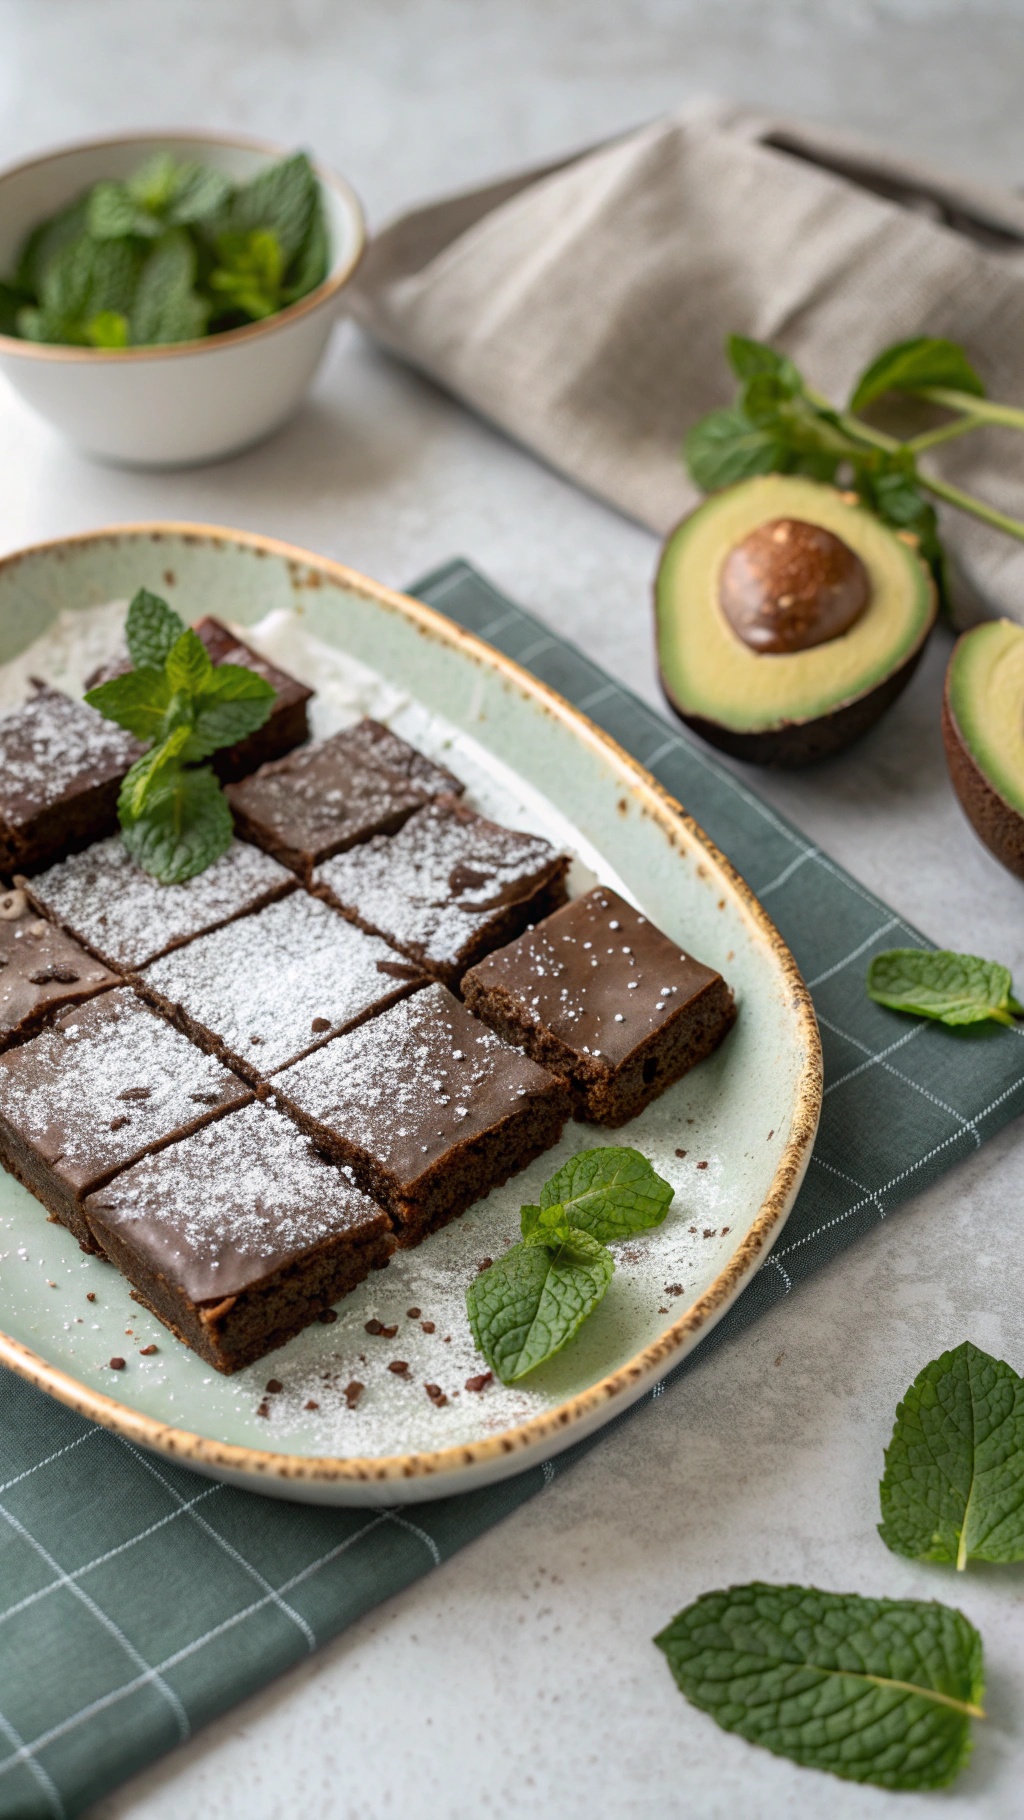
These rich chocolate avocado brownies are a delightful treat for families who love sweets but want to cut back on sugar. The image showcases a beautifully arranged plate of brownies, dusted with powdered sugar and garnished with fresh mint leaves. The deep, dark color of the brownies hints at the rich chocolate flavor, while the avocado adds a creamy texture that keeps them moist.
Using avocado in baking might sound unusual, but it’s a fantastic way to replace butter and reduce sugar. The healthy fats from the avocado make these brownies not only delicious but also a bit healthier. Plus, they’re easy to make and perfect for sharing with family and friends.
Let’s get into the recipe so you can whip up a batch of these tasty brownies!
Ingredients
- 1 ripe avocado
- 1/2 cup unsweetened cocoa powder
- 1/2 cup almond flour
- 1/4 cup honey or maple syrup
- 1/4 cup unsweetened applesauce
- 2 large eggs
- 1 teaspoon vanilla extract
- 1/2 teaspoon baking soda
- 1/4 teaspoon salt
- 1/4 cup dark chocolate chips (optional)
Instructions
- Preheat the oven to 350°F (175°C). Grease an 8x8 inch baking dish or line it with parchment paper.
- In a mixing bowl, mash the ripe avocado until smooth. Add the cocoa powder, almond flour, honey or maple syrup, applesauce, eggs, vanilla extract, baking soda, and salt. Mix until well combined.
- If using, fold in the dark chocolate chips for an extra chocolatey flavor.
- Pour the batter into the prepared baking dish and spread it evenly.
- Bake for 20-25 minutes, or until a toothpick inserted into the center comes out clean.
- Let the brownies cool in the pan before cutting them into squares. Serve with a sprinkle of powdered sugar and fresh mint leaves for a lovely presentation.
Sweet And Tangy: Low-Sugar Lemon Bars
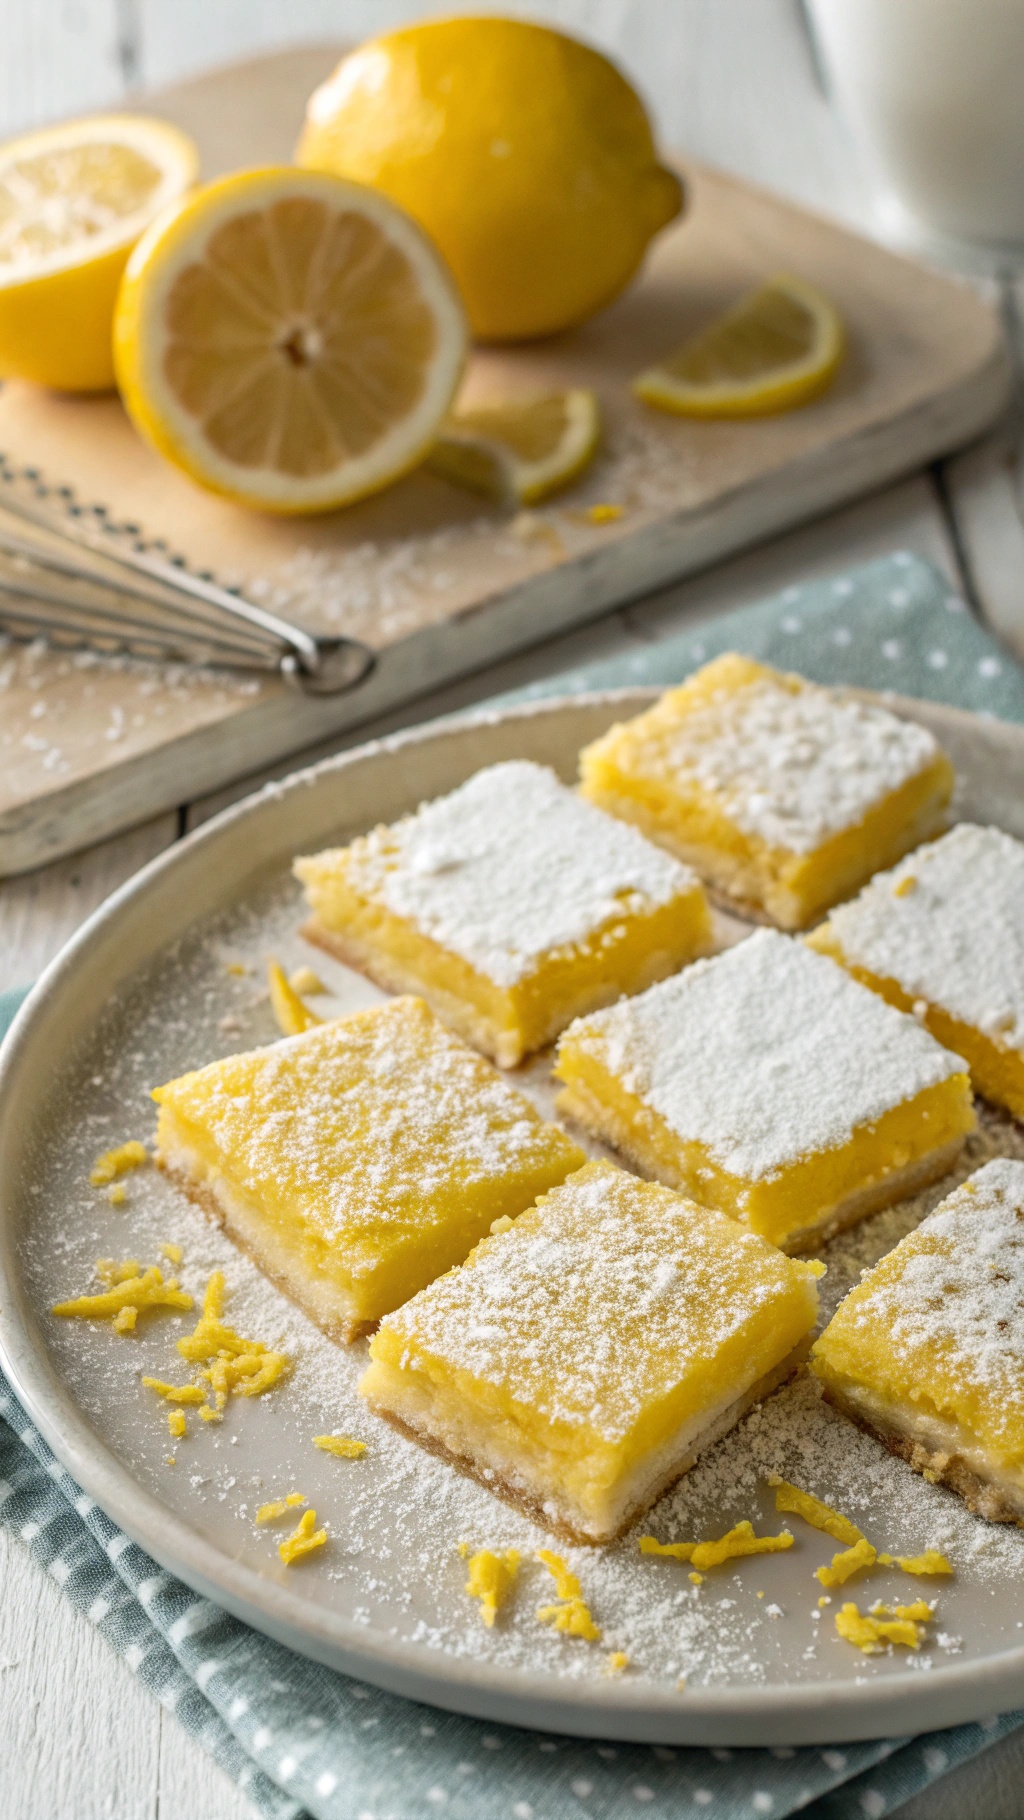
Lemon bars are a classic treat, loved for their bright flavor and refreshing taste. These low-sugar lemon bars are perfect for families who enjoy sweets without the guilt. The image showcases beautifully cut squares of lemon bars, dusted with powdered sugar, sitting on a plate. The vibrant yellow color of the lemon filling is inviting, while the crust looks perfectly baked. Fresh lemons and lemon slices in the background hint at the zesty flavor that awaits.
Making these bars is simple and fun. The combination of sweet and tangy flavors creates a delightful dessert that everyone will enjoy. Plus, using less sugar means you can indulge without worrying too much about your sugar intake. Gather your family in the kitchen and get ready to whip up these tasty treats!
Ingredients
- 1 cup all-purpose flour
- 1/4 cup unsalted butter, softened
- 1/4 cup powdered sugar
- 1/2 cup fresh lemon juice
- 1 tablespoon lemon zest
- 2 large eggs
- 1/4 cup honey or maple syrup
- 1/2 teaspoon baking powder
- Pinch of salt
Instructions
- Preheat your oven to 350°F (175°C). Grease an 8x8 inch baking dish.
- In a bowl, mix flour, butter, and powdered sugar until crumbly. Press the mixture into the bottom of the prepared dish to form the crust.
- Bake the crust for about 15 minutes, or until lightly golden.
- While the crust is baking, whisk together lemon juice, lemon zest, eggs, honey (or maple syrup), baking powder, and salt in a separate bowl.
- Pour the lemon mixture over the baked crust and return to the oven.
- Bake for an additional 20-25 minutes, or until the filling is set.
- Let the bars cool completely before slicing. Dust with powdered sugar before serving.
Cocoa Bliss: Healthy Low-Sugar Chocolate Chip Cookies
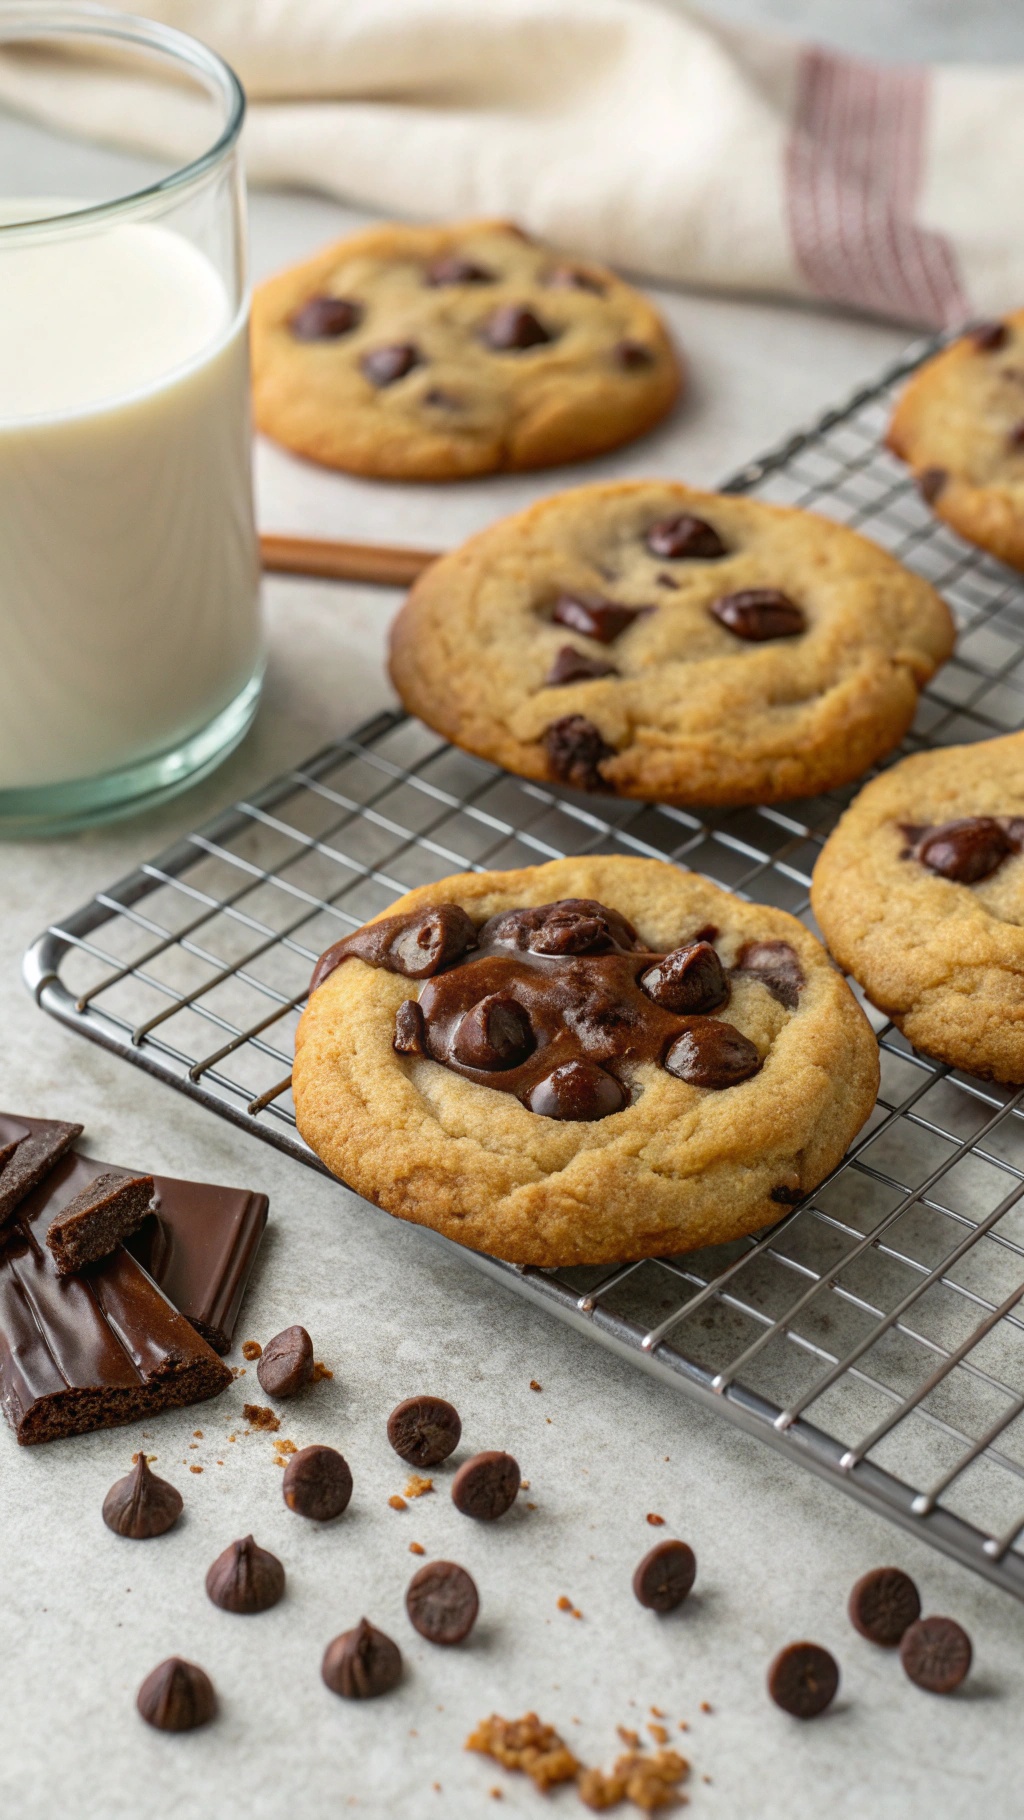
These low-sugar chocolate chip cookies are a delightful treat for families who love sweets but want to keep things healthier. The image shows warm, gooey cookies fresh from the oven, with melted chocolate chips glistening on top. A glass of milk sits nearby, ready to complement the cookies perfectly.
Making these cookies is simple and fun, especially with kids. You can enjoy the process of mixing ingredients and watching them bake. The smell that fills the kitchen is irresistible!
These cookies use less sugar than traditional recipes, making them a guilt-free indulgence. They are soft, chewy, and packed with chocolate flavor, ensuring that everyone will love them.
Ingredients
- 1 cup almond flour
- 1/2 cup coconut flour
- 1/4 cup coconut oil, melted
- 1/4 cup honey or maple syrup
- 1 large egg
- 1 teaspoon vanilla extract
- 1/2 teaspoon baking soda
- 1/4 teaspoon salt
- 1/2 cup dark chocolate chips
Instructions
- Preheat your oven to 350°F (175°C) and line a baking sheet with parchment paper.
- In a mixing bowl, combine almond flour, coconut flour, baking soda, and salt.
- In another bowl, whisk together melted coconut oil, honey (or maple syrup), egg, and vanilla extract until smooth.
- Gradually add the dry ingredients to the wet ingredients, mixing until well combined. Fold in the dark chocolate chips.
- Drop spoonfuls of dough onto the prepared baking sheet, spacing them about 2 inches apart.
- Bake for 10-12 minutes or until the edges are golden brown. Let them cool on the baking sheet for a few minutes before transferring to a wire rack.
Fruity And Flavorful: Low-Sugar Strawberry Shortcake
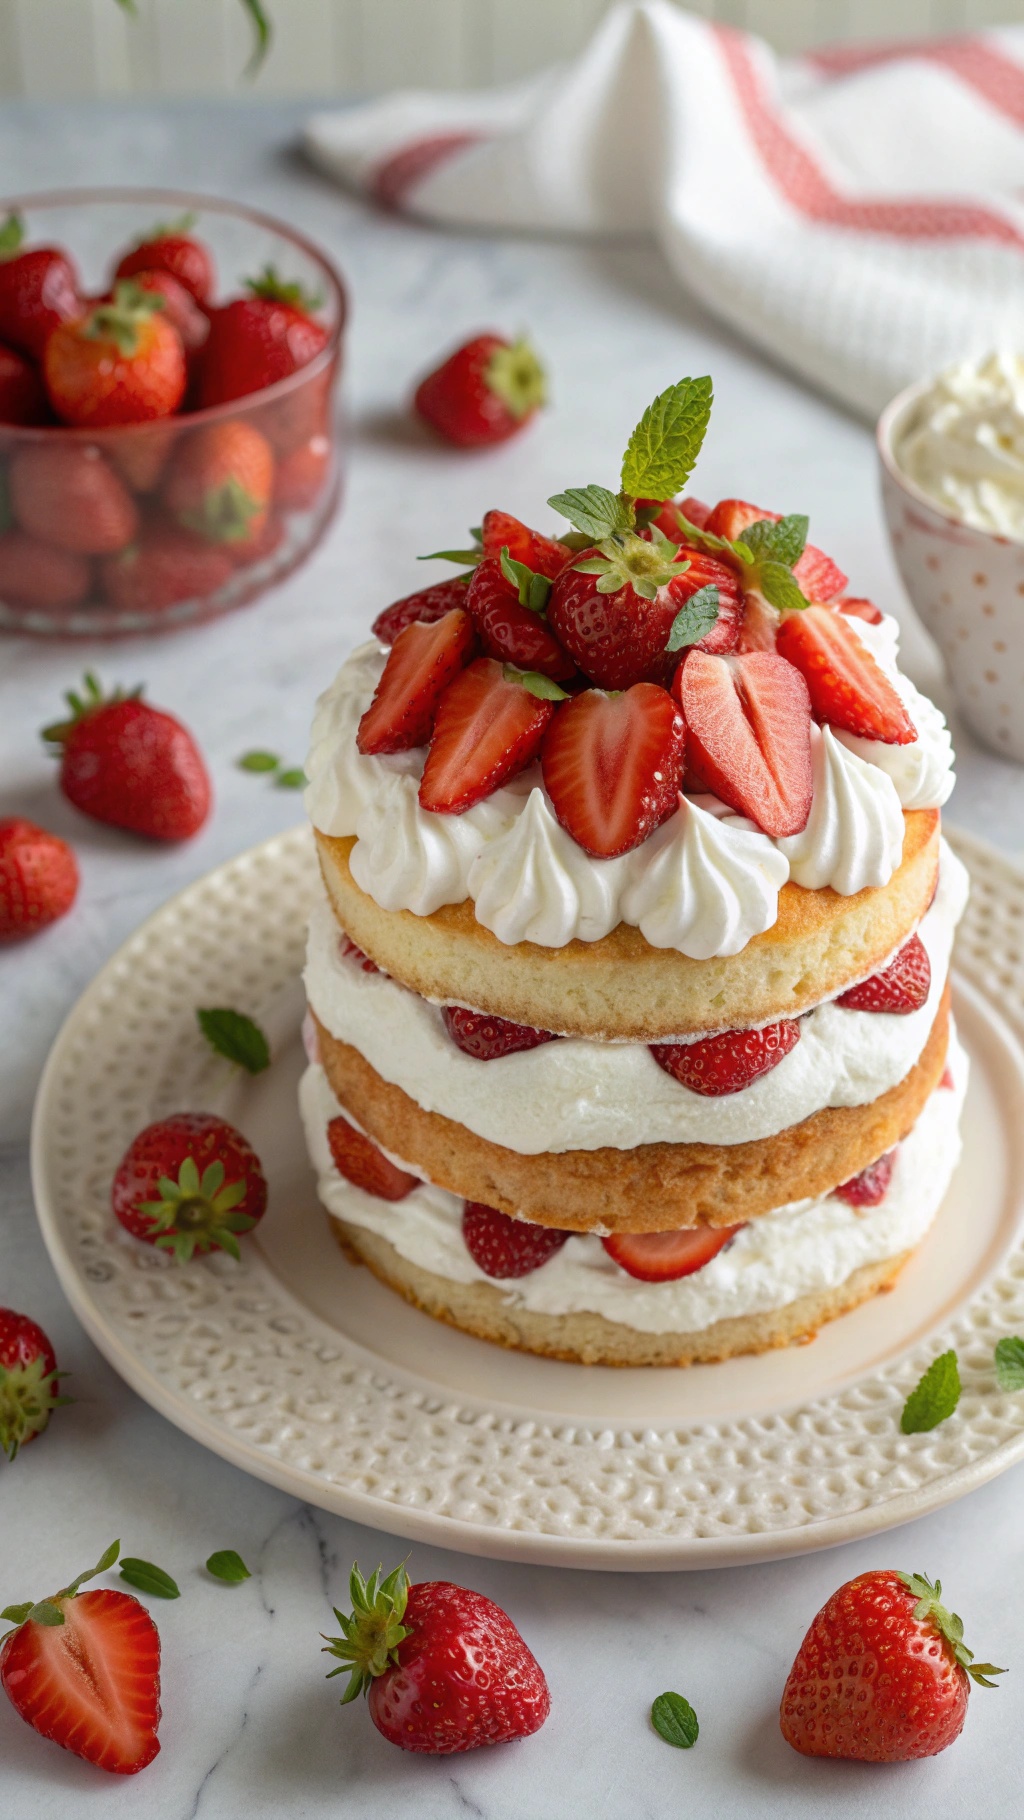
Strawberry shortcake is a classic dessert that brings joy to many families. This low-sugar version keeps the sweetness while being kinder to your health. The image shows a beautifully layered cake topped with fresh strawberries and whipped cream. It’s not just a treat for the taste buds; it’s a feast for the eyes too!
Using fresh strawberries adds a burst of flavor and natural sweetness. The light whipped cream complements the cake perfectly, making it a delightful dessert for any occasion. This recipe is simple enough for kids to help with, making it a fun family activity.
Let’s get started on making this delicious low-sugar strawberry shortcake!
Ingredients
- 2 cups fresh strawberries, sliced
- 1 cup all-purpose flour
- 1/4 cup granulated sugar substitute (like stevia or erythritol)
- 1 teaspoon baking powder
- 1/2 teaspoon salt
- 1/2 cup unsalted butter, softened
- 2 large eggs
- 1 teaspoon vanilla extract
- 1 cup heavy whipping cream
- 1 tablespoon powdered sugar substitute
- Fresh mint leaves for garnish (optional)
Instructions
- Preheat the oven to 350°F (175°C). Grease and flour a round cake pan.
- In a bowl, mix flour, sugar substitute, baking powder, and salt. In another bowl, beat the butter until creamy, then add eggs and vanilla. Gradually mix in the dry ingredients until combined.
- Pour the batter into the prepared pan and bake for 25-30 minutes, or until a toothpick comes out clean. Let it cool completely.
- While the cake cools, whip the heavy cream with the powdered sugar substitute until soft peaks form.
- Once the cake is cool, slice it in half horizontally. Spread a layer of whipped cream and top with half of the sliced strawberries. Place the top layer back on and repeat with more whipped cream and strawberries.
- Garnish with mint leaves if desired. Slice and serve!
Chewy And Delicious: Low-Sugar Oatmeal Raisin Cookies
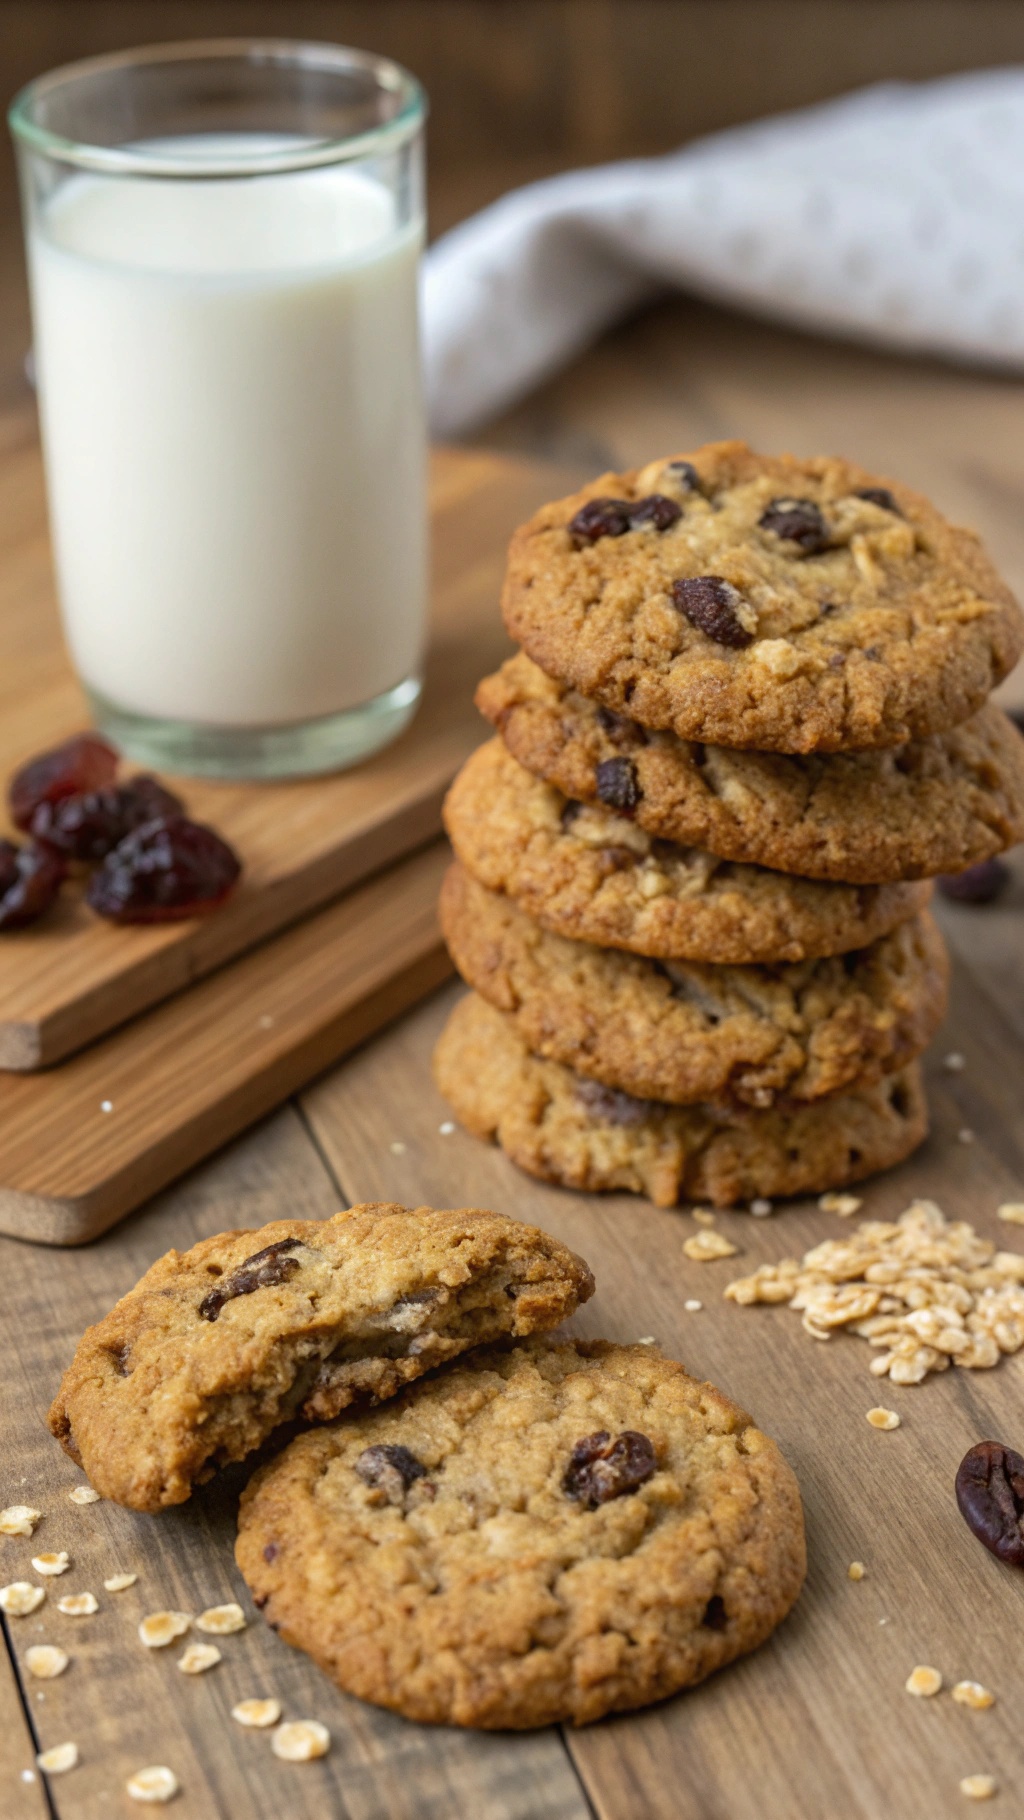
Oatmeal raisin cookies are a classic treat that many families love. These low-sugar versions keep the chewy texture and delicious flavor while being kinder to your sugar intake. Imagine biting into a warm cookie, with the comforting taste of oats and sweet raisins. Perfect for an afternoon snack or a cozy dessert, these cookies are sure to please everyone.
In the image, you can see a stack of golden-brown oatmeal raisin cookies, with a few broken pieces revealing their soft, chewy interior. A glass of milk sits nearby, making it a perfect pairing. This simple setup shows how delightful and inviting homemade cookies can be.
Making these cookies is easy and fun. You can even involve the kids in the process, making it a family activity. The ingredients are straightforward, and the steps are simple enough for little hands to help out. Plus, the smell of cookies baking will fill your home with warmth.
Now, let’s get to the recipe so you can enjoy these tasty treats!
Ingredients
- 1 cup rolled oats
- 1/2 cup whole wheat flour
- 1/4 cup coconut oil, melted
- 1/4 cup honey or maple syrup
- 1/2 teaspoon baking soda
- 1/2 teaspoon cinnamon
- 1/4 teaspoon salt
- 1/2 cup raisins
- 1/4 cup chopped nuts (optional)
Instructions
- Preheat your oven to 350°F (175°C) and line a baking sheet with parchment paper.
- In a large bowl, mix together the rolled oats, whole wheat flour, baking soda, cinnamon, and salt.
- In another bowl, combine the melted coconut oil and honey (or maple syrup) until well blended.
- Pour the wet ingredients into the dry ingredients and mix until combined. Fold in the raisins and nuts if using.
- Drop spoonfuls of the dough onto the prepared baking sheet, spacing them about 2 inches apart.
- Bake for 10-12 minutes, or until the edges are golden brown. Let them cool on the baking sheet for a few minutes before transferring to a wire rack to cool completely.
Elegant And Decadent: Low-Sugar Chocolate Mousse
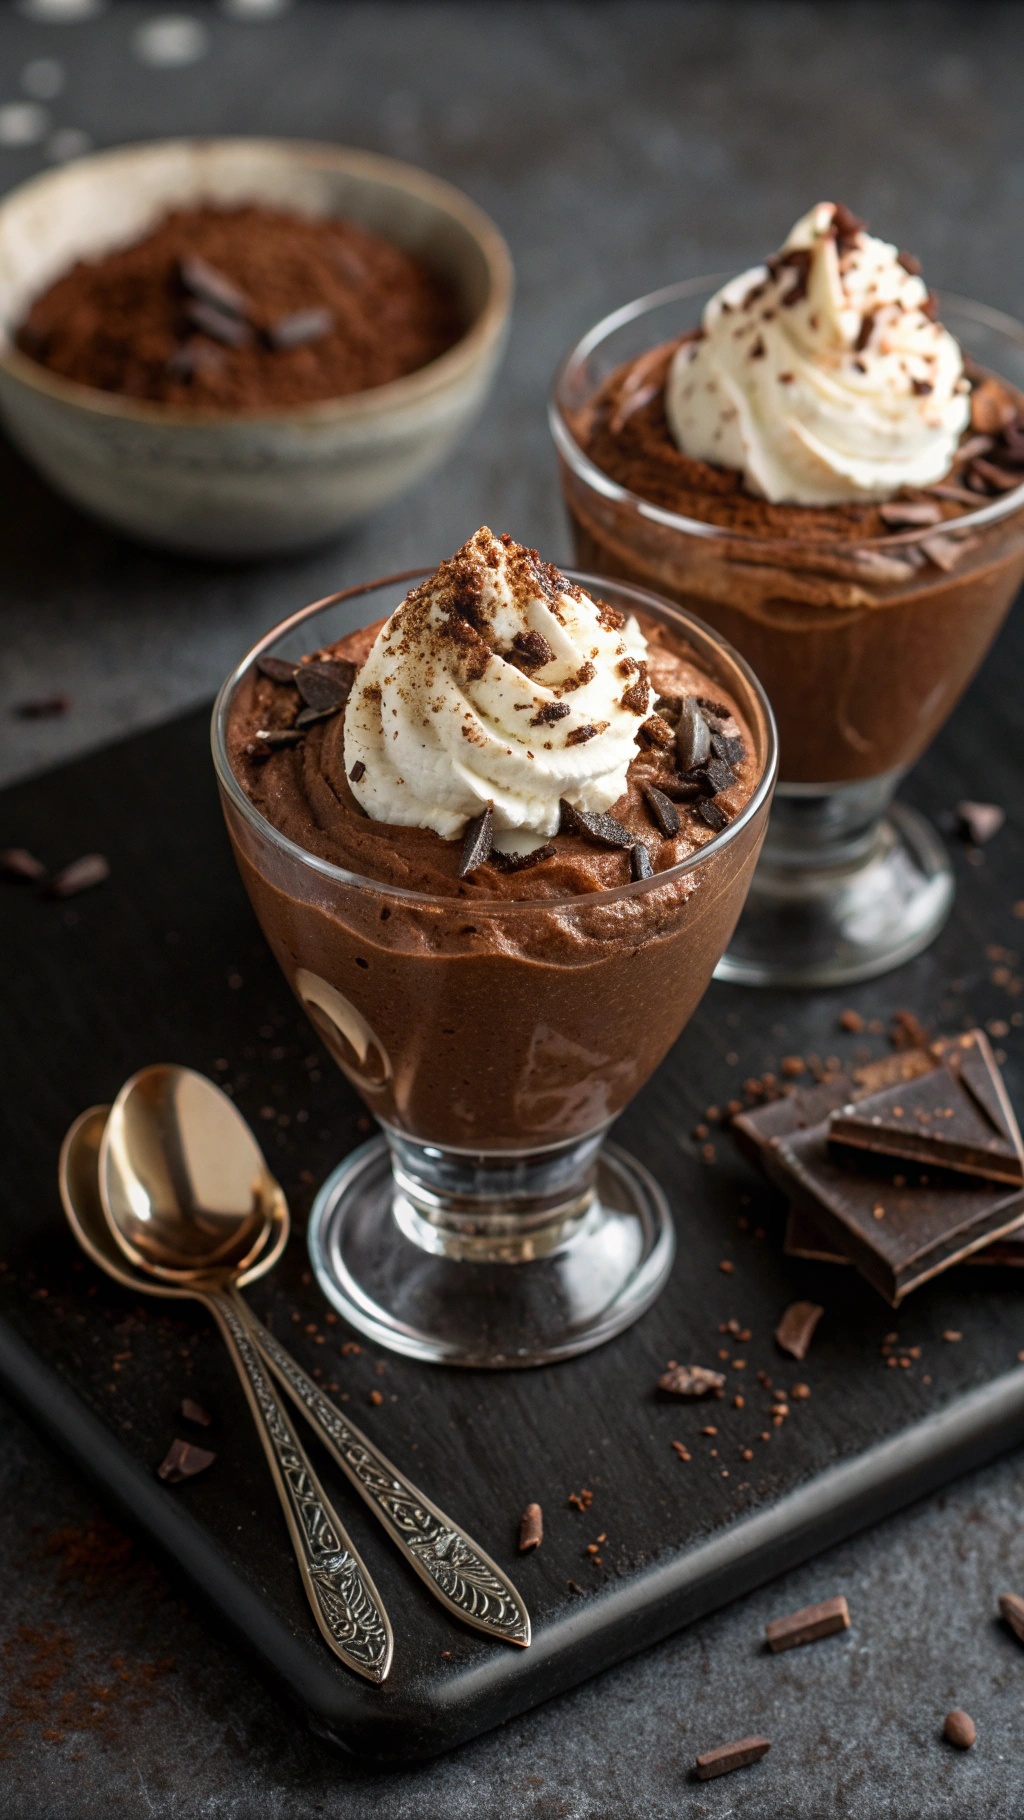
Chocolate mousse is a classic dessert that feels fancy yet is surprisingly easy to make. This low-sugar version allows families to enjoy a rich treat without the guilt. The image shows two beautifully presented servings of chocolate mousse, topped with whipped cream and chocolate shavings. The dark, creamy texture looks inviting, making it hard to resist!
Using high-quality dark chocolate and a few simple ingredients, this mousse is both satisfying and healthier. Families can enjoy this dessert after dinner or as a special treat during the week. Plus, it’s a great way to introduce kids to the joy of cooking and baking.
Let’s get into the ingredients and steps to whip up this delightful low-sugar chocolate mousse!
Ingredients
- 1 cup heavy cream
- 4 ounces dark chocolate (70% cocoa or higher)
- 2 tablespoons unsweetened cocoa powder
- 2 tablespoons powdered erythritol or another low-sugar sweetener
- 1 teaspoon vanilla extract
- Pinch of salt
Instructions
- Melt the Chocolate: In a microwave-safe bowl, melt the dark chocolate in 30-second intervals, stirring in between until smooth. Let it cool slightly.
- Whip the Cream: In a separate bowl, whip the heavy cream until soft peaks form. Be careful not to overwhip.
- Combine Ingredients: Gently fold the melted chocolate into the whipped cream. Add the cocoa powder, erythritol, vanilla extract, and salt. Mix until just combined, being careful not to deflate the whipped cream.
- Chill: Spoon the mousse into serving dishes and refrigerate for at least 1 hour to set.
- Serve: Top with additional whipped cream and chocolate shavings before serving. Enjoy your low-sugar chocolate mousse!
Tropical Escape: Low-Sugar Coconut Macaroons
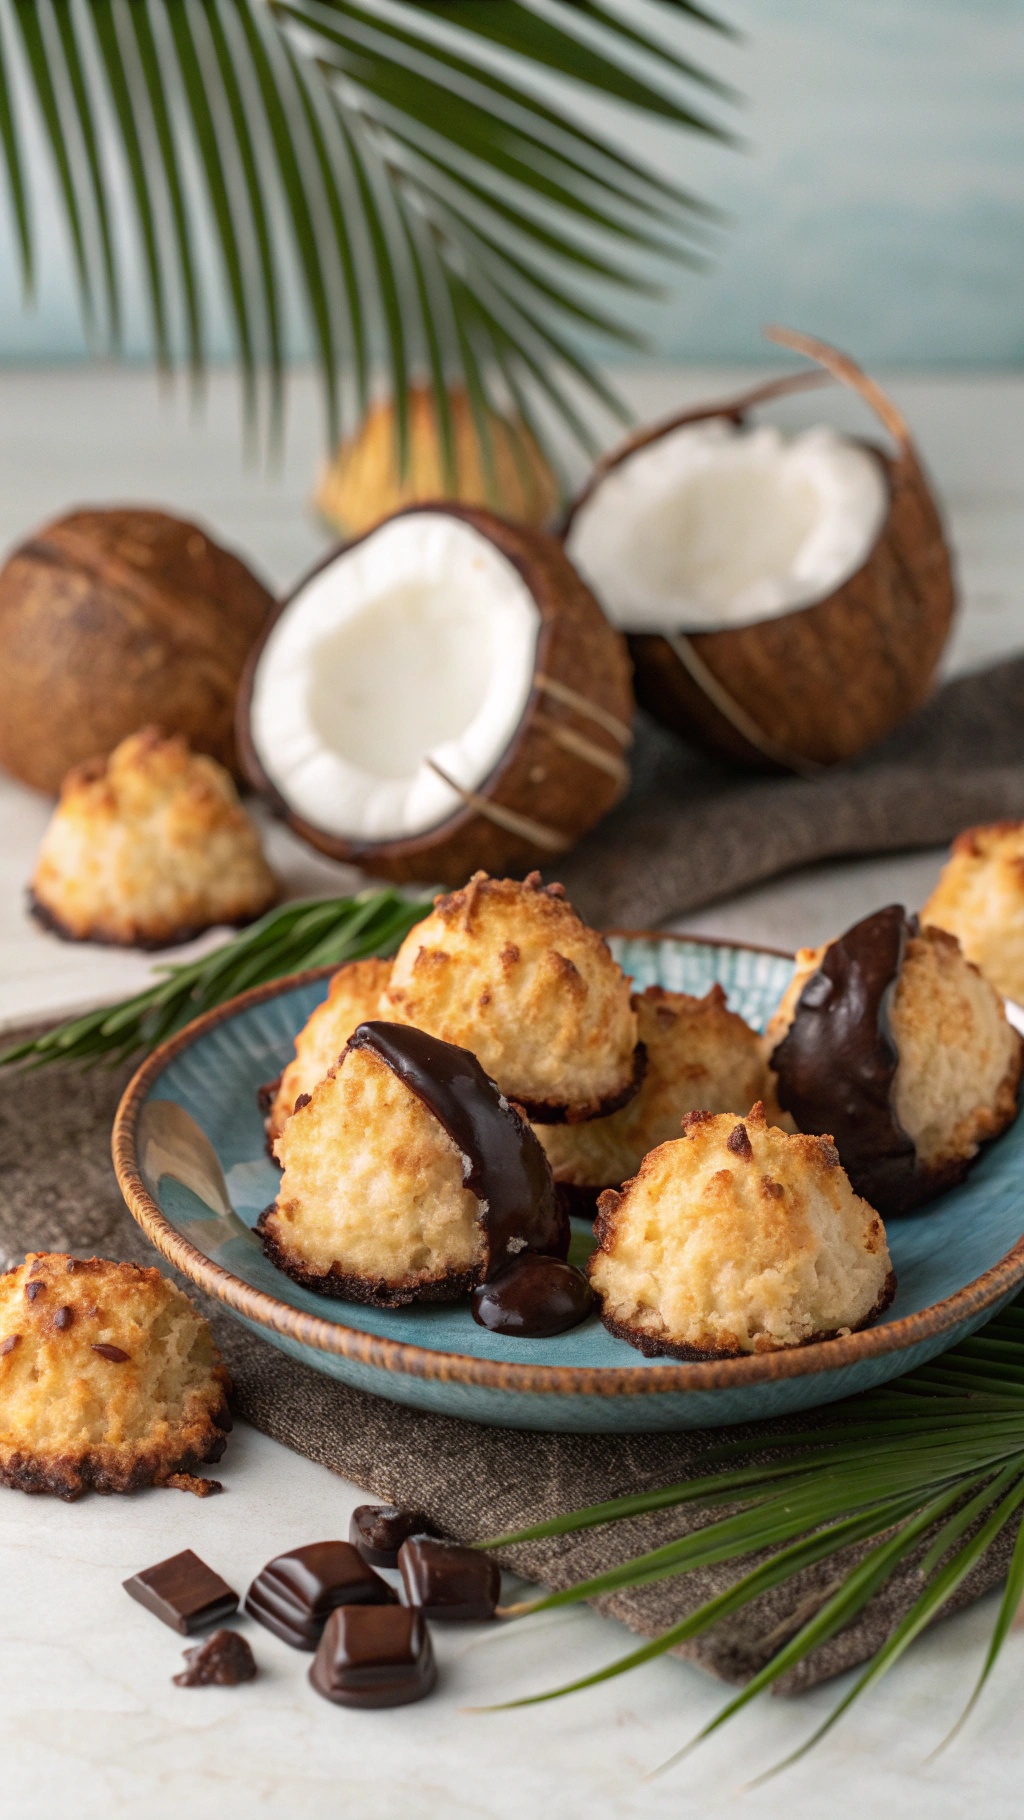
These low-sugar coconut macaroons are a delightful treat that brings a taste of the tropics right into your kitchen. With their golden-brown tops and chewy texture, they are perfect for families who love sweets but want to keep sugar in check. The addition of dark chocolate drizzle makes them even more tempting!
The image showcases a plate of these macaroons, beautifully arranged with a few pieces of dark chocolate nearby. The backdrop features fresh coconuts, hinting at the main ingredient. The vibrant green palm leaves add a tropical vibe, making this dessert feel like a mini vacation.
Making these macaroons is simple and fun. You can involve the kids in the process, from mixing the ingredients to shaping the cookies. They’ll love the hands-on experience and the tasty results!
Ingredients
- 2 1/2 cups unsweetened shredded coconut
- 1/4 cup almond flour
- 1/4 cup granulated erythritol or your favorite low-sugar sweetener
- 2 large egg whites
- 1 teaspoon vanilla extract
- 1/4 teaspoon salt
- 1/2 cup dark chocolate chips (optional, for drizzling)
Instructions
- Preheat your oven to 325°F (160°C) and line a baking sheet with parchment paper.
- In a large bowl, combine shredded coconut, almond flour, erythritol, egg whites, vanilla extract, and salt. Mix until well combined.
- Using your hands, form small mounds of the mixture and place them on the prepared baking sheet, spacing them about an inch apart.
- Bake for 15-20 minutes or until the tops are golden brown. Keep an eye on them to prevent burning!
- While the macaroons cool, melt the dark chocolate in a microwave-safe bowl. Drizzle it over the cooled macaroons for an extra touch of sweetness.
- Let the chocolate set before serving. Enjoy your tropical escape with these delicious low-sugar treats!
Berry Goodness: Low-Sugar Blueberry Muffins
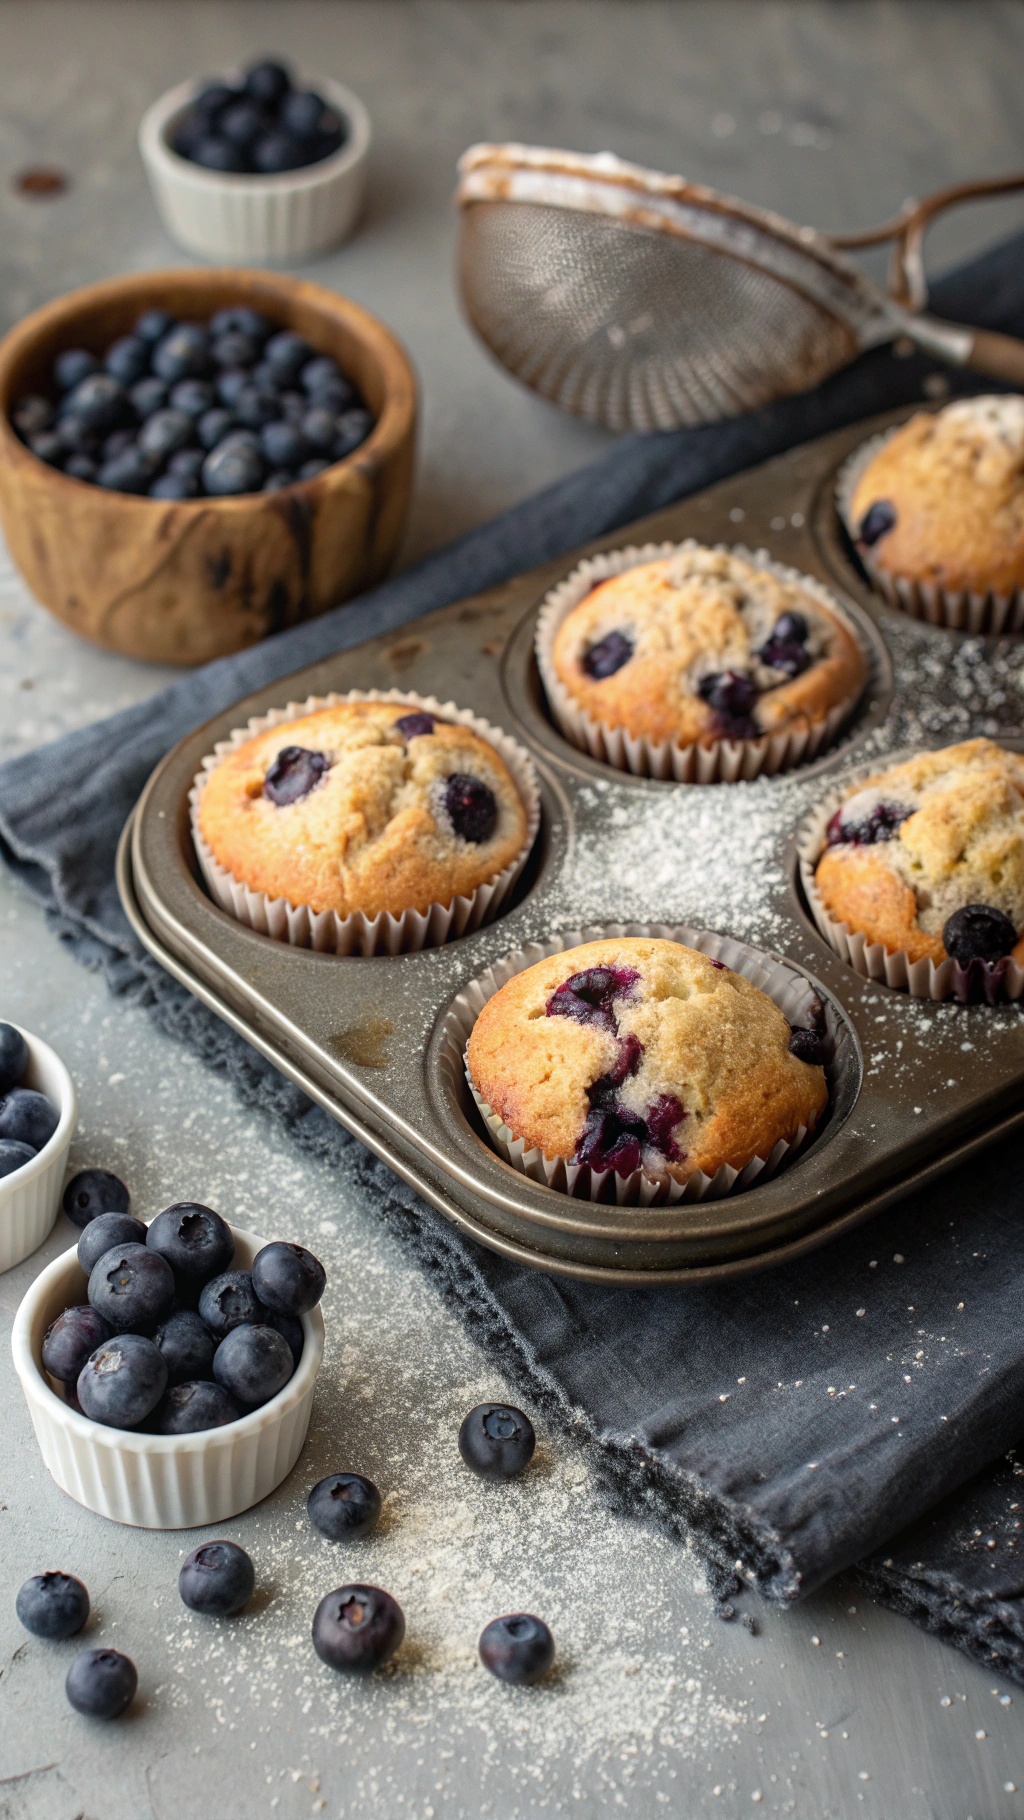
Blueberry muffins are a classic treat loved by many. They’re soft, fluffy, and bursting with juicy blueberries. This low-sugar version keeps the sweetness while being kinder to your health. The image shows freshly baked muffins, golden on top and dotted with blueberries, ready to be enjoyed. Surrounding them are bowls of fresh blueberries, hinting at the delicious ingredients inside.
Making these muffins is simple and fun, perfect for a family baking day. You can involve the kids in mixing and pouring, making it a delightful experience for everyone. Plus, the aroma of baking muffins will fill your home with warmth and comfort.
These muffins are not just tasty; they’re also a great way to sneak in some fruit. Blueberries are packed with antioxidants and vitamins, making them a healthy addition to your breakfast or snack. Enjoy them warm, or pack them for lunch. They’re versatile and perfect for any time of day!
Ingredients
- 1 cup whole wheat flour
- 1/2 cup almond flour
- 1/4 cup coconut sugar
- 1 teaspoon baking powder
- 1/2 teaspoon baking soda
- 1/4 teaspoon salt
- 1/2 cup unsweetened applesauce
- 1/4 cup milk (dairy or non-dairy)
- 1 large egg
- 1 teaspoon vanilla extract
- 1 cup fresh blueberries
Instructions
- Preheat your oven to 350°F (175°C) and line a muffin tin with paper liners.
- In a large bowl, mix the whole wheat flour, almond flour, coconut sugar, baking powder, baking soda, and salt.
- In another bowl, whisk together the applesauce, milk, egg, and vanilla extract until well combined.
- Pour the wet ingredients into the dry ingredients and stir until just combined. Gently fold in the blueberries.
- Divide the batter evenly among the muffin cups, filling each about two-thirds full.
- Bake for 18-20 minutes, or until a toothpick inserted into the center comes out clean.
- Let cool for a few minutes in the pan before transferring to a wire rack to cool completely.
A Comforting Classic: Low-Sugar Apple Crisp
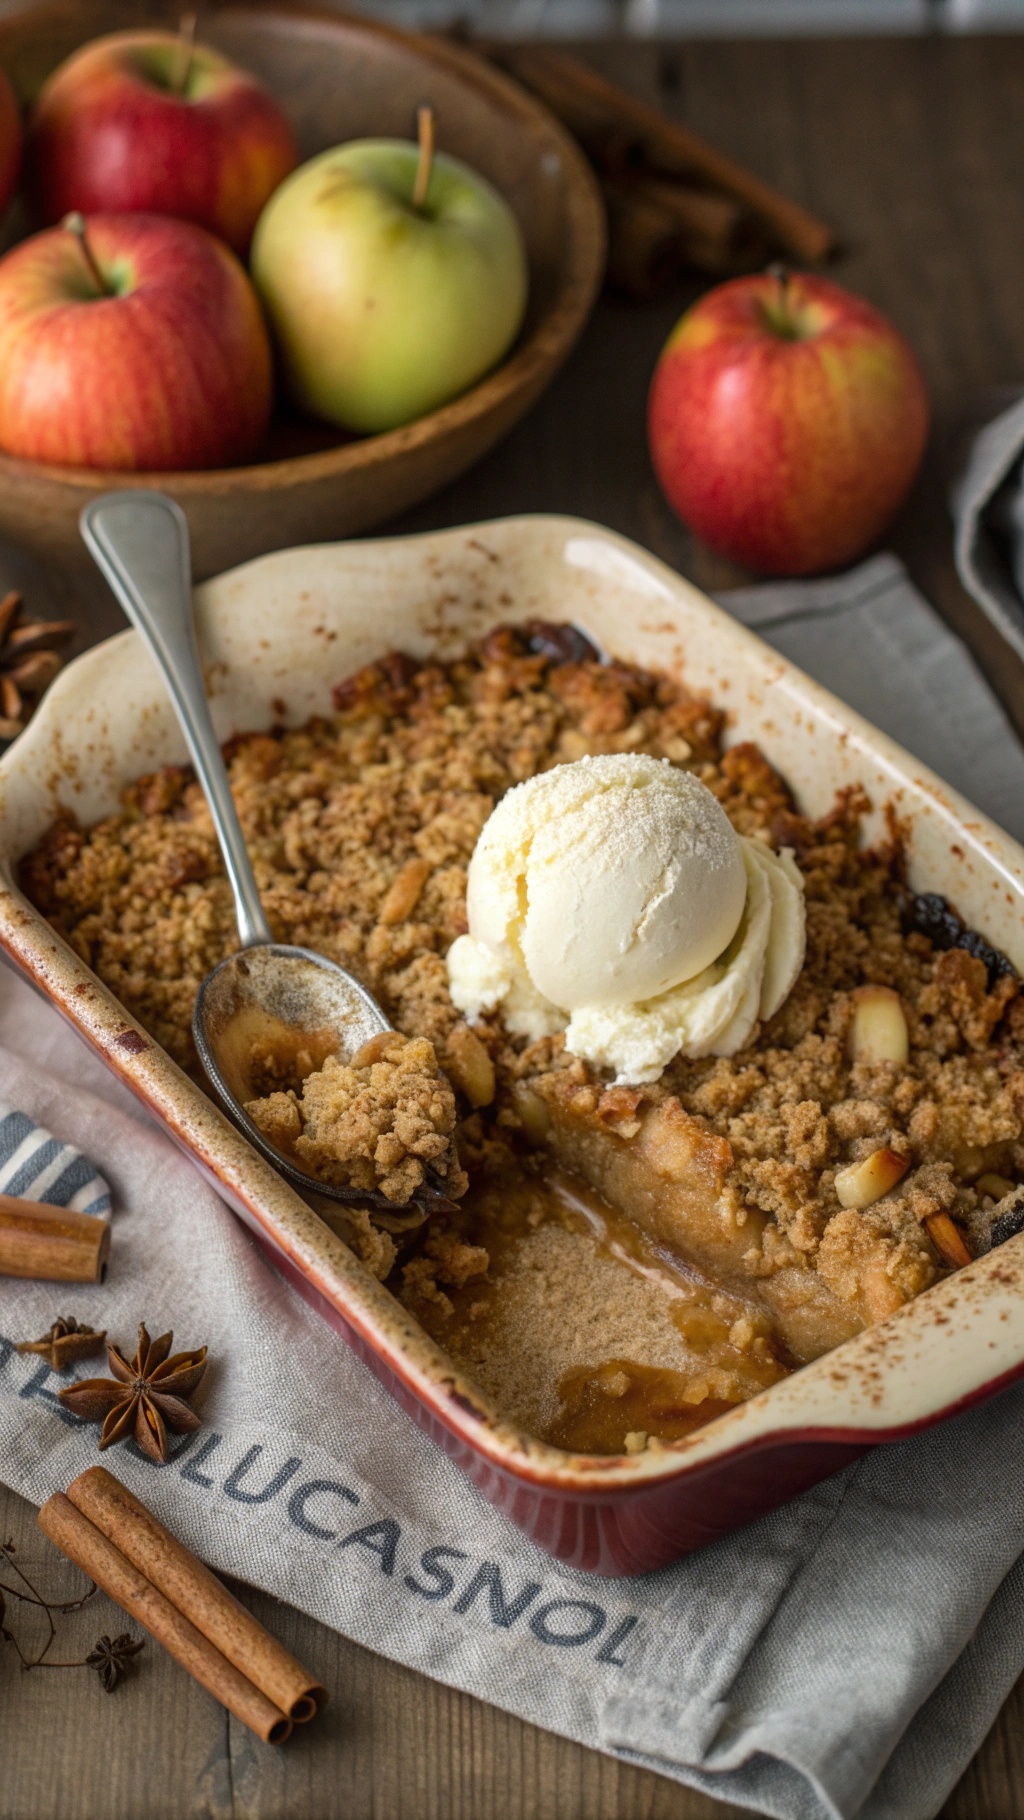
Apple crisp is a classic dessert that brings warmth and comfort to any family gathering. This low-sugar version keeps the sweet, fruity flavor of apples while reducing the sugar content, making it a healthier choice for everyone. The image shows a delicious apple crisp topped with a scoop of vanilla ice cream, inviting you to dig in. The golden-brown topping and juicy apple filling create a delightful contrast that is hard to resist.
Using fresh apples, this recipe is perfect for showcasing seasonal produce. The combination of oats, cinnamon, and a hint of sweetness from natural ingredients makes this dish satisfying without the guilt. Serve it warm, and watch as your family enjoys every bite!
Ingredients
- 4 cups sliced apples (such as Granny Smith or Honeycrisp)
- 1 tablespoon lemon juice
- 1/4 cup rolled oats
- 1/4 cup whole wheat flour
- 1/4 cup chopped nuts (like walnuts or almonds)
- 1 teaspoon ground cinnamon
- 1/4 cup unsweetened applesauce
- 1 tablespoon maple syrup or honey (optional)
- 1/4 cup unsalted butter, melted
Instructions
- Preheat your oven to 350°F (175°C).
- In a large bowl, toss the sliced apples with lemon juice. Spread the apples evenly in a greased baking dish.
- In another bowl, mix together oats, flour, nuts, cinnamon, applesauce, and melted butter. If you want extra sweetness, add maple syrup or honey.
- Sprinkle the oat mixture over the apples, covering them evenly.
- Bake for 30-35 minutes, or until the apples are tender and the topping is golden brown.
- Let it cool slightly before serving. Enjoy it warm with a scoop of vanilla ice cream for a delightful treat!
Zesty And Fresh: Low-Sugar Key Lime Pie
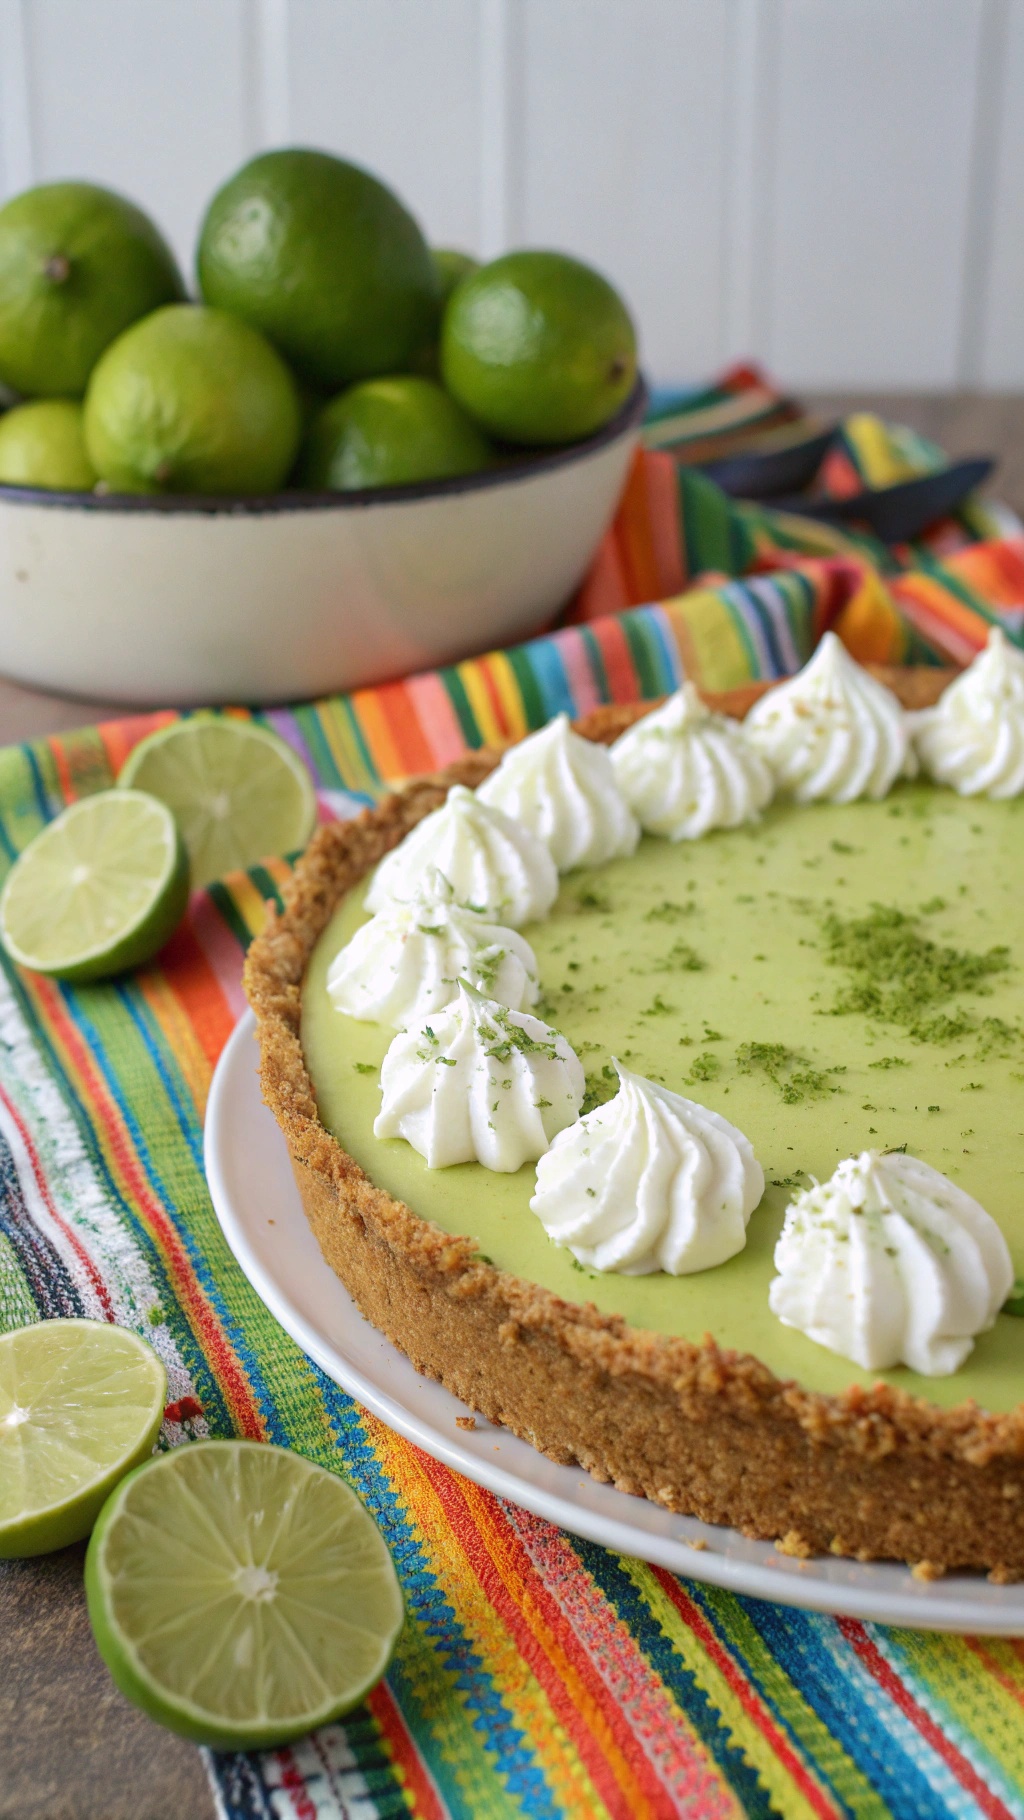
Key lime pie is a classic dessert that brings a burst of freshness to any table. This low-sugar version keeps the tangy flavor while being kinder to your sugar intake. The vibrant green filling sits in a crumbly crust, making it visually appealing and delicious.
The image captures a beautifully prepared key lime pie, topped with fluffy whipped cream and garnished with lime zest. The bright colors of the pie contrast nicely with the colorful striped tablecloth, adding a fun touch to the presentation. Fresh limes in the background hint at the zesty flavor that awaits.
This pie is perfect for family gatherings or a sweet treat after dinner. It’s easy to make and will surely impress everyone with its refreshing taste.
Ingredients
- 1 ½ cups graham cracker crumbs
- ¼ cup unsweetened cocoa powder
- ¼ cup melted coconut oil
- 2 tablespoons honey or maple syrup
- 1 can (14 oz) sweetened condensed milk (low-sugar version)
- ½ cup fresh key lime juice
- 3 large egg yolks
- 1 teaspoon lime zest
- Whipped cream for topping
Instructions
- Preheat the oven to 350°F (175°C).
- In a bowl, mix graham cracker crumbs, cocoa powder, melted coconut oil, and honey until combined. Press this mixture into the bottom of a pie dish to form the crust.
- Bake the crust for 10 minutes, then let it cool.
- In another bowl, whisk together the sweetened condensed milk, key lime juice, egg yolks, and lime zest until smooth.
- Pour the filling into the cooled crust and bake for an additional 15 minutes.
- Remove from the oven and let it cool to room temperature. Refrigerate for at least 2 hours before serving.
- Top with whipped cream and extra lime zest before serving.
A Fruity Treat: Low-Sugar Raspberry Sorbet
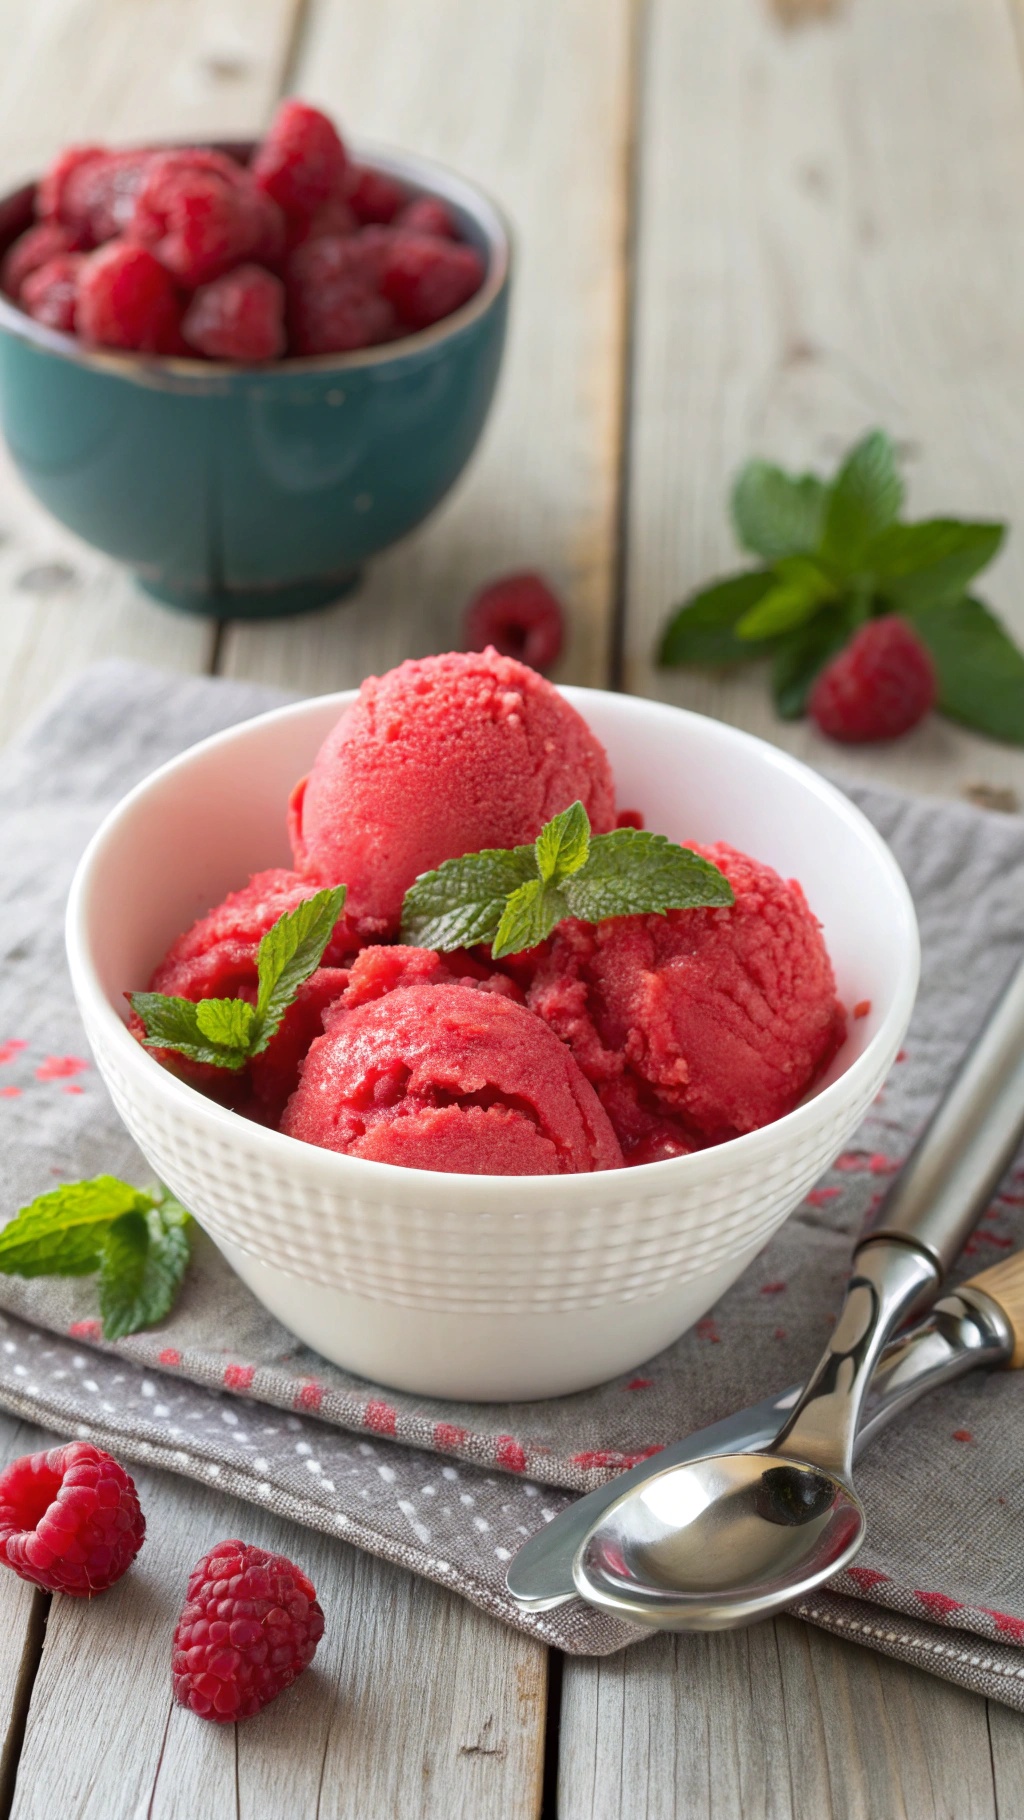
Raspberry sorbet is a delightful way to enjoy a sweet treat without all the sugar. This vibrant dessert is not only refreshing but also packed with the natural goodness of raspberries. The image shows a bowl filled with smooth, pink sorbet, garnished with fresh mint leaves, making it look as appealing as it tastes. The bright color of the sorbet is inviting, and the surrounding raspberries add a touch of charm.
This low-sugar raspberry sorbet is perfect for families who love sweets but want to keep things healthier. It’s easy to make and can be a fun activity to do together. Kids will love helping to blend the ingredients and scoop the sorbet into bowls.
Ingredients
- 4 cups fresh or frozen raspberries
- 1/2 cup water
- 1/4 cup honey or agave syrup
- 1 tablespoon lemon juice
- Fresh mint leaves for garnish
Instructions
- Blend the Raspberries: In a blender, combine the raspberries, water, honey, and lemon juice. Blend until smooth.
- Strain the Mixture: Pour the blended mixture through a fine mesh strainer to remove the seeds. Use a spatula to press the mixture through.
- Freeze the Sorbet: Pour the strained raspberry mixture into a shallow dish. Place it in the freezer for about 2-3 hours, stirring every 30 minutes until it reaches a sorbet consistency.
- Serve: Once the sorbet is ready, scoop it into bowls and garnish with fresh mint leaves. Enjoy your refreshing treat!


Comments
Post a Comment