15 Easy No-Bake Halloween Treats for Busy Parents
15 Easy No-Bake Halloween Treats for Busy Parents
Halloween is creeping up fast, and busy parents often find themselves short on time but wanting to celebrate. No-bake treats are the perfect solution—quick, simple, and fun to make with the kids. Whether you're looking for spooky snacks or festive goodies, these easy recipes will help you whip up delicious Halloween treats without the hassle of baking.
Spooky Spider Web Cupcakes For Halloween Fun
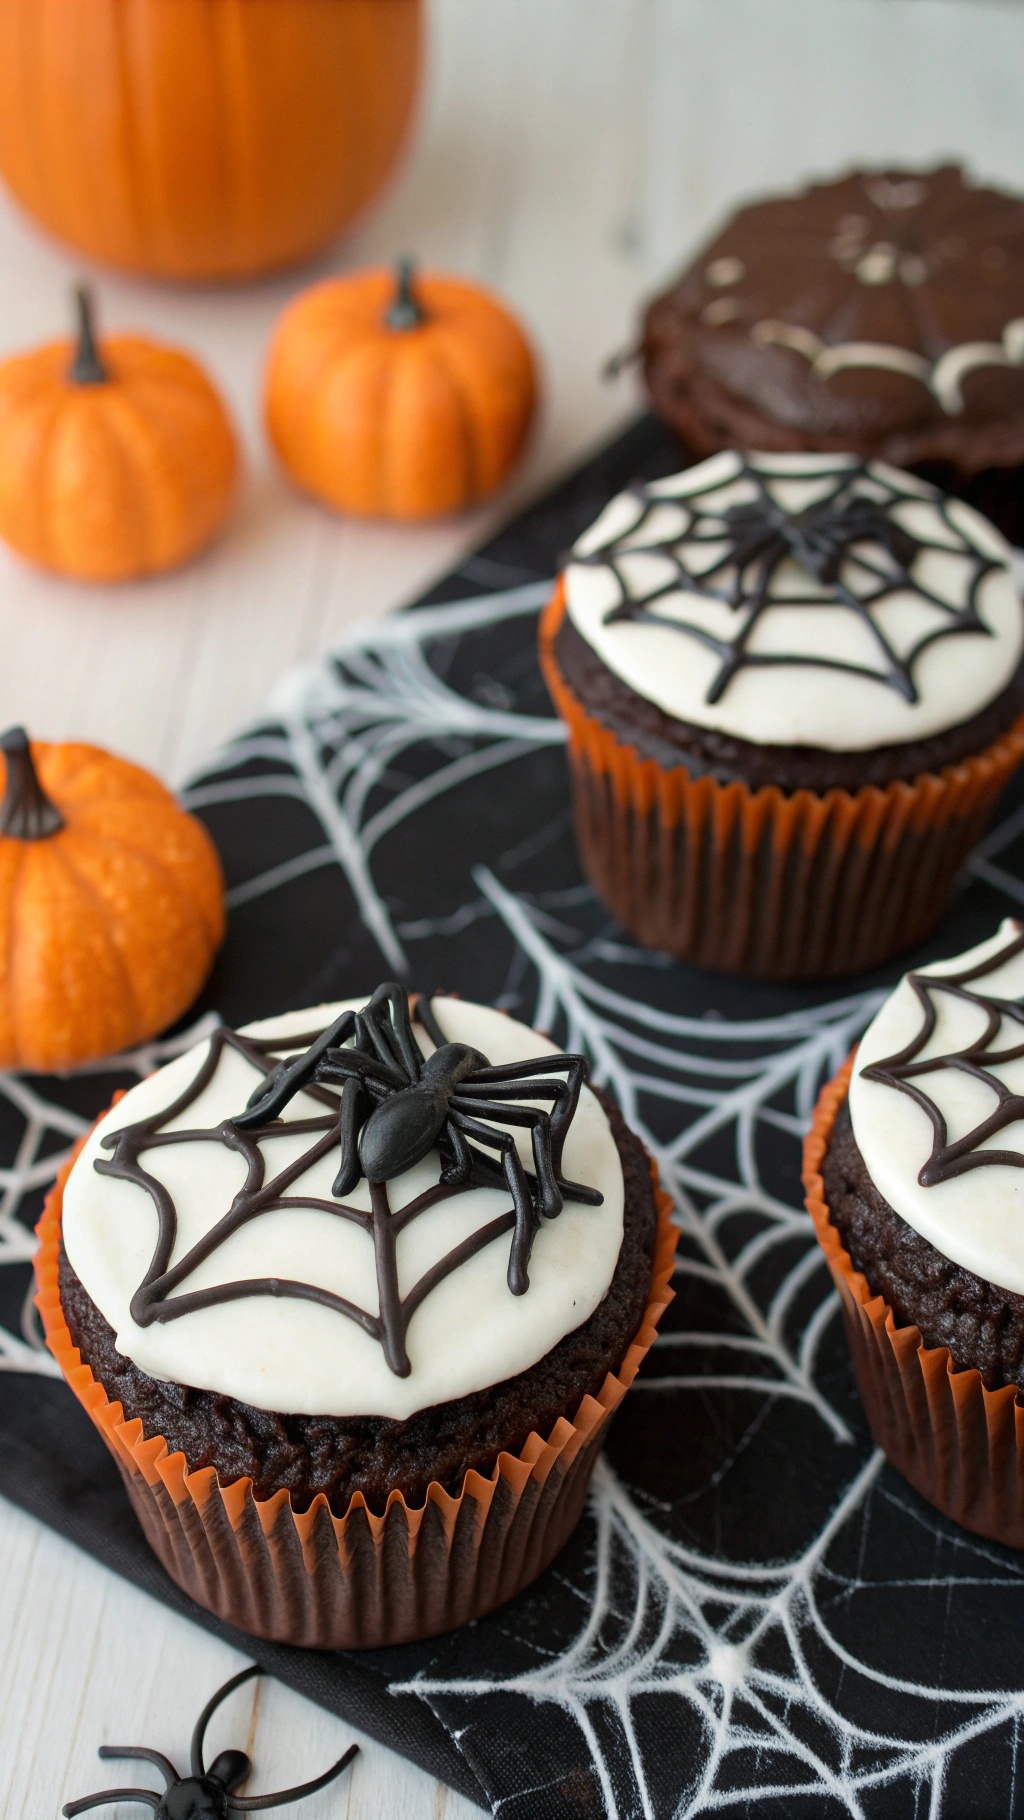
These Spooky Spider Web Cupcakes are a fantastic treat for Halloween! They are not only easy to make, but they also add a fun twist to your Halloween festivities. The rich chocolate cupcakes are topped with a smooth white frosting, creating the perfect canvas for a spooky spider web design.
To make these cupcakes, start with your favorite chocolate cupcake recipe or a box mix for convenience. Once baked and cooled, frost them generously with white frosting. Use black icing to create a web design on top. For an extra creepy touch, add a plastic spider on each cupcake. These treats are sure to delight kids and adults alike!
Ingredients
- 1 box chocolate cake mix (or homemade chocolate cupcake recipe)
- 3 large eggs
- 1 cup water
- 1/2 cup vegetable oil
- 1 can white frosting
- Black decorating icing
- Plastic spiders (for decoration)
Instructions
- Preheat your oven to 350°F (175°C). Line a cupcake pan with orange cupcake liners.
- In a large bowl, combine the chocolate cake mix, eggs, water, and vegetable oil. Mix until smooth.
- Pour the batter into the cupcake liners, filling each about two-thirds full. Bake for 18-20 minutes or until a toothpick comes out clean.
- Let the cupcakes cool completely before frosting.
- Spread a generous amount of white frosting on each cupcake.
- Using black decorating icing, pipe a spider web design on top of the frosting.
- Finish by placing a plastic spider on each cupcake for a spooky effect.
Witch’S Hat Cookies: A Quick And Easy Treat
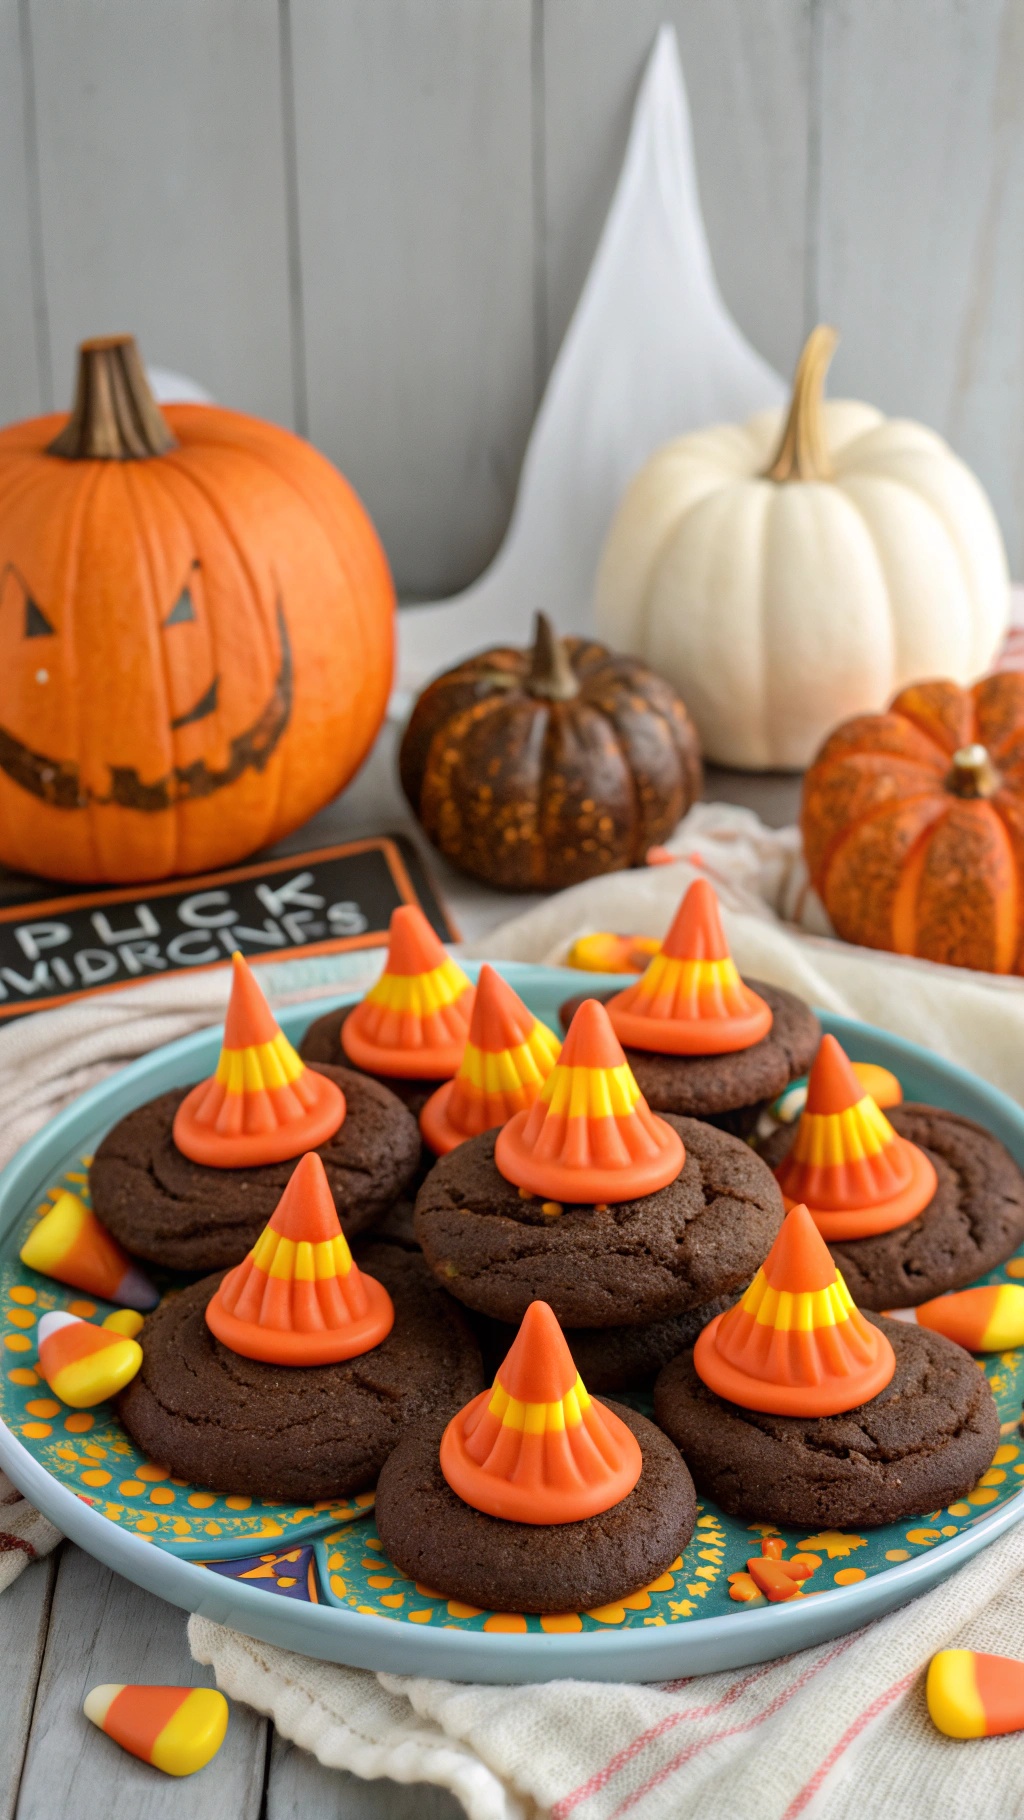
Witch’s Hat Cookies are a fun and festive treat perfect for Halloween. These cookies are not only easy to make, but they also look adorable on any spooky dessert table. The combination of chocolate cookies and candy corn creates a delightful treat that kids and adults will love.
To make these cookies, start with a basic chocolate cookie base. Once baked, top each cookie with a chocolate candy melt and place a piece of candy corn on top to create the witch's hat effect. This treat is great for busy parents who want to whip up something special without spending hours in the kitchen.
Gather your little ones for a fun baking session. They will enjoy decorating the cookies and, of course, eating them afterward! These Witch’s Hat Cookies are sure to be a hit at any Halloween gathering.
Ingredients
- 1 cup unsalted butter, softened
- 1 cup granulated sugar
- 1 cup brown sugar, packed
- 2 large eggs
- 2 teaspoons vanilla extract
- 3 cups all-purpose flour
- 1 cup cocoa powder
- 1 teaspoon baking soda
- 1/2 teaspoon salt
- 1 cup chocolate candy melts
- Candy corn for decoration
Instructions
- Preheat your oven to 350°F (175°C) and line a baking sheet with parchment paper.
- In a large bowl, cream together the softened butter, granulated sugar, and brown sugar until light and fluffy.
- Add the eggs and vanilla extract, mixing until well combined.
- In another bowl, whisk together the flour, cocoa powder, baking soda, and salt.
- Gradually add the dry ingredients to the wet mixture, stirring until a dough forms.
- Using a cookie scoop, drop dough onto the prepared baking sheet, spacing them about 2 inches apart.
- Bake for 10-12 minutes, or until the edges are set. Let them cool on the baking sheet for a few minutes before transferring to a wire rack.
- Melt the chocolate candy melts according to package instructions. Once melted, spoon a small amount onto the center of each cookie.
- Place a piece of candy corn upright in the melted chocolate to create the witch's hat.
- Let the cookies cool completely before serving. Enjoy your spooky treats!
Mummy Pretzel Bites: A Crunchy Halloween Delight
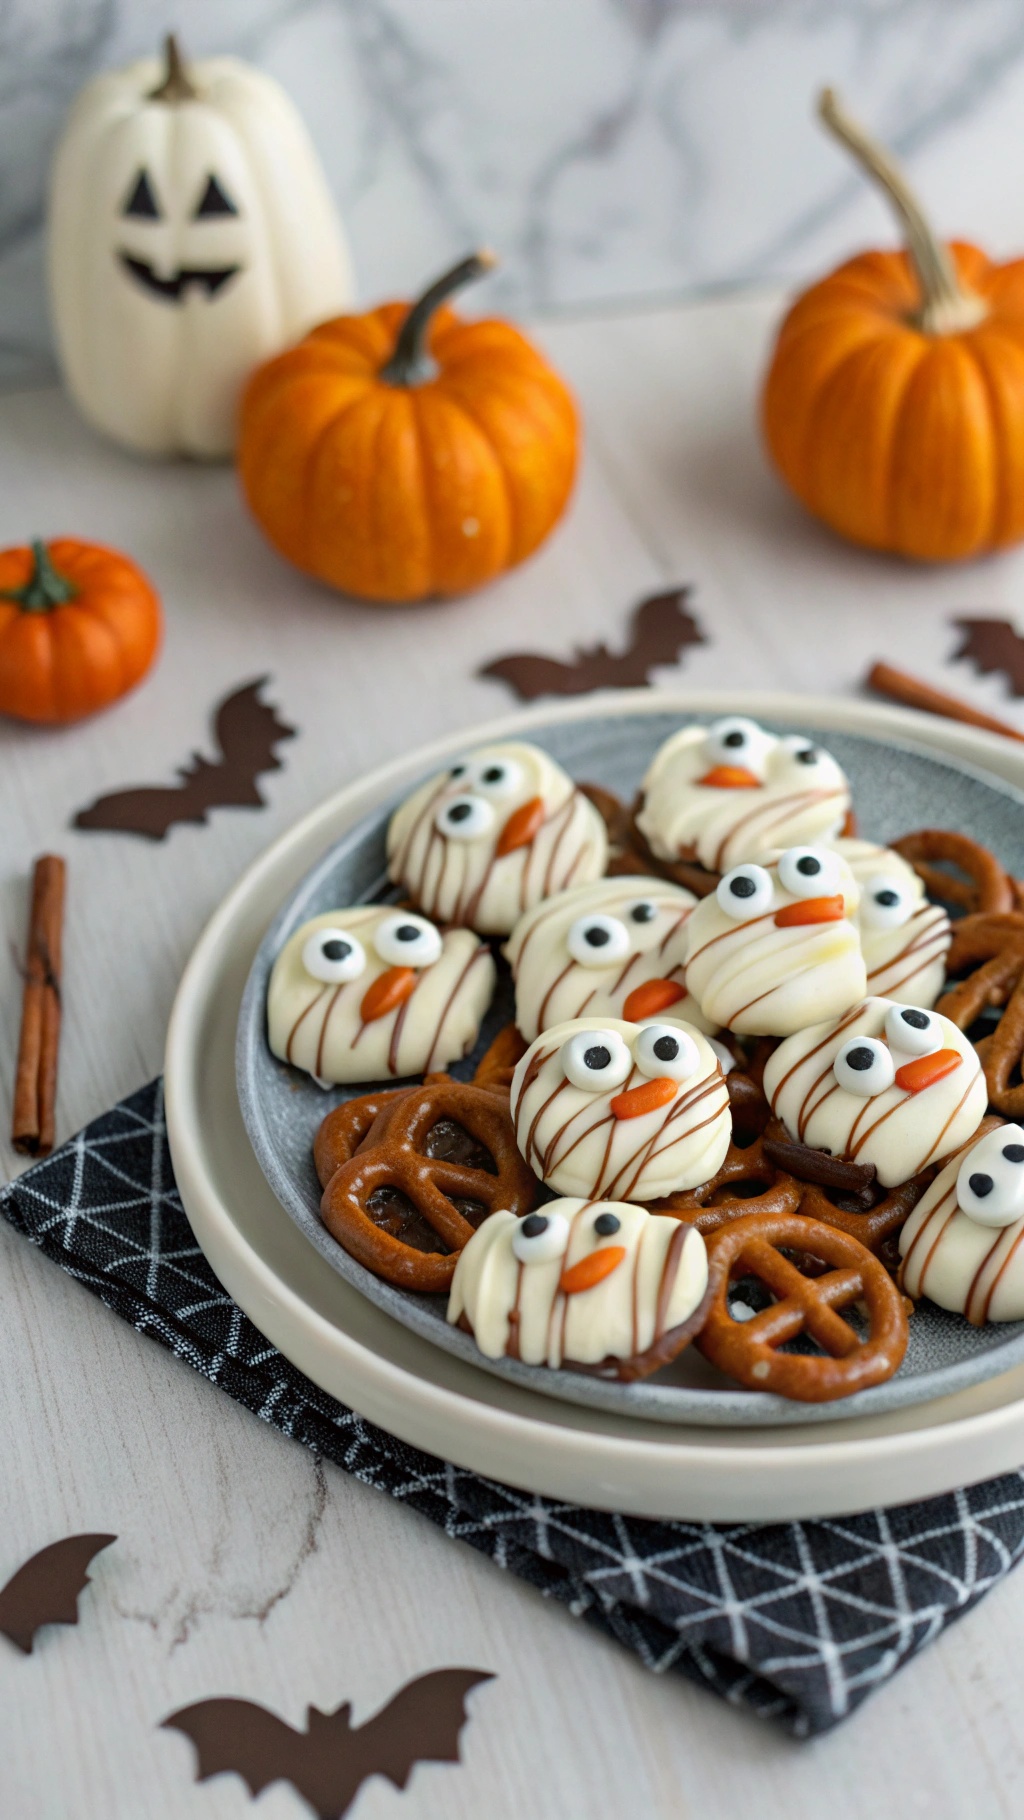
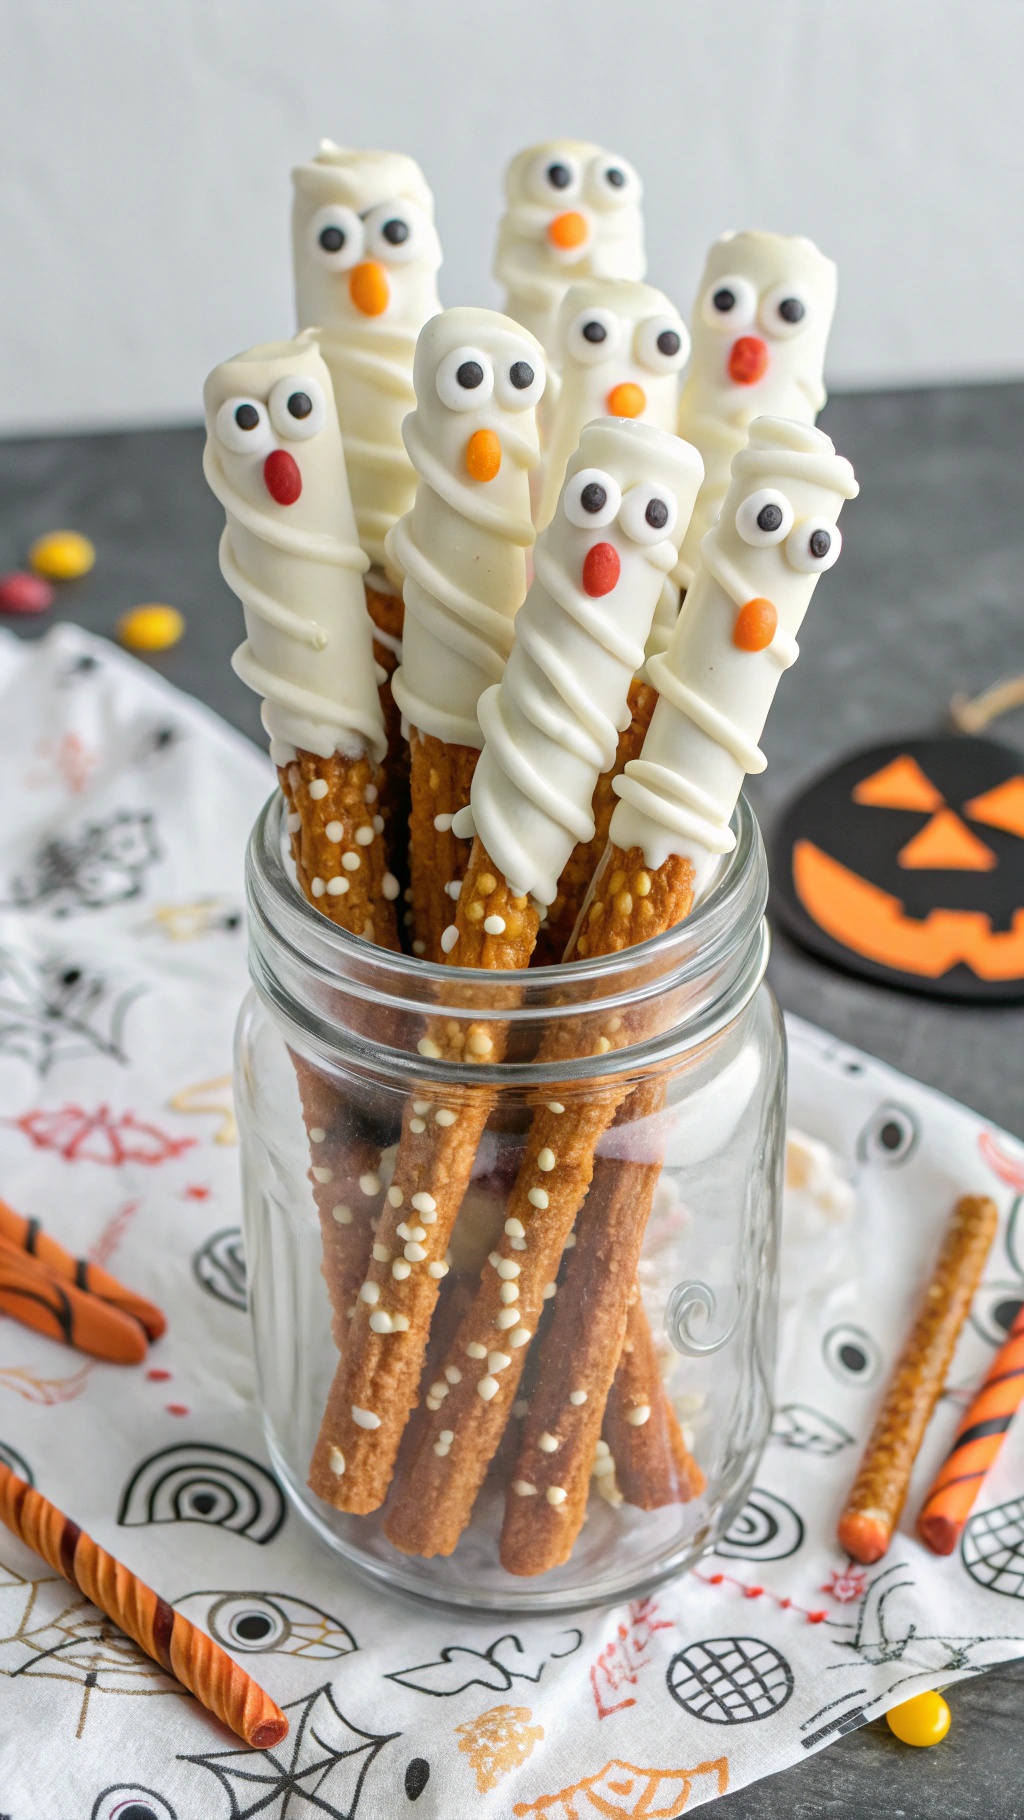
Mummy Pretzel Bites are a fun and easy treat for Halloween. These little snacks are perfect for busy parents who want to whip up something festive without spending hours in the kitchen. They combine the crunch of pretzels with the sweetness of chocolate, making them a hit with kids and adults alike.
The image shows a delightful platter of Mummy Pretzel Bites. Each pretzel is topped with white chocolate, resembling a wrapped mummy. The cute candy eyes and orange candy noses add a playful touch, making these treats not only tasty but also visually appealing. Surrounded by mini pumpkins and bat decorations, they capture the spirit of Halloween perfectly.
Making these treats is simple and quick. You only need a few ingredients, and the steps are easy to follow. Let’s get started on creating these spooky snacks!
Ingredients
- 1 cup pretzel snaps
- 1 cup white chocolate chips
- 1/4 cup milk chocolate chips
- 1/4 cup orange candy melts or orange icing
- Candy eyes
Instructions
- Melt the white chocolate chips in a microwave-safe bowl, heating in 30-second intervals until smooth.
- Dip each pretzel snap into the melted white chocolate, ensuring it's fully coated. Place them on a baking sheet lined with parchment paper.
- While the chocolate is still wet, add candy eyes and a small piece of orange candy for the nose.
- Using a piping bag or a fork, drizzle melted milk chocolate over the pretzels to create the mummy wrapping effect.
- Let the pretzels cool until the chocolate hardens. Enjoy your Mummy Pretzel Bites!
Pumpkin Spice Rice Krispie Treats For A Festive Crunch
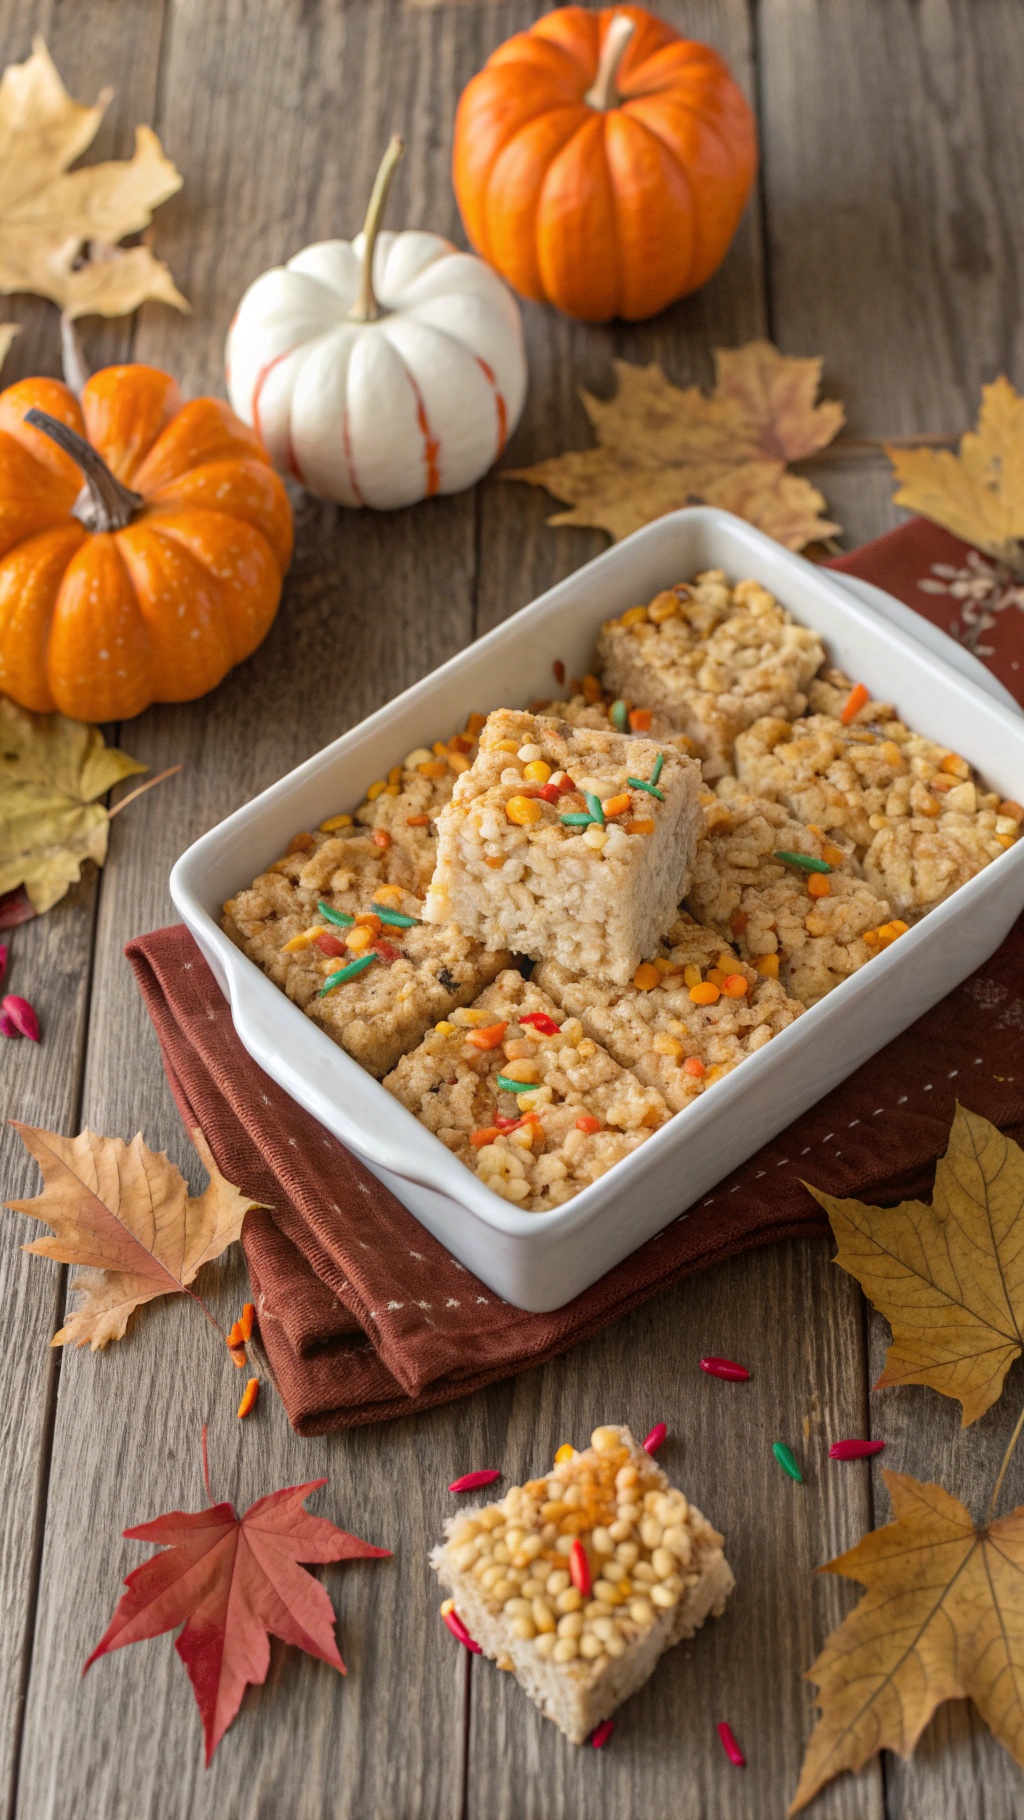
Get ready to enjoy a fun and easy treat this Halloween! These Pumpkin Spice Rice Krispie Treats are perfect for busy parents. They combine the classic crunch of Rice Krispies with the warm flavors of pumpkin spice, making them a festive addition to your holiday celebrations.
The image shows a delightful batch of these treats, cut into squares and topped with colorful sprinkles. The treats are nestled in a white dish, surrounded by mini pumpkins and autumn leaves, creating a cozy fall vibe. The vibrant colors of the sprinkles add a playful touch, making these treats visually appealing for kids and adults alike.
Making these treats is simple and requires no baking, which is a huge plus for parents on the go. Just gather your ingredients, mix them up, and let them set. In no time, you’ll have a delicious snack that everyone will love!
Ingredients
- 3 tablespoons unsalted butter
- 1 package (10 oz) marshmallows
- 1 teaspoon pumpkin spice
- 6 cups Rice Krispies cereal
- 1/2 cup candy corn
- 1/4 cup fall-themed sprinkles
Instructions
- Melt the Butter: In a large saucepan, melt the butter over low heat. Add the marshmallows and stir until completely melted.
- Add Pumpkin Spice: Stir in the pumpkin spice until well combined.
- Mix in Cereal: Remove the pan from heat and add the Rice Krispies cereal. Stir until the cereal is evenly coated with the marshmallow mixture.
- Add Candy Corn: Gently fold in the candy corn for an extra festive touch.
- Press into Pan: Grease a 9x13 inch pan and press the mixture evenly into the pan. Use a spatula or wax paper to flatten it down.
- Top with Sprinkles: While still warm, sprinkle the fall-themed sprinkles on top for decoration.
- Cool and Cut: Allow the treats to cool completely before cutting them into squares. Enjoy your festive Pumpkin Spice Rice Krispie Treats!
Delightfully Creepy Chocolate-Dipped Bananas
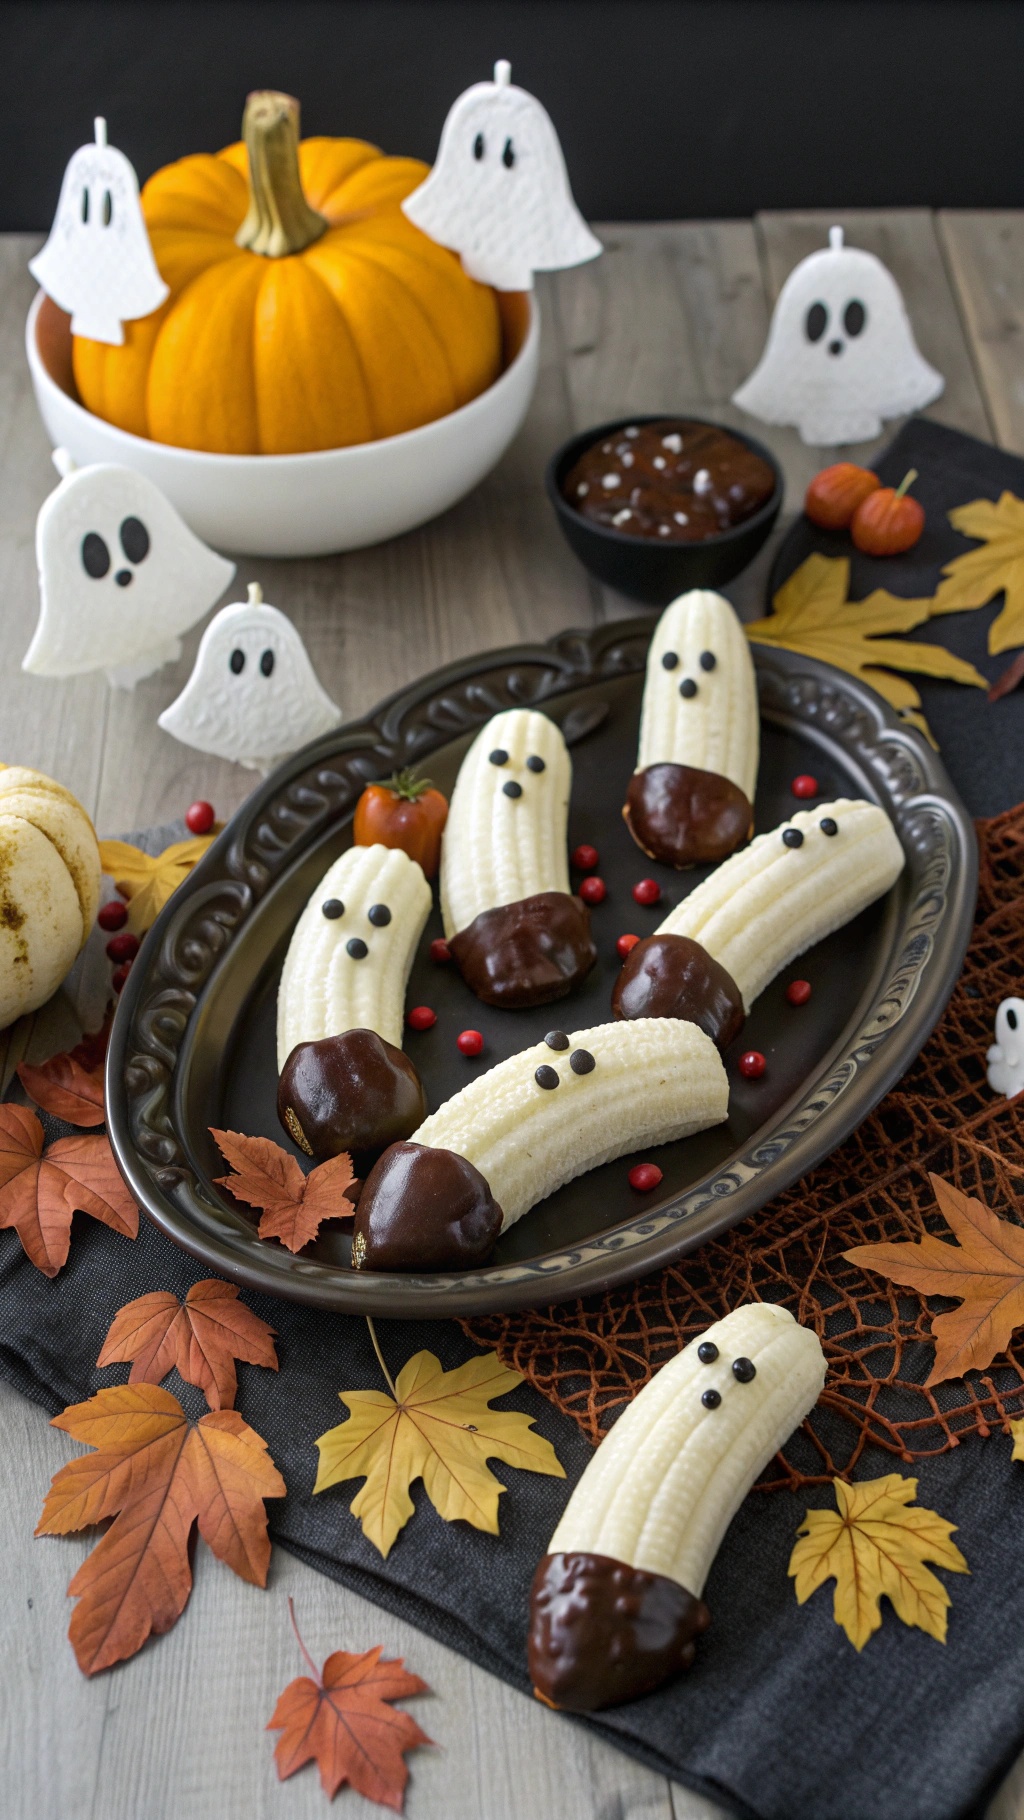
These chocolate-dipped bananas are a fun and easy Halloween treat that kids will love. They look like little ghosts, making them perfect for the spooky season. The bananas are dipped in rich chocolate and decorated with candy eyes, creating a delightful and creepy snack.
To make these treats, simply slice bananas in half and dip the cut ends into melted chocolate. Let them cool on a plate lined with parchment paper. Once set, use small candy eyes to give them a ghostly appearance. They can be served on a platter with some festive decorations like pumpkins and autumn leaves to enhance the Halloween vibe.
This treat is not only quick to make but also a healthier option for Halloween festivities. Kids can enjoy the sweetness of bananas paired with chocolate without the guilt. Plus, they are a great way to get some fruit into their Halloween haul!
Ingredients
- 4 ripe bananas
- 1 cup semi-sweet chocolate chips
- 1 tablespoon coconut oil (optional)
- Candy eyes for decoration
Instructions
- Prepare the Bananas: Peel the bananas and cut them in half crosswise.
- Melt the Chocolate: In a microwave-safe bowl, combine the chocolate chips and coconut oil. Heat in 30-second intervals, stirring in between, until smooth.
- Dip the Bananas: Dip the cut ends of the banana halves into the melted chocolate, allowing any excess to drip off.
- Set the Treats: Place the dipped bananas on a parchment-lined plate and let them cool until the chocolate hardens.
- Add Eyes: Once the chocolate is set, attach candy eyes to each banana using a small dab of melted chocolate.
- Serve: Arrange the ghostly bananas on a platter and enjoy your spooky treats!
Mini Pumpkin Cheesecakes: Easy No-Bake Treats
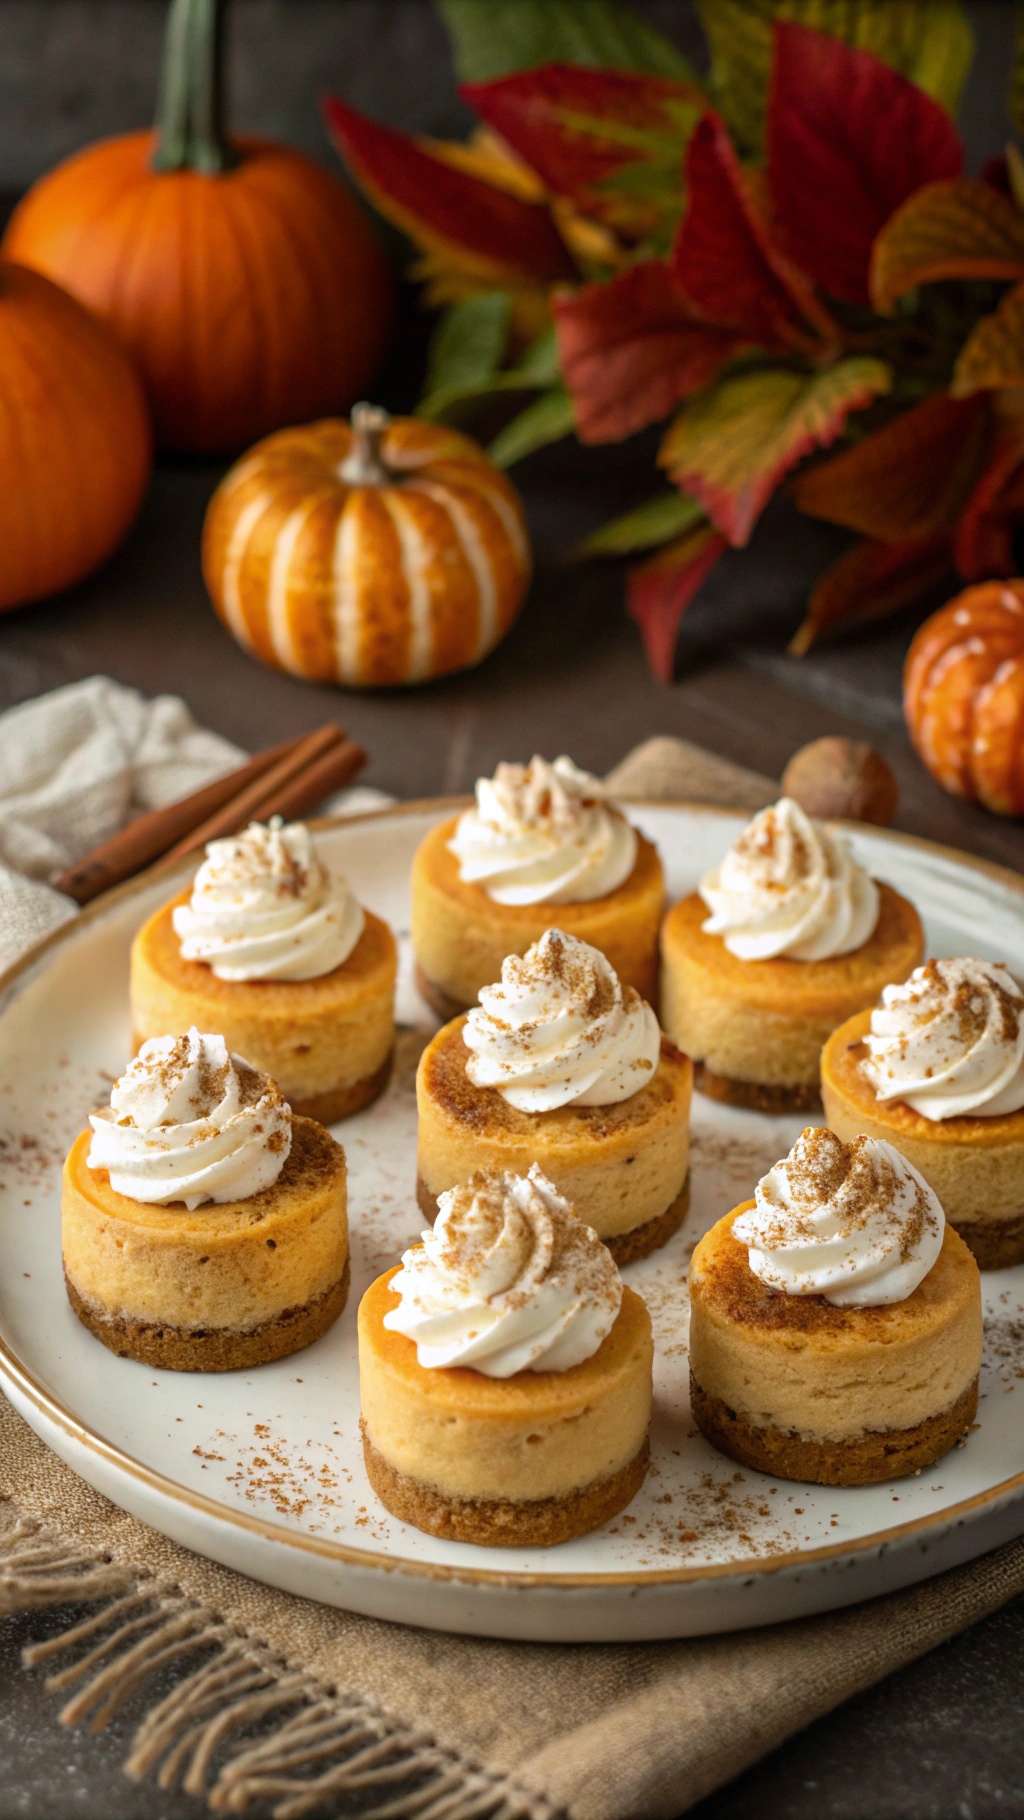
These mini pumpkin cheesecakes are perfect for busy parents looking for a quick and festive dessert. They are easy to make, require no baking, and are sure to impress both kids and adults alike. The creamy pumpkin filling sits atop a delicious graham cracker crust, making each bite a delightful treat.
With the vibrant colors of fall around, these cheesecakes fit right in. Imagine a platter filled with these adorable mini desserts, topped with fluffy whipped cream and a sprinkle of cinnamon. They not only look great but taste even better!
Gather your ingredients, and let’s whip up these delightful treats in no time!
Ingredients
- 1 cup graham cracker crumbs
- 1/4 cup granulated sugar
- 1/2 cup unsalted butter, melted
- 16 oz cream cheese, softened
- 1 cup pumpkin puree
- 1 cup powdered sugar
- 1 teaspoon vanilla extract
- 1 teaspoon pumpkin pie spice
- 1 cup whipped cream (for topping)
- Cinnamon (for garnish)
Instructions
- Make the Crust: In a bowl, mix graham cracker crumbs, sugar, and melted butter until combined. Press the mixture into the bottom of mini cheesecake molds or muffin tins.
- Prepare the Filling: In a separate bowl, beat the cream cheese until smooth. Add the pumpkin puree, powdered sugar, vanilla extract, and pumpkin pie spice. Mix until well combined.
- Fill the Molds: Spoon the pumpkin filling over the crusts in the molds, smoothing the tops with a spatula.
- Chill: Place the filled molds in the refrigerator for at least 4 hours or until set.
- Serve: Once set, remove the cheesecakes from the molds. Top each with whipped cream and a sprinkle of cinnamon before serving.
Spooky Chocolate Bark: A Simple Halloween Snack
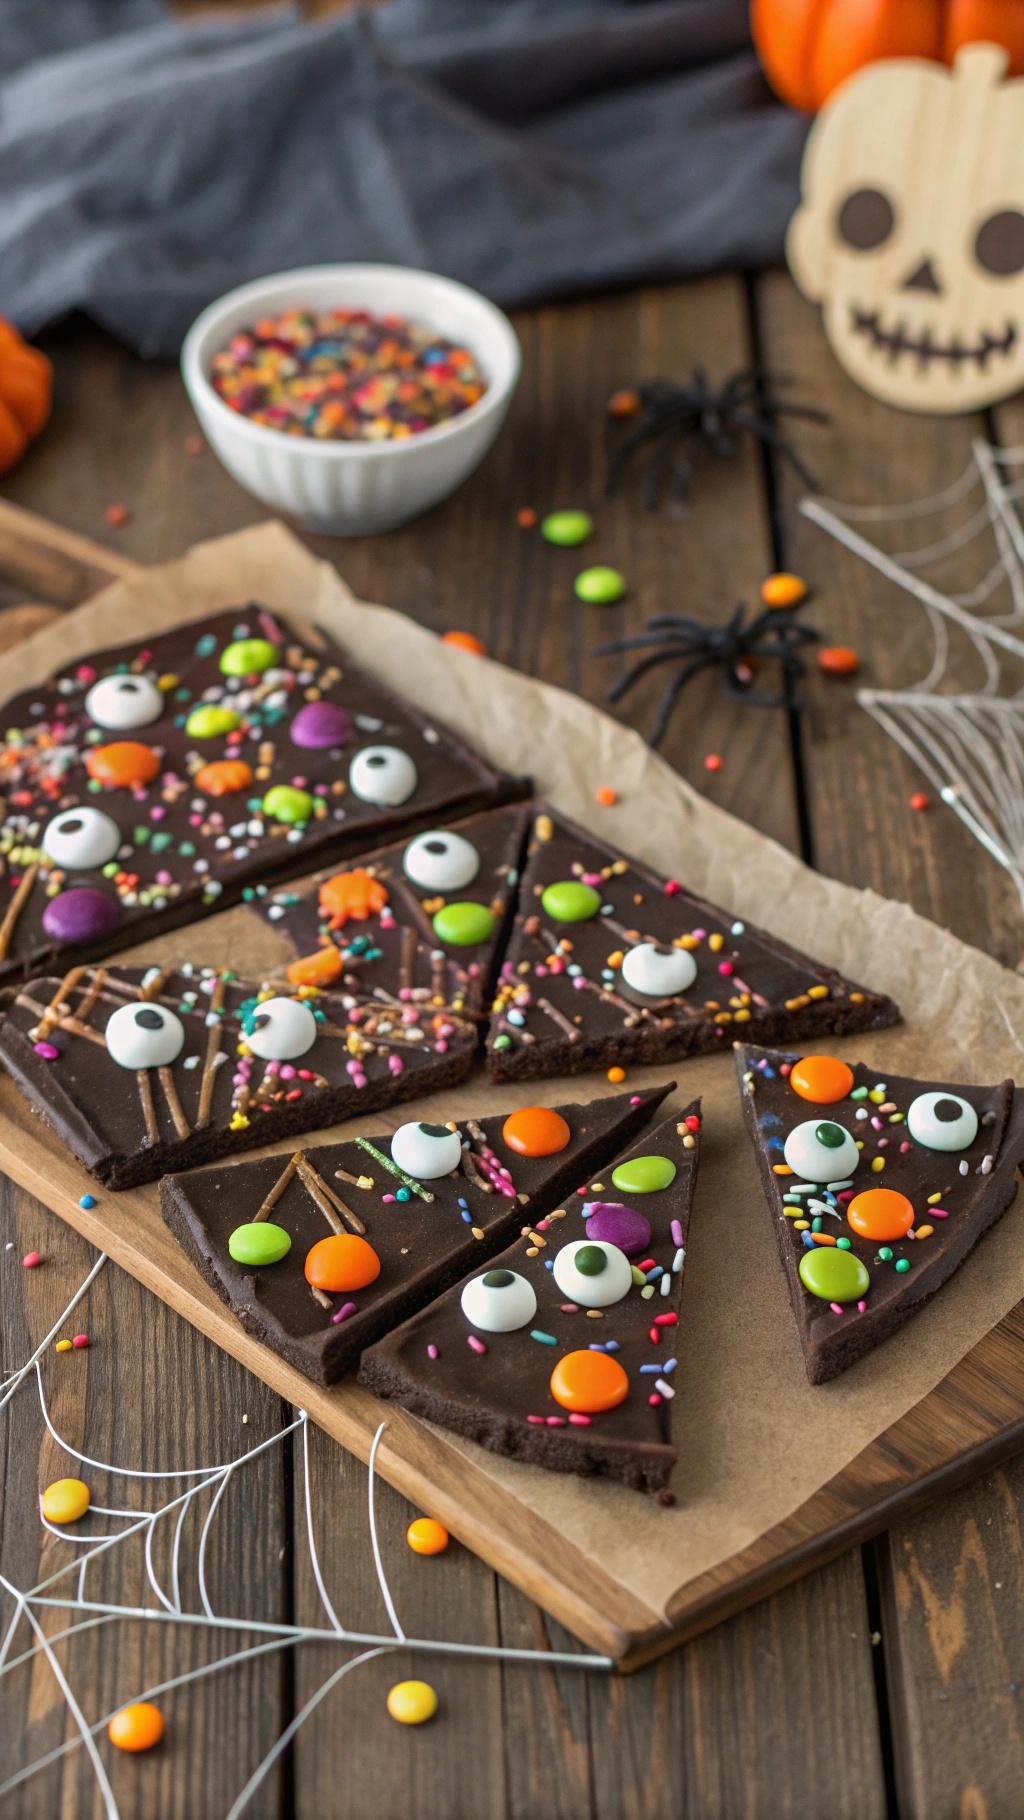
Halloween is a time for fun treats, and spooky chocolate bark is a perfect choice for busy parents. This snack is quick to make and requires no baking, making it ideal for those hectic days leading up to Halloween. The image shows a colorful spread of chocolate bark decorated with candy eyes, sprinkles, and other festive toppings. It’s not just tasty; it’s also a fun activity to do with the kids!
To make this treat, you’ll need some basic ingredients. Start with good-quality chocolate, which can be dark, milk, or white, depending on your preference. The toppings can include candy corn, colorful sprinkles, and edible eyes, which add a playful touch. This chocolate bark is not only delicious but also visually appealing, making it a hit at any Halloween gathering.
Here’s how to make your own spooky chocolate bark:
Ingredients
- 2 cups dark or milk chocolate chips
- 1 cup white chocolate chips
- 1/2 cup candy eyes
- 1/2 cup Halloween-themed sprinkles
- 1/2 cup gummy worms or other candies
- Parchment paper for lining the baking sheet
Instructions
- Prepare the Baking Sheet: Line a baking sheet with parchment paper.
- Melt the Chocolate: In a microwave-safe bowl, melt the dark or milk chocolate chips in 30-second intervals, stirring in between until smooth.
- Spread the Chocolate: Pour the melted chocolate onto the prepared baking sheet and spread it into an even layer using a spatula.
- Add Toppings: While the chocolate is still warm, sprinkle the white chocolate chips, candy eyes, sprinkles, and gummy worms over the top, pressing them gently into the chocolate.
- Chill: Place the baking sheet in the refrigerator for about 20-30 minutes, or until the chocolate is fully set.
- Break and Serve: Once set, break the chocolate bark into pieces and serve. Store any leftovers in an airtight container.
Witch’S Brew Jello Cups: Fun And Festive
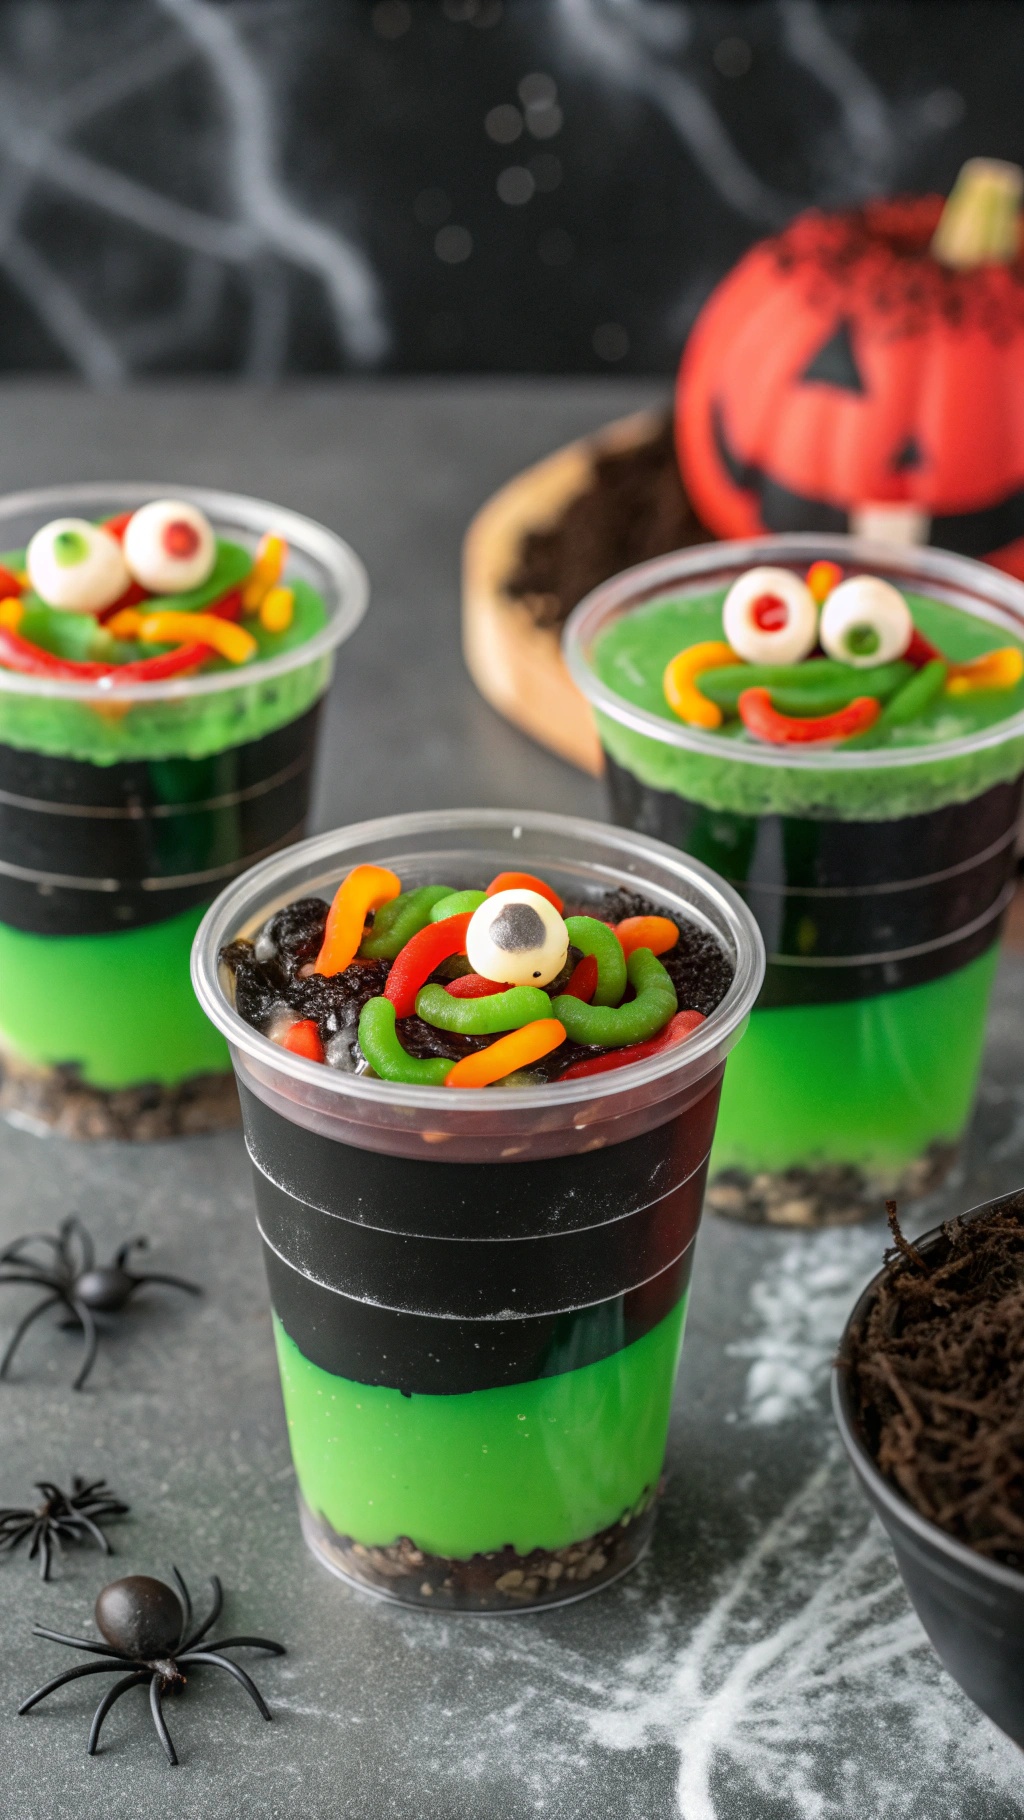
Witch’s Brew Jello Cups are a delightful treat that brings a festive touch to any Halloween gathering. These colorful cups are layered with vibrant green and black jello, topped with gummy worms and candy eyes, making them both spooky and fun for kids and adults alike.
Creating these cups is a breeze, perfect for busy parents. You can whip them up in no time, and they require no baking! Just layer the jello and let it set. The combination of flavors and textures will surely delight everyone at your Halloween party.
To make these Witch’s Brew Jello Cups, you’ll need some simple ingredients. Gather your favorite jello flavors, some crushed cookies for a “dirt” layer, and fun toppings like gummy worms and candy eyes. The kids will love helping to assemble these spooky treats!
Ingredients
- 1 box green jello
- 1 box black cherry jello
- 2 cups boiling water
- 1 cup cold water
- 1 cup crushed chocolate cookies
- Gummy worms
- Candy eyes
Instructions
- Prepare the Green Jello: In a bowl, dissolve the green jello in 1 cup of boiling water. Stir until completely dissolved. Add 1/2 cup of cold water and mix well. Pour into clear cups, filling them about halfway. Refrigerate until set, about 2 hours.
- Make the Black Cherry Jello: In another bowl, dissolve the black cherry jello in 1 cup of boiling water. Stir until dissolved, then add 1/2 cup of cold water. Allow to cool slightly.
- Layer the Jello: Once the green jello is set, carefully pour the black cherry jello over the green layer in each cup. Refrigerate again until set, about 2 hours.
- Add the “Dirt”: Once the black cherry layer is set, sprinkle crushed chocolate cookies on top to create a “dirt” layer.
- Decorate: Finish by adding gummy worms and candy eyes on top of the cups for a fun, spooky look!
Ghostly Yogurt Parfaits: A Healthy Treat
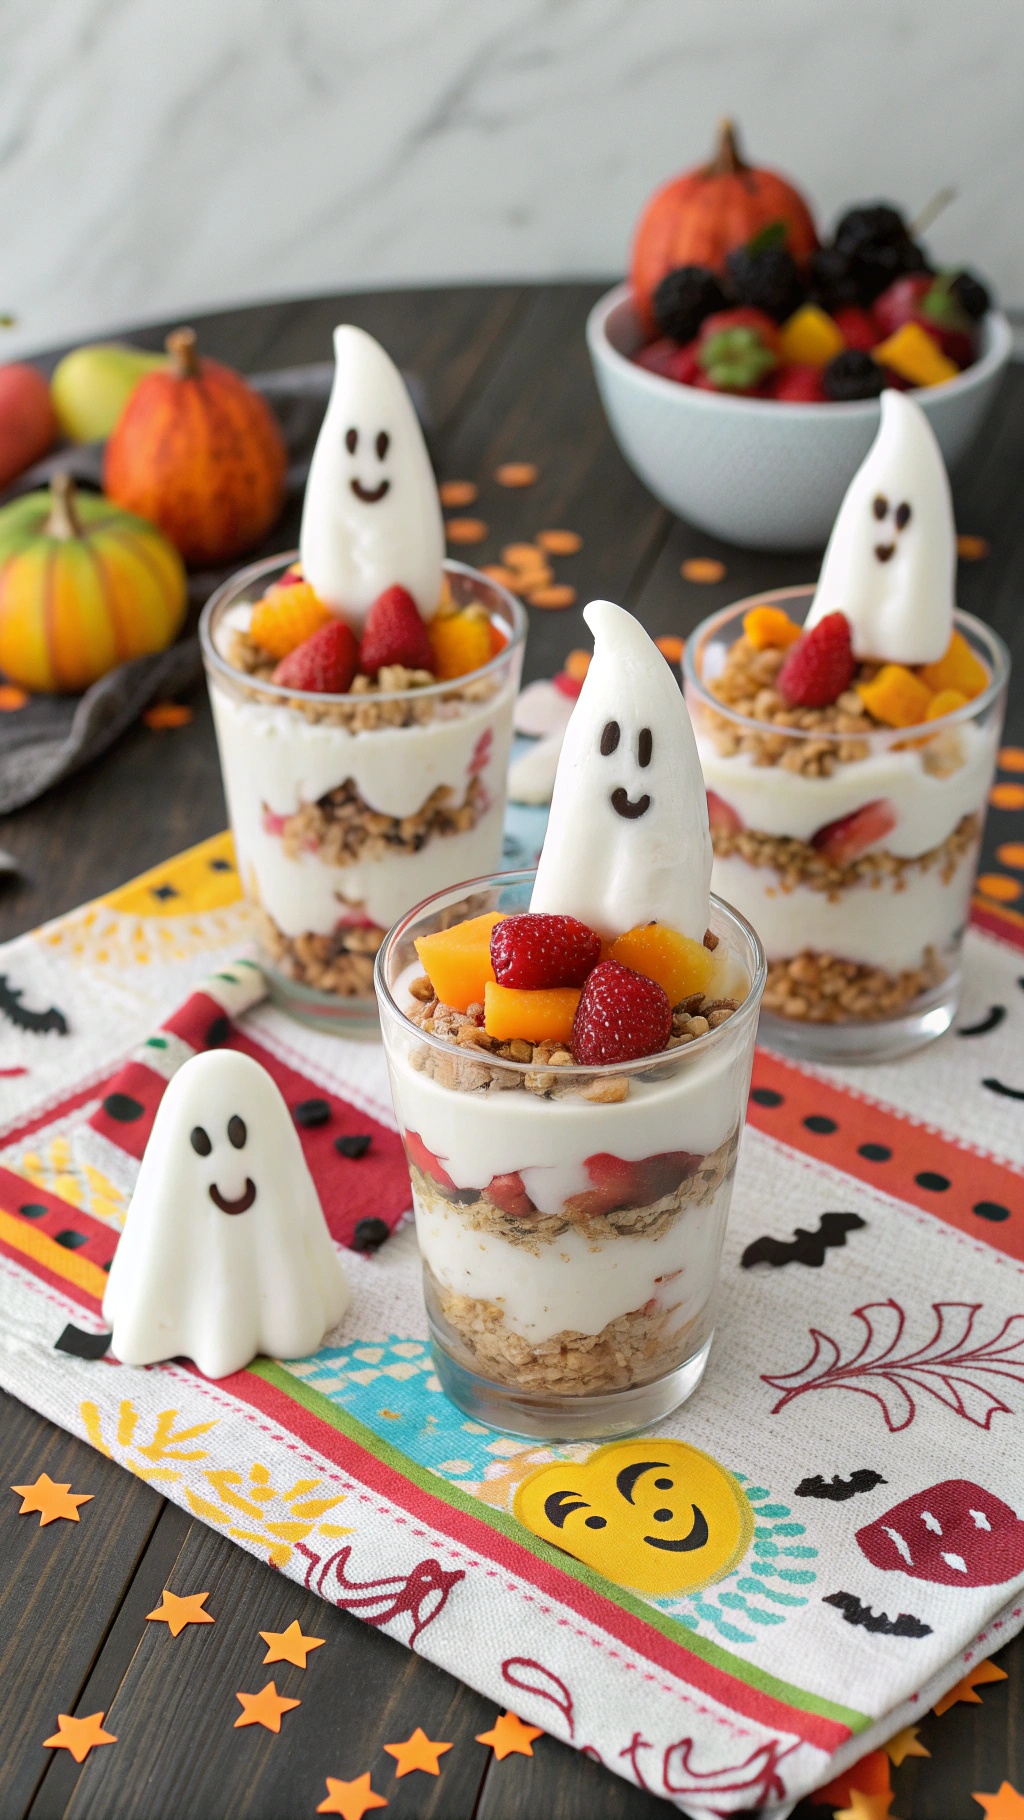
These Ghostly Yogurt Parfaits are a fun and healthy treat for busy parents looking to celebrate Halloween without the fuss of baking. The parfaits are layered with creamy yogurt, crunchy granola, and colorful fruits, making them both nutritious and visually appealing. The ghostly figures on top add a playful twist that kids will love!
To make these parfaits, start by choosing your favorite yogurt. Greek yogurt works great for added protein. Layer it with granola and a mix of fruits like strawberries, mangoes, and blueberries. The key is to make it look festive, so don’t hold back on the colors!
For the ghostly topping, you can use a small piece of whipped cream or a marshmallow shaped like a ghost. Use chocolate chips or a food-safe marker to draw on the ghost's face. This simple touch makes the parfaits extra special for Halloween.
These parfaits are not only quick to assemble but also a hit at any Halloween gathering. Kids can even help in the kitchen, making it a fun family activity. Enjoy these spooky treats while keeping it healthy!
Ingredients
- 2 cups Greek yogurt
- 1 cup granola
- 1 cup mixed fruits (strawberries, mangoes, blueberries)
- 4 marshmallows or whipped cream for ghosts
- Chocolate chips or food-safe marker for faces
Instructions
- In a clear glass or cup, start with a layer of Greek yogurt at the bottom.
- Add a layer of granola on top of the yogurt.
- Next, add a layer of mixed fruits.
- Repeat the layers until the glass is full, finishing with yogurt on top.
- For the ghostly topping, place a marshmallow or dollop of whipped cream on top and decorate with chocolate chips or draw a face with a food-safe marker.
- Serve immediately and enjoy your spooky, healthy treat!
Creepy Crawly Cupcakes: An Easy Bake-Free Recipe
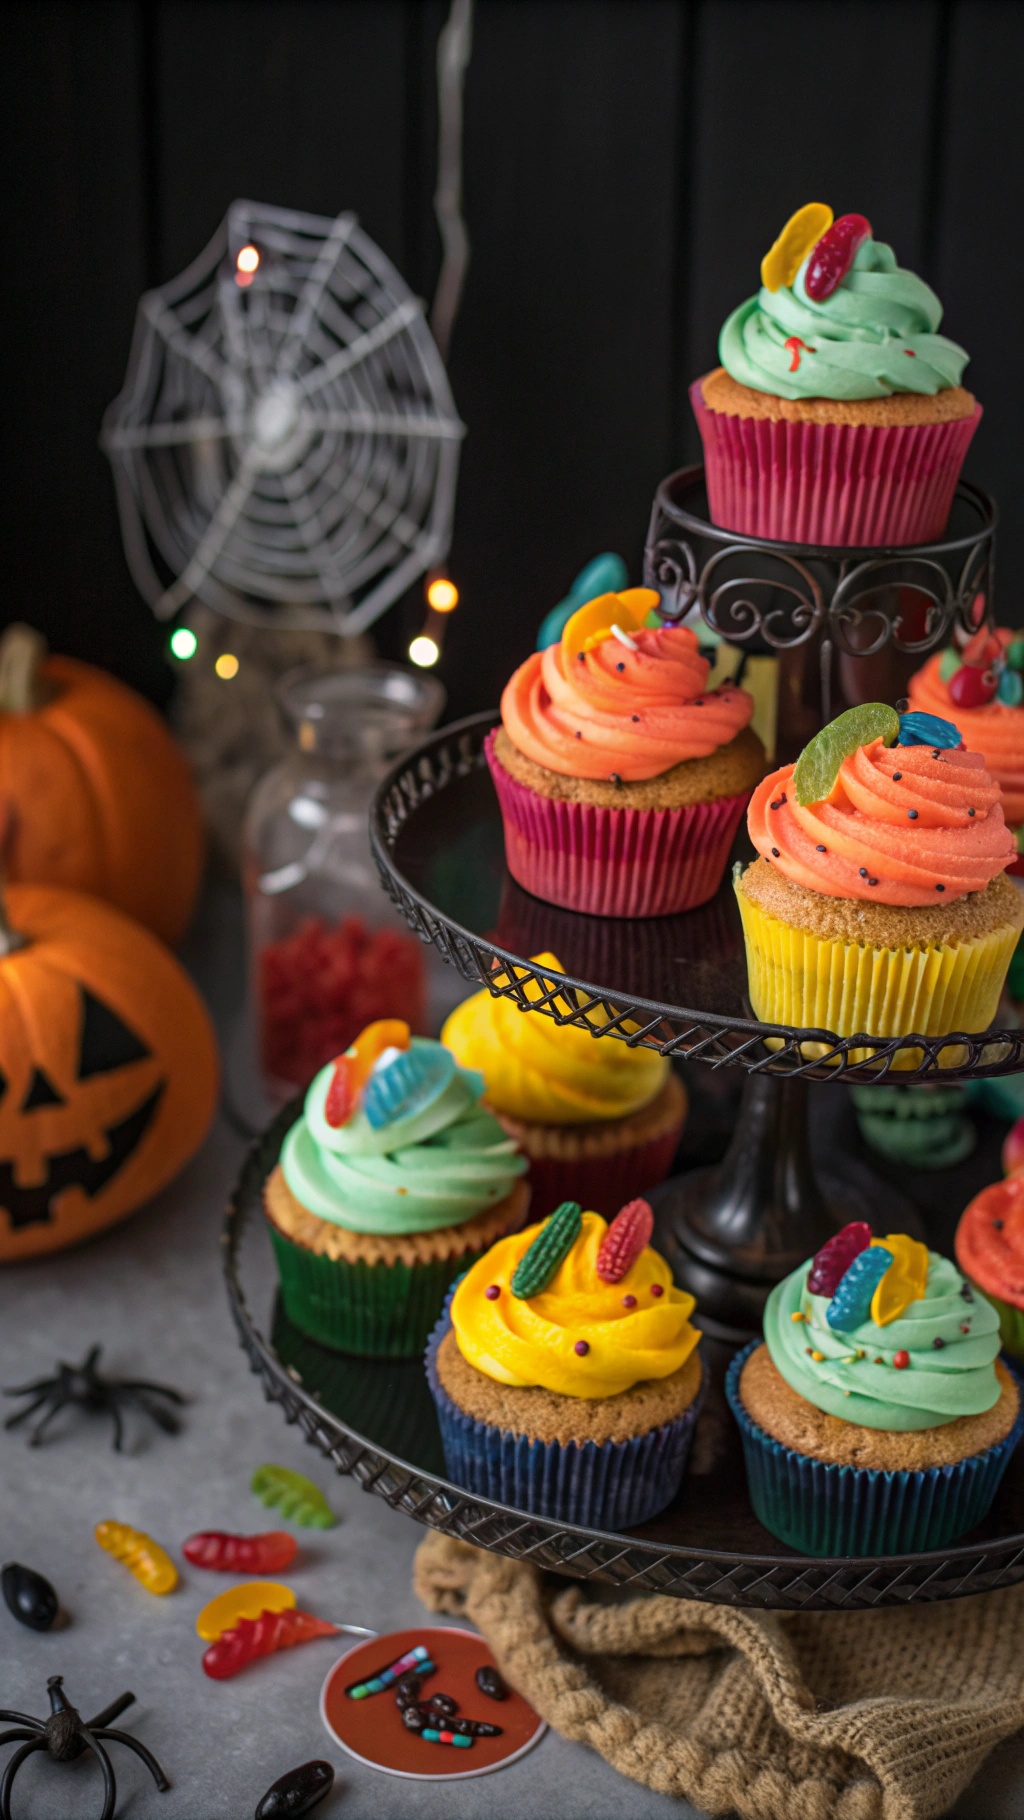
These Creepy Crawly Cupcakes are perfect for busy parents looking to whip up a fun Halloween treat without turning on the oven. The vibrant colors and playful decorations make them a hit with kids and adults alike. Imagine a tower of cupcakes topped with swirls of green and orange frosting, each adorned with gummy worms and other spooky candies. The sight alone is enough to get everyone in the Halloween spirit!
To make these cupcakes, you’ll need some basic ingredients and a little creativity. Start with store-bought cupcakes, which saves time. Then, grab your favorite frosting in fun colors. The key is to have fun with the decorations. Use gummy worms, candy eyes, or even edible glitter to give your cupcakes that creepy crawly look.
This recipe is not just easy; it’s also a great way to involve the kids. Let them help with the decorating. They’ll love getting their hands sticky and creating their own spooky designs. Plus, it’s a wonderful way to bond and make memories during the Halloween season.
Ingredients
- 12 store-bought cupcakes
- 1 cup green frosting
- 1 cup orange frosting
- Gummy worms
- Candy eyes
- Sprinkles (optional)
Instructions
- Frost the Cupcakes: Use a spatula or piping bag to spread green frosting on half of the cupcakes and orange frosting on the other half.
- Add Decorations: Place gummy worms on top of the green frosted cupcakes and candy eyes on the orange frosted ones.
- Sprinkle Some Fun: If desired, add sprinkles for an extra festive touch.
- Serve and Enjoy: Arrange the cupcakes on a spooky platter and watch them disappear!
Chocolate Chip Pumpkin Energy Bites For Quick Snacking
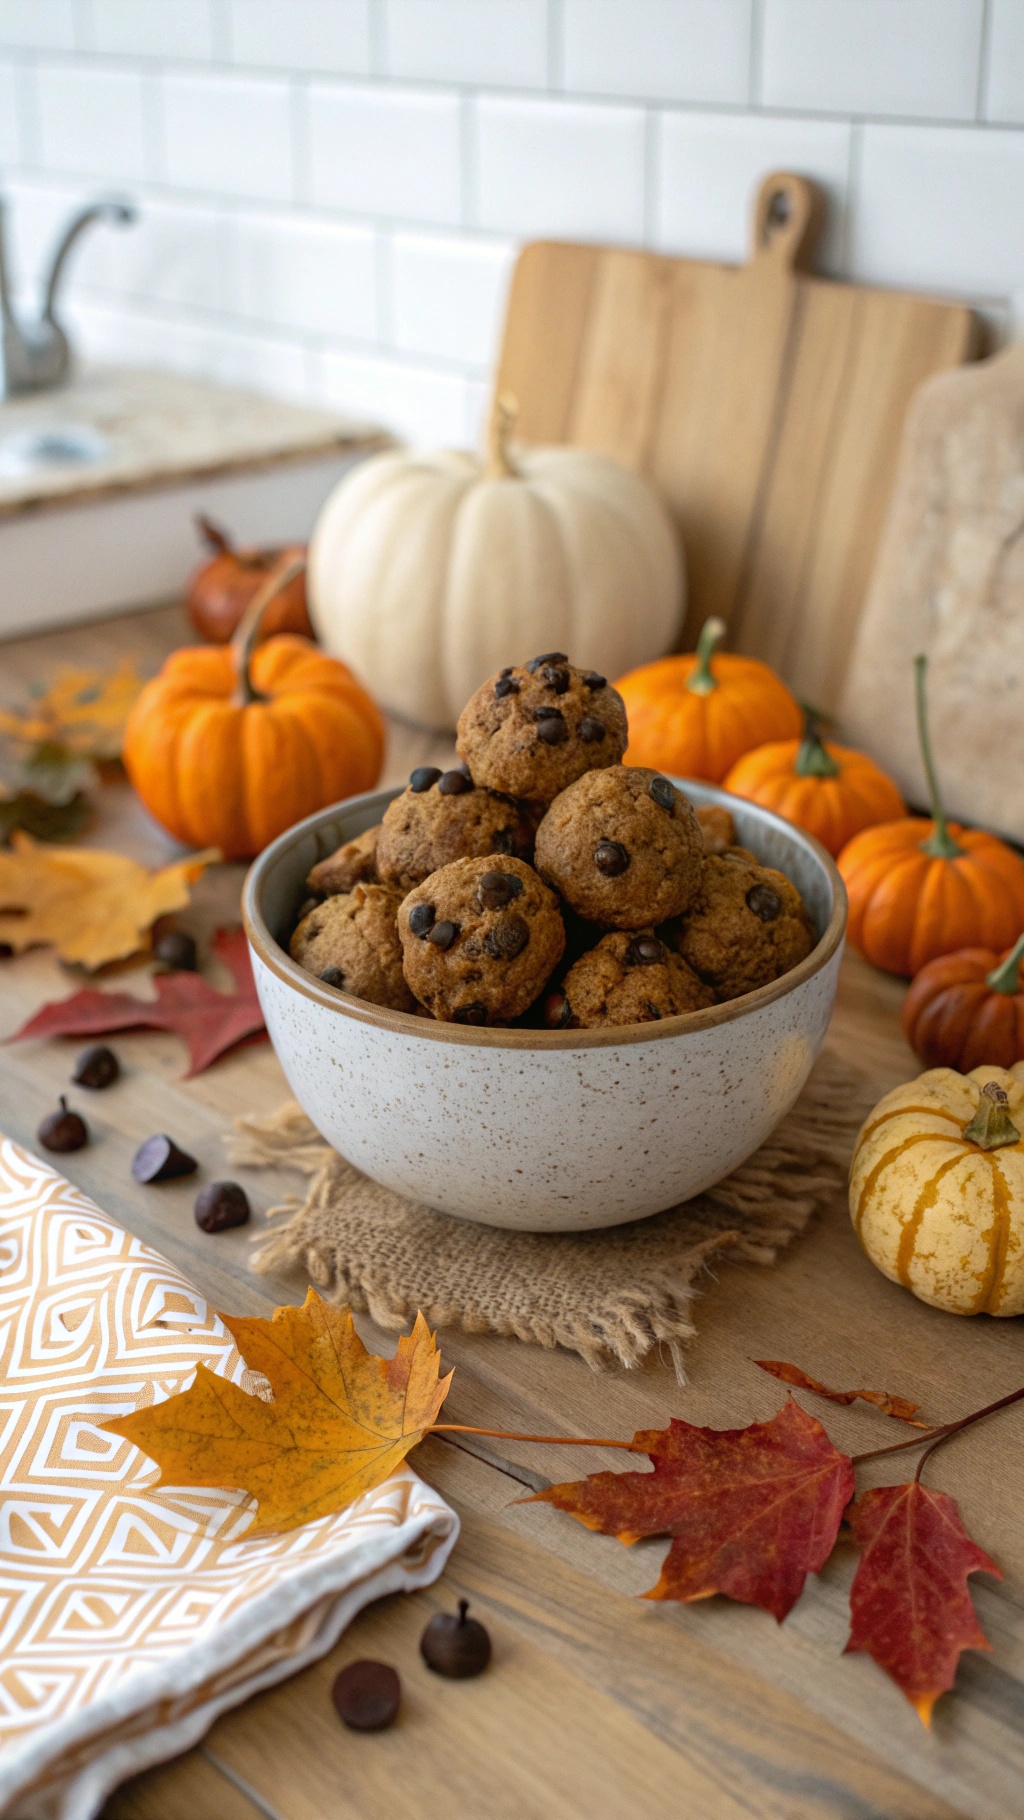
These Chocolate Chip Pumpkin Energy Bites are perfect for busy parents looking for a quick and healthy snack. The image captures a cozy setting with a bowl full of these delicious bites, surrounded by vibrant pumpkins and autumn leaves. The warm tones of the scene evoke the spirit of fall, making it an inviting treat for Halloween.
These energy bites are not just tasty; they are also packed with nutrients. The combination of pumpkin and chocolate chips makes them a hit with kids and adults alike. Plus, they require no baking, which is a huge time-saver!
To whip up these delightful snacks, you’ll need a few simple ingredients. Gather rolled oats, pumpkin puree, nut butter, honey, and chocolate chips. Mix everything together, roll them into bite-sized balls, and you’re ready to go!
These bites are great for after-school snacks or even a quick breakfast on the run. They are easy to store and can last in the fridge for up to a week. So, let’s get started on making these yummy treats!
Ingredients
- 1 cup rolled oats
- 1/2 cup pumpkin puree
- 1/2 cup nut butter (like almond or peanut butter)
- 1/4 cup honey or maple syrup
- 1/2 cup chocolate chips
- 1 teaspoon vanilla extract
- 1 teaspoon pumpkin spice (optional)
Instructions
- In a large bowl, combine the rolled oats, pumpkin puree, nut butter, honey, and vanilla extract. Mix until well combined.
- Add in the chocolate chips and pumpkin spice, if using. Stir until evenly distributed.
- Using your hands, roll the mixture into small balls, about 1 inch in diameter.
- Place the energy bites on a baking sheet lined with parchment paper.
- Refrigerate for at least 30 minutes to firm up before serving.
- Store any leftovers in an airtight container in the fridge for up to a week.
Meringue Bones: A Sweet Halloween Treat
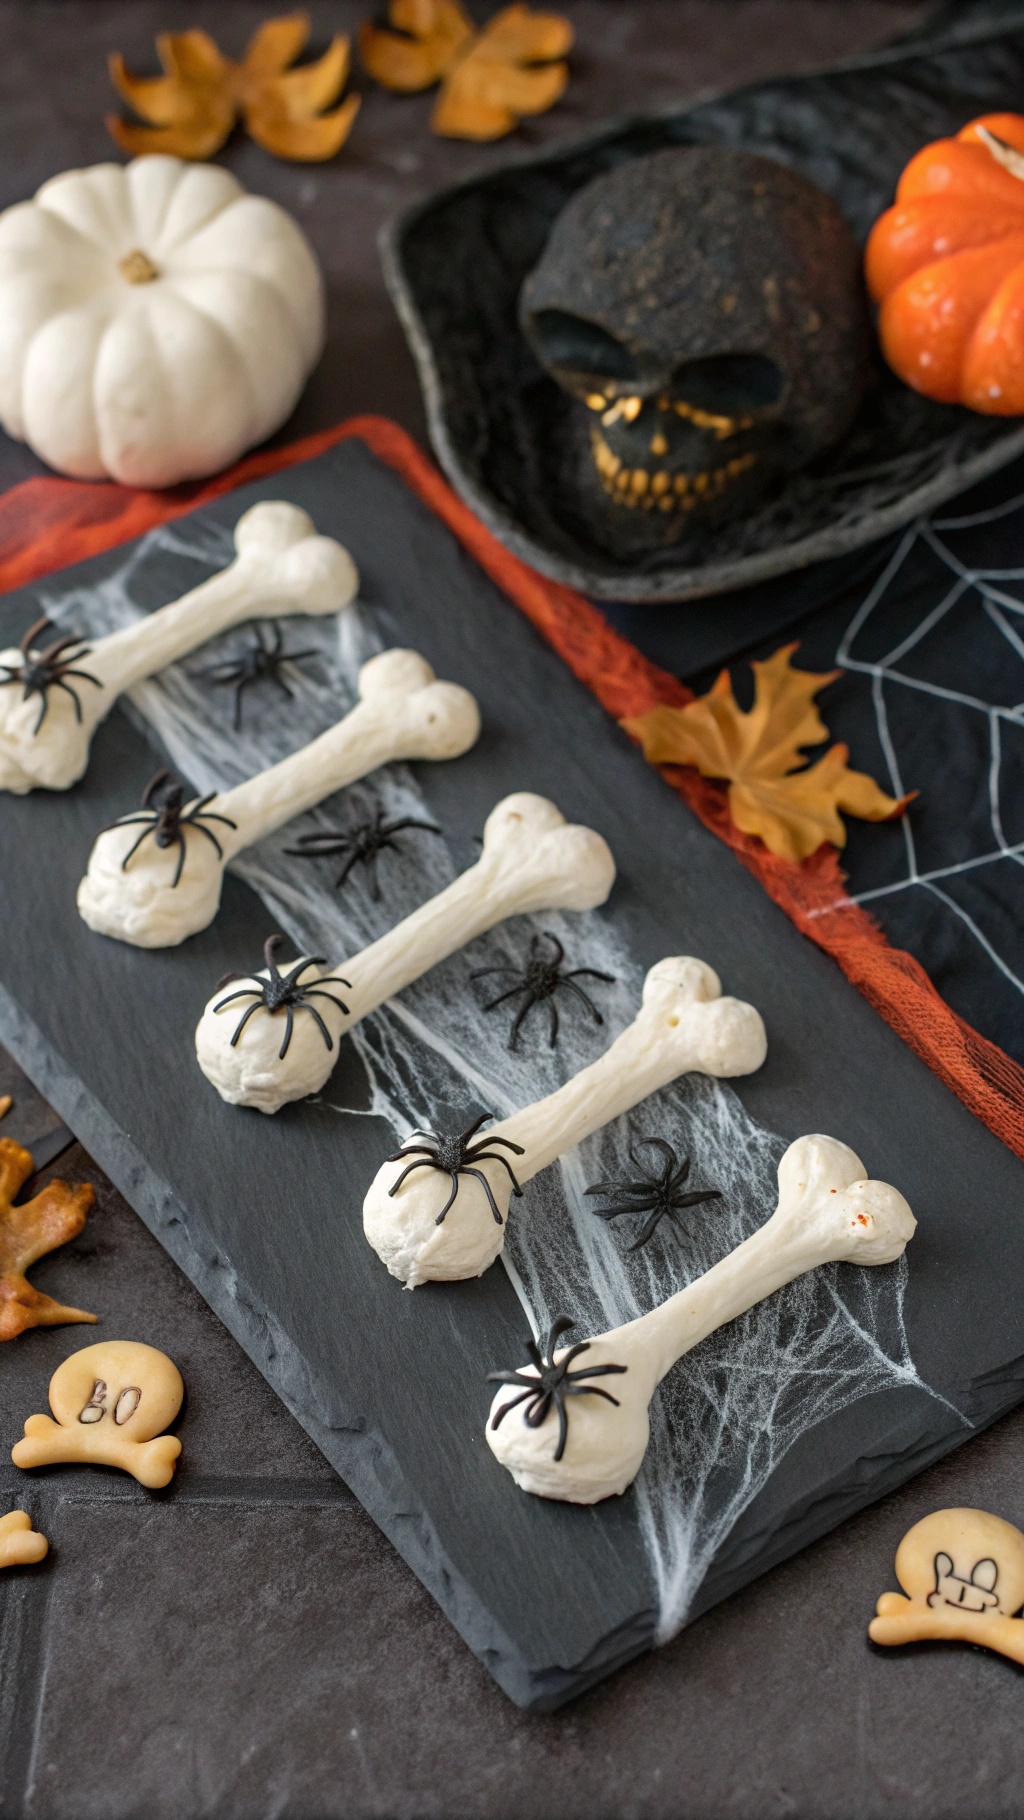
Meringue bones are a fun and spooky treat perfect for Halloween. These light and airy confections look just like bones, making them a hit at any Halloween gathering. They are easy to make and require no baking, which is a huge plus for busy parents.
The image shows a delightful display of meringue bones arranged on a dark slate board. Each bone is topped with a little black spider, adding to the Halloween vibe. The background features autumn leaves and decorative pumpkins, creating a festive atmosphere.
These treats are not just visually appealing; they are also a great way to get kids involved in the kitchen. They can help pipe the meringue and decorate the bones with spiders. Plus, they are gluten-free, making them suitable for various dietary needs.
Let’s get started on making these fun meringue bones!
Ingredients
- 4 large egg whites
- 1 cup granulated sugar
- 1/4 teaspoon cream of tartar
- 1 teaspoon vanilla extract
- Black decorating gel or melted chocolate (for spiders)
Instructions
- Preheat your oven to 200°F (93°C) and line a baking sheet with parchment paper.
- In a large bowl, beat the egg whites and cream of tartar until soft peaks form.
- Gradually add the sugar, continuing to beat until stiff peaks form and the mixture is glossy.
- Mix in the vanilla extract gently.
- Transfer the meringue to a piping bag fitted with a large round tip. Pipe bone shapes onto the prepared baking sheet.
- Bake for 1.5 to 2 hours, or until the meringues are dry and can easily lift off the parchment.
- Let them cool completely before decorating.
- Once cooled, use black decorating gel or melted chocolate to add little spiders on top of the bones.
Ghostly Pretzel Rods: A Fun And Easy Snack
These Ghostly Pretzel Rods are the perfect treat for busy parents looking to add some fun to Halloween. They are simple to make and require no baking, making them ideal for a quick snack. The combination of crunchy pretzel rods and creamy white chocolate creates a delightful contrast that kids will love.
To make these ghostly snacks, start by melting some white chocolate. Dip each pretzel rod into the melted chocolate, coating it generously. Allow any excess chocolate to drip off before placing it on parchment paper to set. Once the chocolate has hardened, use candy eyes and orange candy pieces to create the ghostly faces. This is a great way to get the kids involved in the kitchen, letting them decorate their own spooky snacks!
These pretzel rods not only look adorable but also taste amazing. They are a great addition to any Halloween party or a fun after-school treat. Plus, they are easy to store and can be made ahead of time, making them a stress-free option for busy parents.
Ingredients
- 1 cup white chocolate chips
- 10 pretzel rods
- Candy eyes
- Orange candy pieces (for noses)
- Sprinkles (optional)
Instructions
- Melt the white chocolate chips in a microwave-safe bowl, heating in 30-second intervals until smooth.
- Dip each pretzel rod into the melted chocolate, ensuring it is well-coated.
- Allow excess chocolate to drip off, then place the pretzel on parchment paper.
- Before the chocolate sets, add candy eyes and orange candy pieces to create ghost faces.
- Let the chocolate harden completely before serving or storing in an airtight container.
Monster Munch Snack Mix: A Crunchy Treat For All
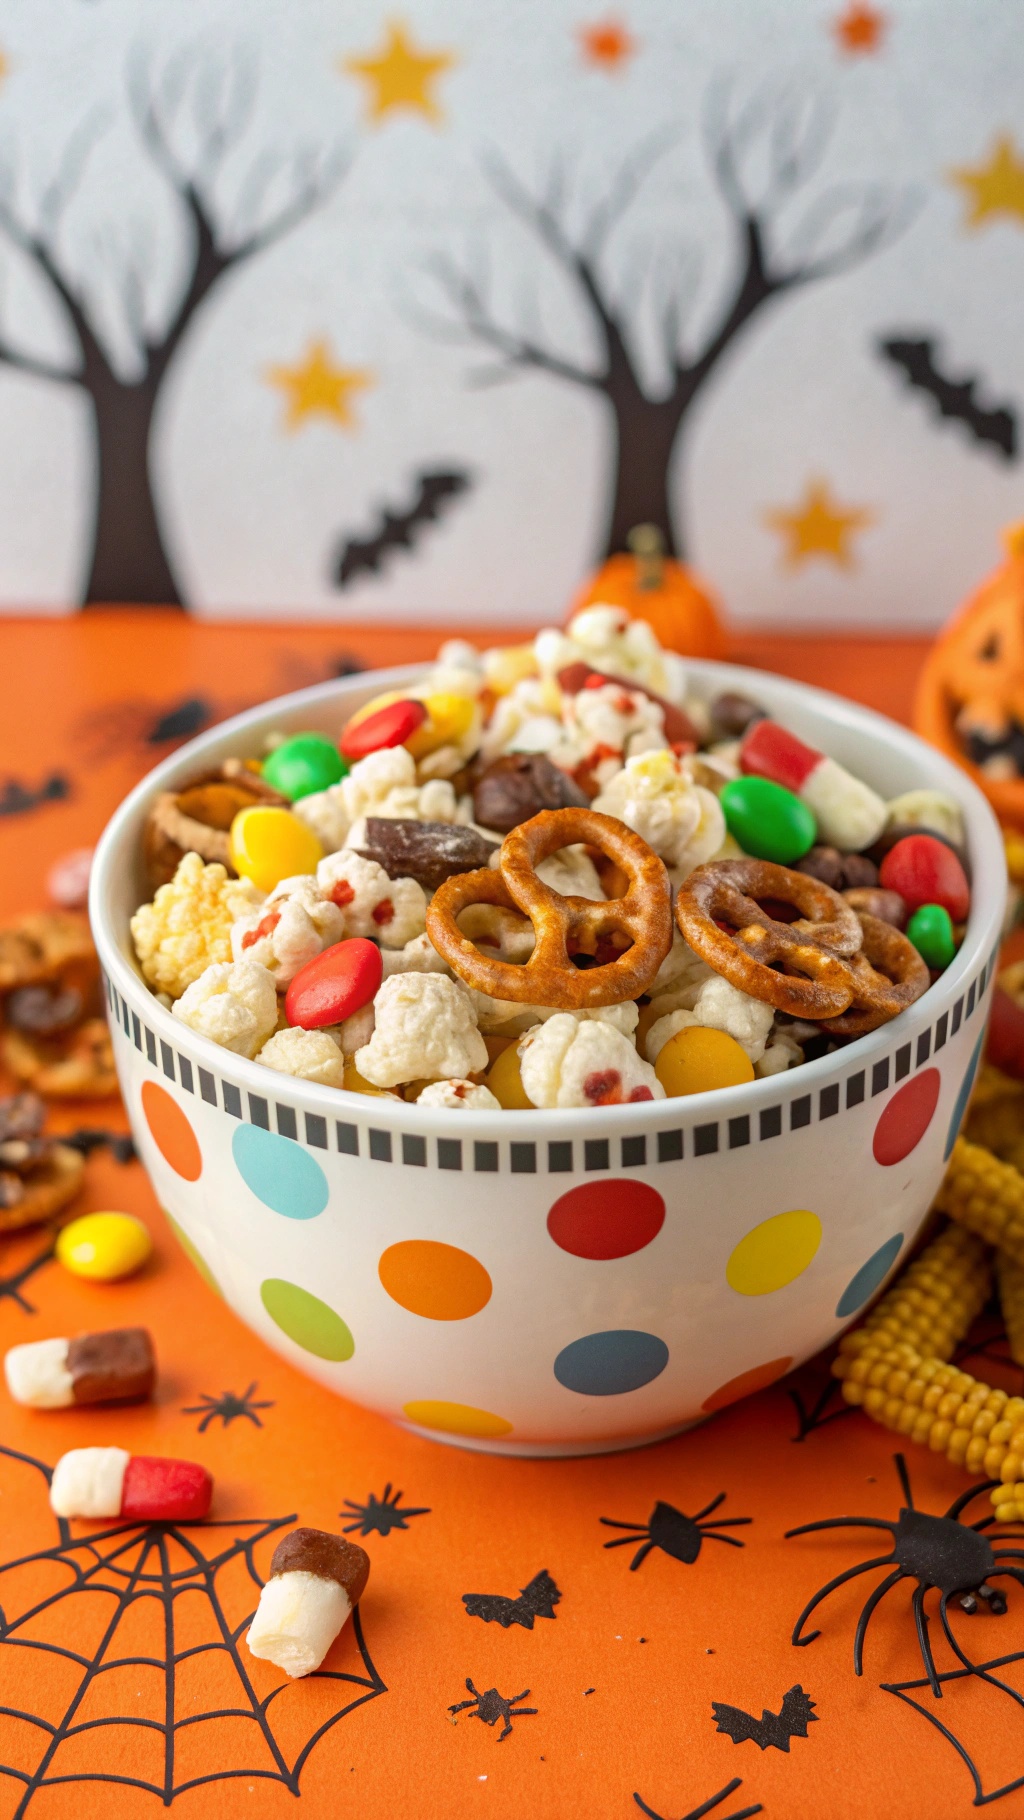
Monster Munch Snack Mix is the perfect Halloween treat for busy parents. This fun and colorful mix combines popcorn, pretzels, and candy for a crunchy snack that kids will love. It’s easy to make and requires no baking, making it a great choice for those hectic days leading up to Halloween.
The image shows a vibrant bowl filled with a delightful mix of popcorn, pretzels, and various candies. The bowl is decorated with playful polka dots, adding to the festive vibe. Surrounding the bowl are Halloween-themed decorations, including pumpkins and spider webs, creating a fun atmosphere.
This snack mix is not only tasty but also customizable. You can add your favorite candies or even some nuts for an extra crunch. It’s a great way to get the kids involved in the kitchen, letting them choose their favorite ingredients to toss into the mix.
Here’s how to whip up this spooky snack:
Ingredients
- 8 cups popped popcorn
- 2 cups pretzel twists
- 1 cup candy corn
- 1 cup chocolate candies (like M&M's)
- 1 cup Halloween-themed gummies
- 1/2 cup mini marshmallows
Instructions
- In a large bowl, combine the popped popcorn and pretzel twists.
- Add the candy corn, chocolate candies, gummies, and mini marshmallows.
- Toss everything together until well mixed.
- Serve in individual bowls or keep in an airtight container for snacking later.
Eyeball Cake Pops: A Spooky Delight
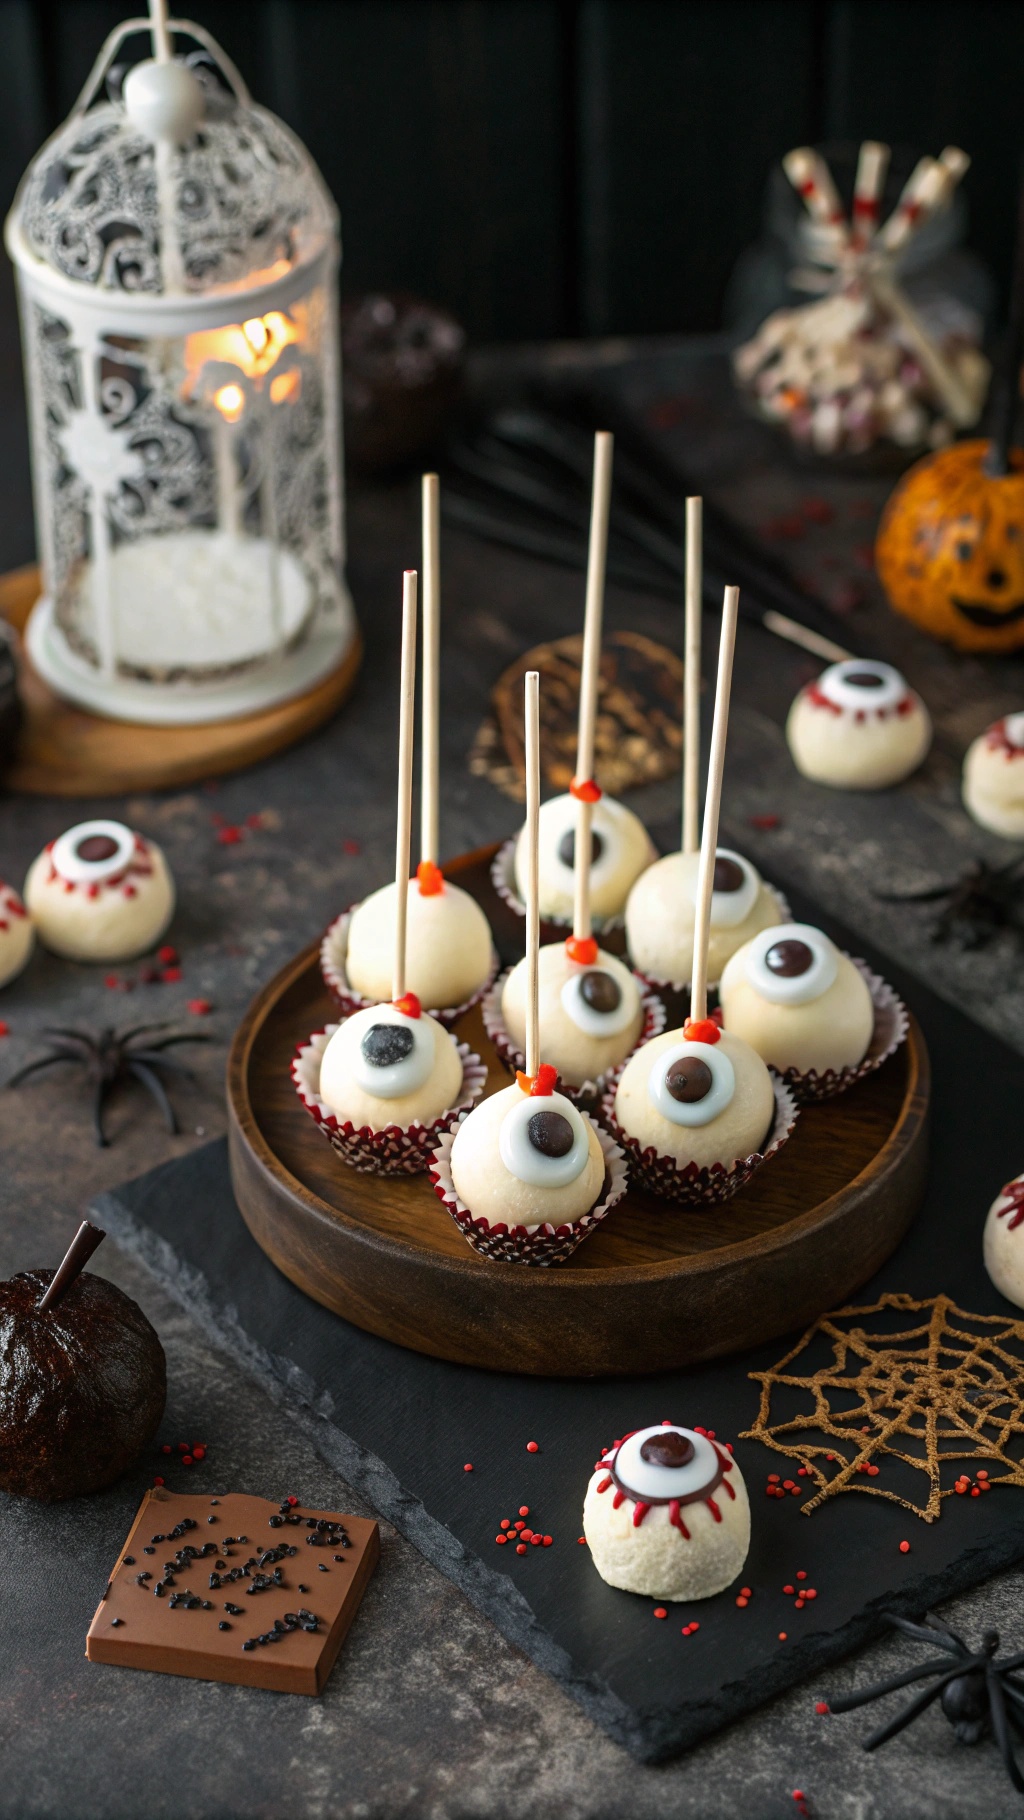
Eyeball cake pops are a fun and spooky treat perfect for Halloween. They look like little eyeballs, making them a hit at any Halloween gathering. These cake pops are easy to make and require no baking, making them ideal for busy parents. Just imagine the smiles on your kids' faces when they see these creepy yet cute treats!
To make these delightful eyeball cake pops, you’ll need a few simple ingredients. The combination of cake and frosting creates a moist and delicious base, while the candy coating adds a fun twist. Decorating them with candy eyes and red icing gives them that perfect Halloween touch.
Ingredients
- 1 box of cake mix (any flavor)
- 1 can of frosting (any flavor)
- 1 package of white candy melts
- Candy eyes
- Red icing (for decoration)
- Sticks for cake pops
Instructions
- Bake the Cake: Prepare the cake mix according to package instructions. Once baked, let it cool completely.
- Mix with Frosting: Crumble the cooled cake into a large bowl. Add the frosting and mix until well combined.
- Shape the Pops: Roll the mixture into small balls and place them on a baking sheet lined with parchment paper. Insert a stick into each ball.
- Chill: Refrigerate the cake pops for about 30 minutes to firm them up.
- Melt the Candy: In a microwave-safe bowl, melt the white candy melts according to package instructions.
- Coat the Pops: Dip each cake pop into the melted candy, ensuring they are fully coated. Allow excess to drip off.
- Add Decorations: Before the coating sets, place candy eyes on top and use red icing to create veins for a spooky effect.
- Let Set: Allow the cake pops to set completely before serving.
These eyeball cake pops are sure to be a favorite. They are simple to make and look fantastic on any Halloween table. Enjoy making these spooky delights with your little ones!


Comments
Post a Comment