7 Budget-Friendly Baking Recipes You Can Make for Under $5
7 Budget-Friendly Baking Recipes You Can Make for Under $5
Cake, cookies, and brownies can be enjoyed without breaking the bank! "Budget-Friendly Baking Ideas: Delicious Recipes for Under $5" brings you a collection of easy and tasty recipes that won’t strain your wallet. Each mouthwatering treat can be made with simple ingredients, proving that delicious baked goods can fit into any budget. Grab your apron and get ready to whip up some sweet wonders without the hefty price tag!
Easy And Affordable Classic Peach Cobbler Recipe
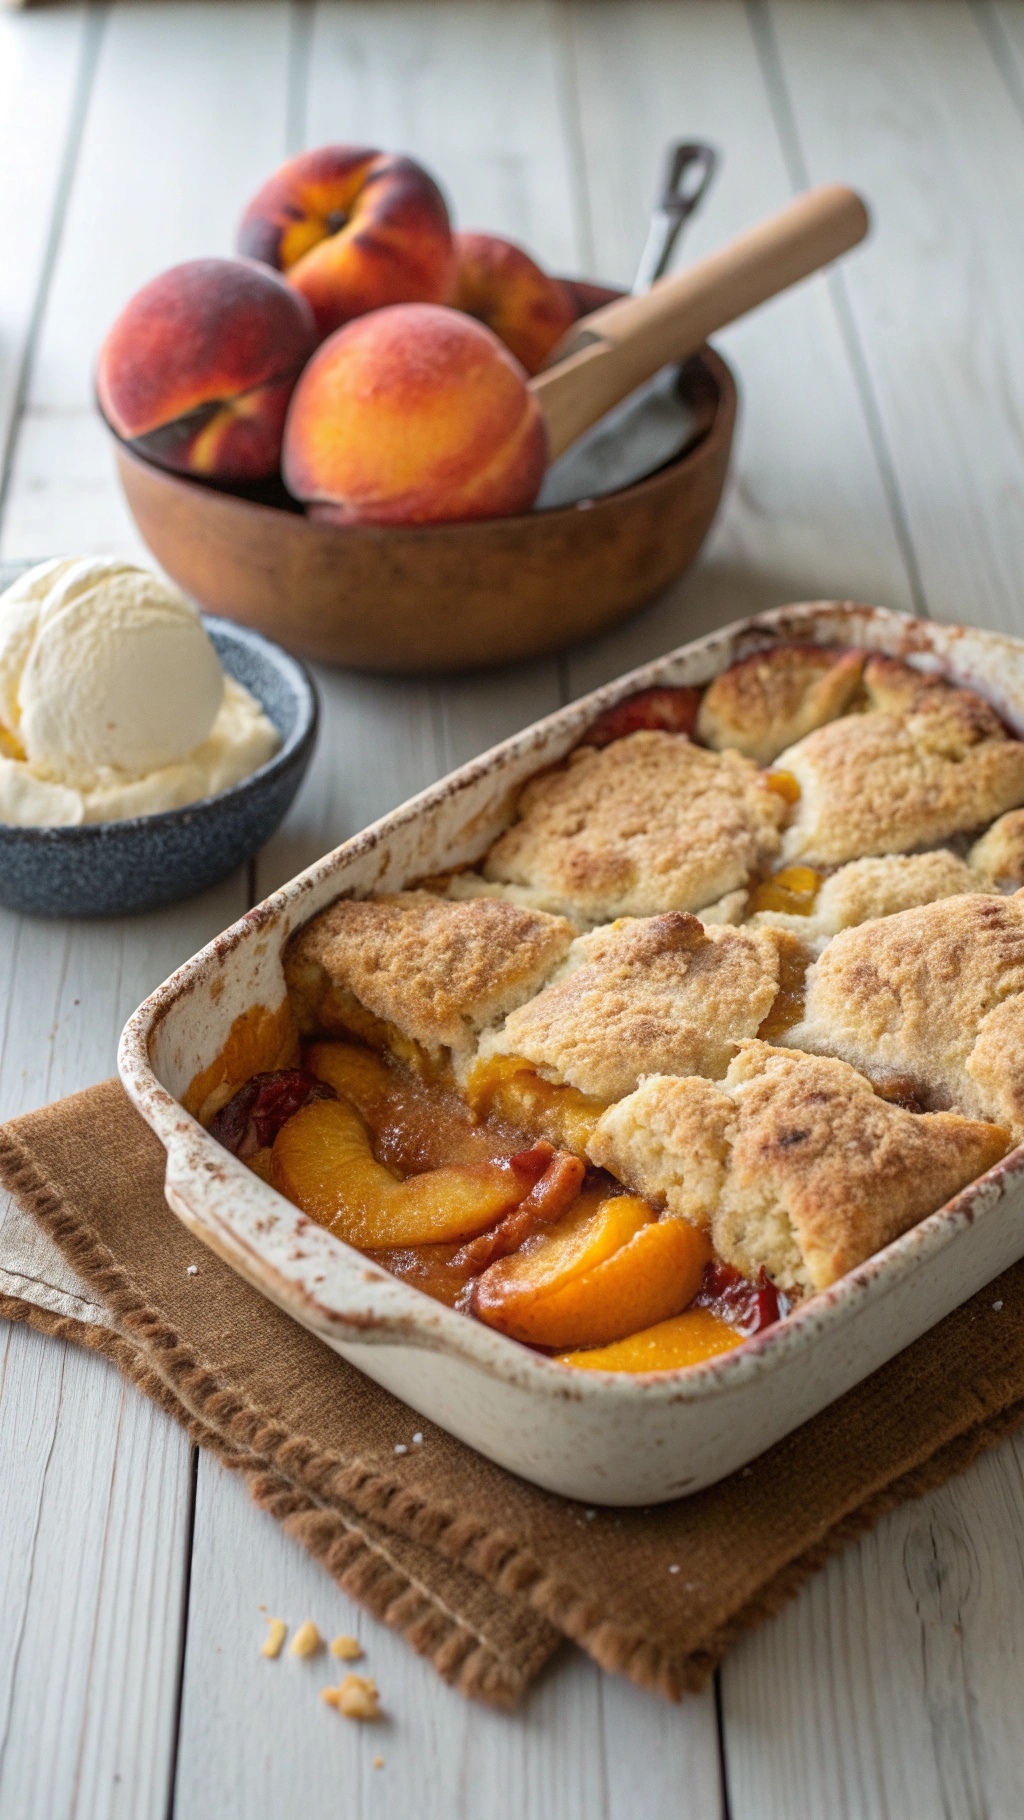
Peach cobbler is a classic dessert that brings comfort and joy to any table. This easy recipe is perfect for those who want to enjoy a sweet treat without breaking the bank. The image showcases a warm, golden cobbler topped with a crumbly biscuit layer, surrounded by juicy peaches. A scoop of vanilla ice cream sits nearby, ready to complement the warm dessert.
Making peach cobbler is simple and requires just a few ingredients. You’ll need fresh peaches, sugar, flour, baking powder, milk, and butter. This recipe is not only budget-friendly but also quick to prepare, making it a great option for busy weeknights or last-minute gatherings.
Let’s get started on this delightful dessert that everyone will love!
Ingredients
- 4 cups fresh peaches, sliced
- 1 cup granulated sugar
- 1 cup all-purpose flour
- 1 tablespoon baking powder
- 1 cup milk
- 1/2 cup unsalted butter, melted
- 1 teaspoon vanilla extract
Instructions
- Preheat your oven to 350°F (175°C).
- In a bowl, mix the sliced peaches with half of the sugar and set aside.
- In another bowl, combine the flour, baking powder, and remaining sugar. Stir in the milk, melted butter, and vanilla until smooth.
- Pour the batter into a greased baking dish. Spoon the peach mixture over the batter, making sure to distribute it evenly.
- Bake for 40-45 minutes, or until the top is golden brown and the peaches are bubbly.
- Serve warm, ideally with a scoop of vanilla ice cream on top!
Quick And Simple Chocolate Mug Cake
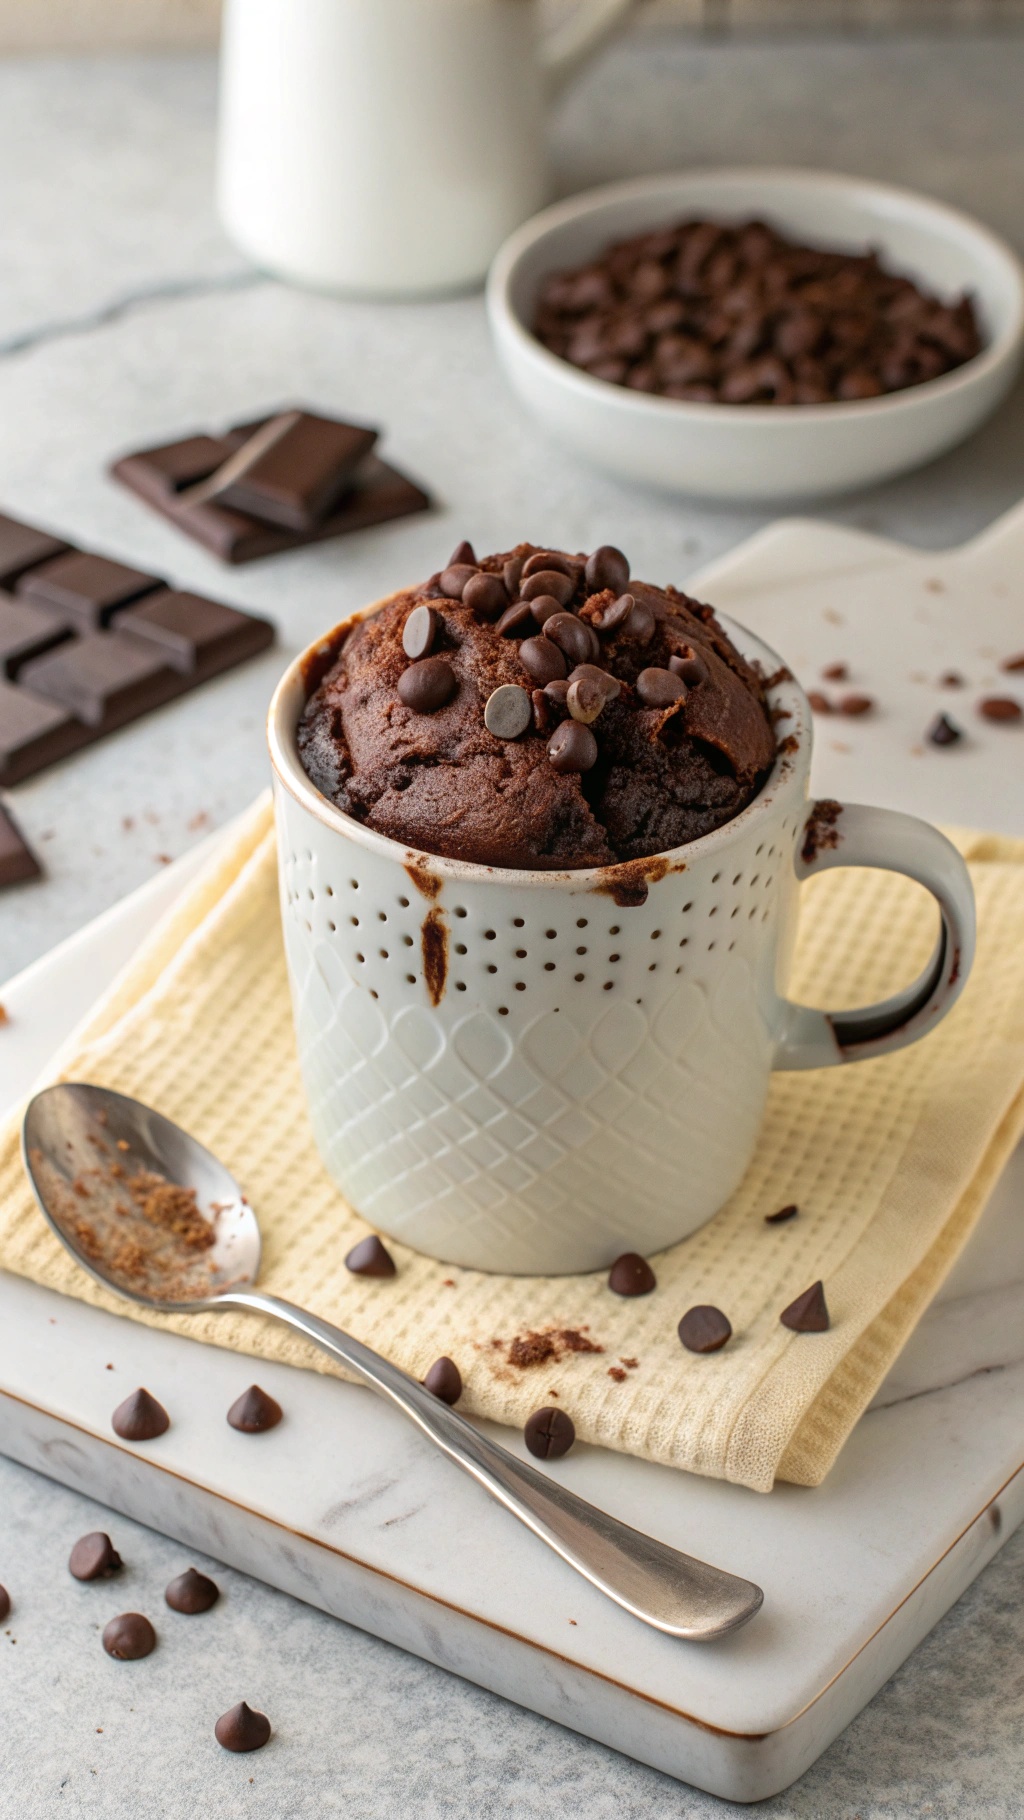
Craving something sweet but short on time? This quick and simple chocolate mug cake is the perfect solution. It’s rich, moist, and ready in just a few minutes. Plus, it’s budget-friendly, making it a great option for anyone looking to satisfy their sweet tooth without breaking the bank.
The image showcases a delicious chocolate mug cake topped with chocolate chips, sitting in a charming white mug. The warm, gooey texture is inviting, and you can almost taste the chocolate goodness just by looking at it. Perfect for a late-night snack or a quick dessert, this mug cake is sure to impress.
Making this treat is super easy. You just need a few basic ingredients, and you can whip it up in no time. Let’s get into the details!
Ingredients
- 4 tablespoons all-purpose flour
- 4 tablespoons granulated sugar
- 2 tablespoons unsweetened cocoa powder
- 1/8 teaspoon baking powder
- 1/8 teaspoon salt
- 3 tablespoons milk
- 2 tablespoons vegetable oil
- 1/4 teaspoon vanilla extract
- 2 tablespoons chocolate chips (optional)
Instructions
- In a microwave-safe mug, mix the flour, sugar, cocoa powder, baking powder, and salt until well combined.
- Add the milk, vegetable oil, and vanilla extract. Stir until smooth and there are no lumps.
- If you like, fold in the chocolate chips for an extra chocolatey treat.
- Microwave the mug on high for about 1 minute and 30 seconds. Cooking time may vary, so keep an eye on it to avoid overflowing.
- Let it cool for a minute before digging in. Enjoy your delicious chocolate mug cake!
No-Bake Strawberry Cheesecake Cups
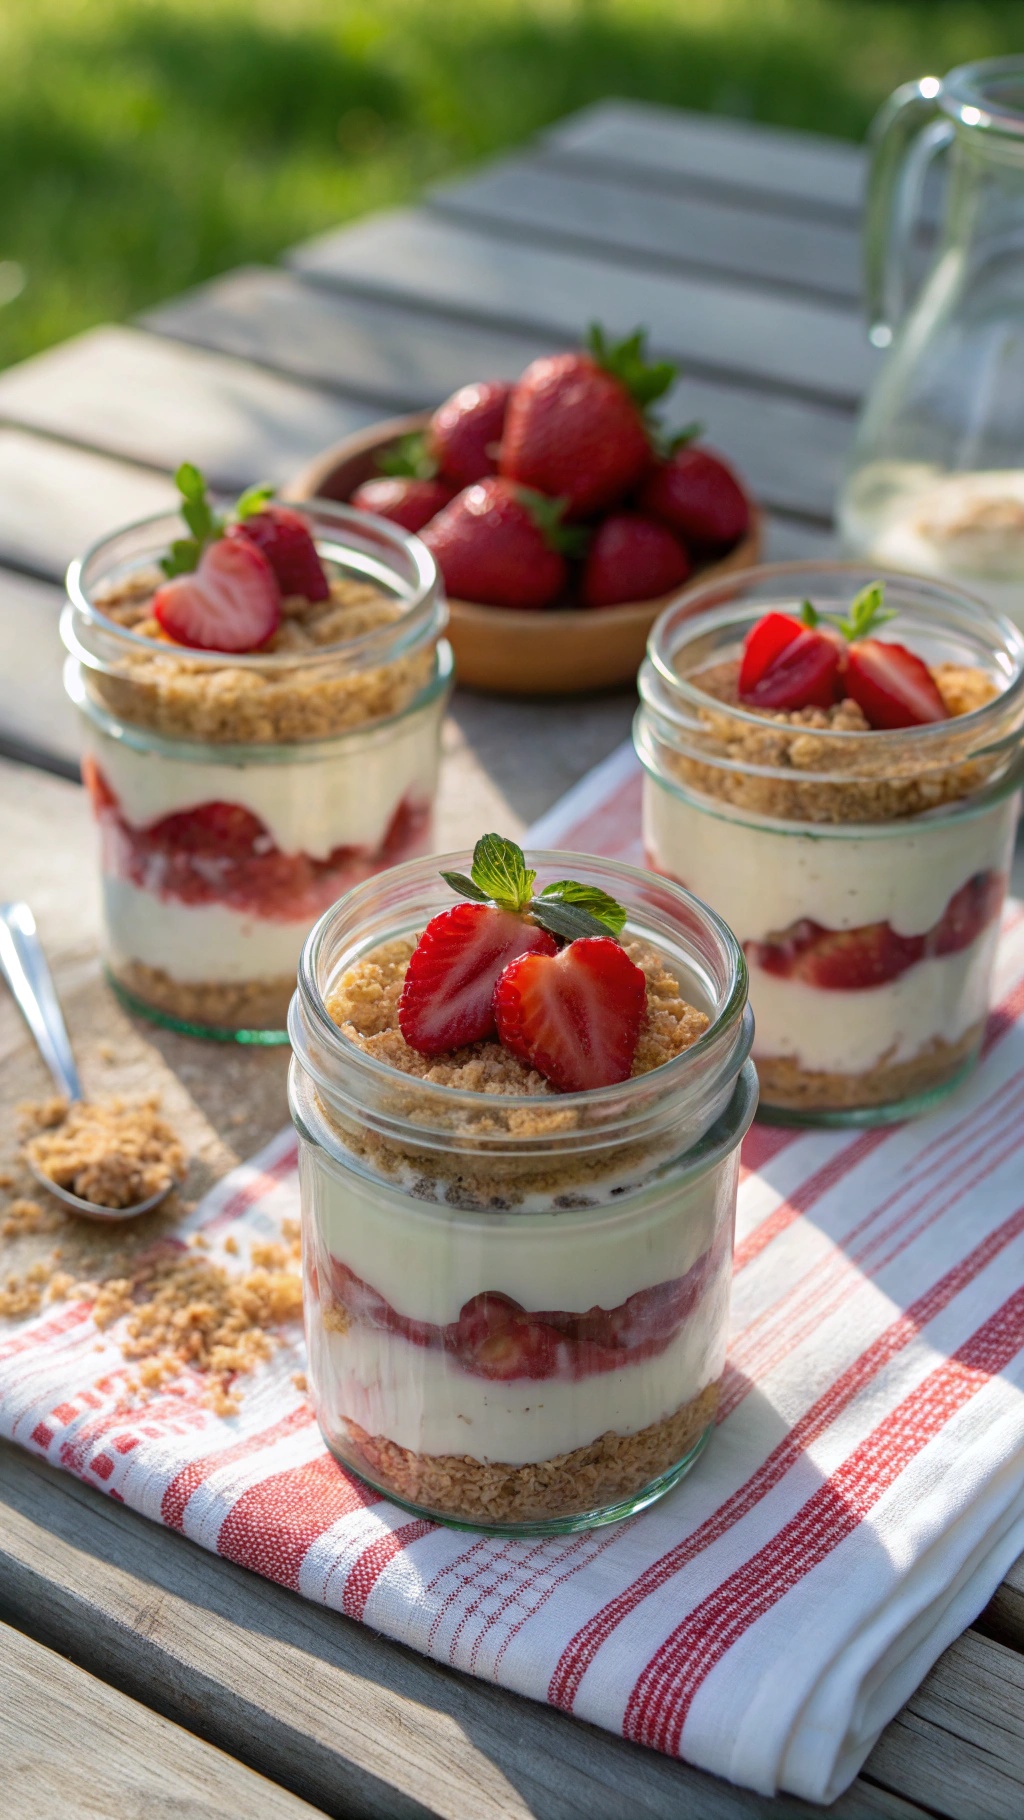
No-bake strawberry cheesecake cups are a delightful treat that’s easy to make and budget-friendly. These little jars are filled with layers of creamy cheesecake, fresh strawberries, and a crunchy graham cracker crust. They look beautiful and taste amazing, making them perfect for any occasion.
The image shows these lovely cups, each topped with fresh strawberries and a sprinkle of graham cracker crumbs. The vibrant red of the strawberries contrasts beautifully with the creamy filling, creating an inviting dessert that anyone would love to dig into.
This recipe is not only simple but also costs less than $5 to make. It’s a great way to impress your friends or family without breaking the bank. Let’s get started!
Ingredients
- 1 cup graham cracker crumbs
- 2 tablespoons sugar
- 4 tablespoons unsalted butter, melted
- 8 ounces cream cheese, softened
- 1/2 cup powdered sugar
- 1 teaspoon vanilla extract
- 1 cup heavy whipping cream
- 2 cups fresh strawberries, sliced
Instructions
- Make the Crust: In a bowl, combine graham cracker crumbs, sugar, and melted butter. Mix well. Divide the mixture evenly among serving cups, pressing it down to form a crust.
- Prepare the Cheesecake Filling: In another bowl, beat the softened cream cheese, powdered sugar, and vanilla extract until smooth. In a separate bowl, whip the heavy cream until stiff peaks form. Gently fold the whipped cream into the cream cheese mixture until well combined.
- Layer the Cups: Spoon a layer of the cheesecake filling over the crust in each cup. Add a layer of sliced strawberries on top of the filling. Repeat the layers until the cups are filled.
- Chill: Cover the cups and refrigerate for at least 2 hours to allow the flavors to meld and the cheesecake to set.
- Serve: Before serving, top with additional strawberries and a sprinkle of graham cracker crumbs. Enjoy your delicious no-bake strawberry cheesecake cups!
Delightful Cinnamon Sugar Donuts
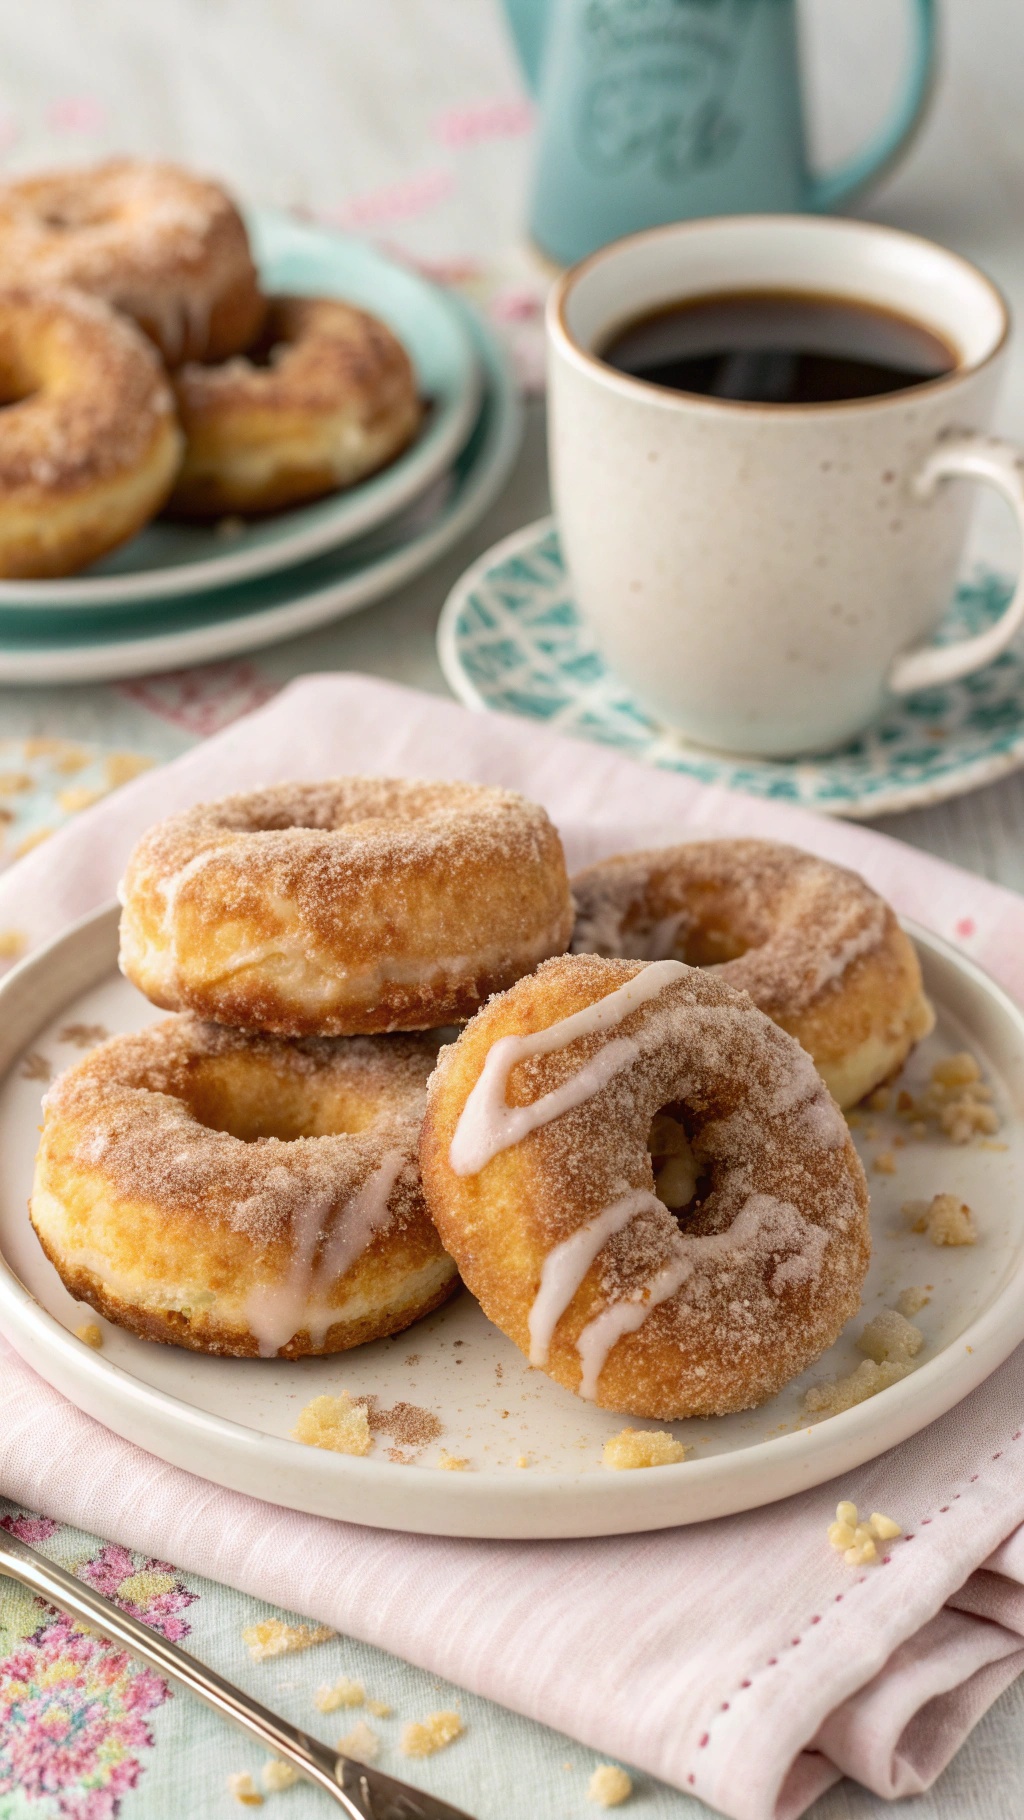
Cinnamon sugar donuts are a delightful treat that can brighten any day. These fluffy, sweet rings are coated in a sugary cinnamon mixture that makes them irresistible. Perfect for breakfast or a snack, they are easy to make and budget-friendly.
Imagine biting into a warm donut, the sweet cinnamon flavor melting in your mouth. Pair these with a cup of coffee, and you have a cozy moment that feels special. Making these donuts at home is not only fun but also a great way to save money while enjoying a delicious dessert.
Let’s get started on making these tasty treats!
Ingredients
- 2 cups all-purpose flour
- 1/2 cup granulated sugar
- 2 teaspoons baking powder
- 1/2 teaspoon salt
- 1/2 teaspoon ground cinnamon
- 1/2 cup milk
- 2 large eggs
- 1/4 cup unsalted butter, melted
- 1/2 cup granulated sugar (for coating)
- 1 tablespoon ground cinnamon (for coating)
Instructions
- Preheat the oven to 350°F (175°C) and grease a donut pan.
- In a large bowl, mix the flour, sugar, baking powder, salt, and cinnamon.
- In another bowl, whisk together the milk, eggs, and melted butter.
- Combine the wet and dry ingredients, stirring until just mixed.
- Fill each donut mold about halfway with the batter.
- Bake for 10-12 minutes, or until a toothpick comes out clean.
- While the donuts cool, mix the sugar and cinnamon for the coating.
- Once cooled, brush the donuts with melted butter and roll them in the cinnamon sugar mixture.
- Enjoy your delightful cinnamon sugar donuts!
Simple Chocolate Chip Cookies On A Budget
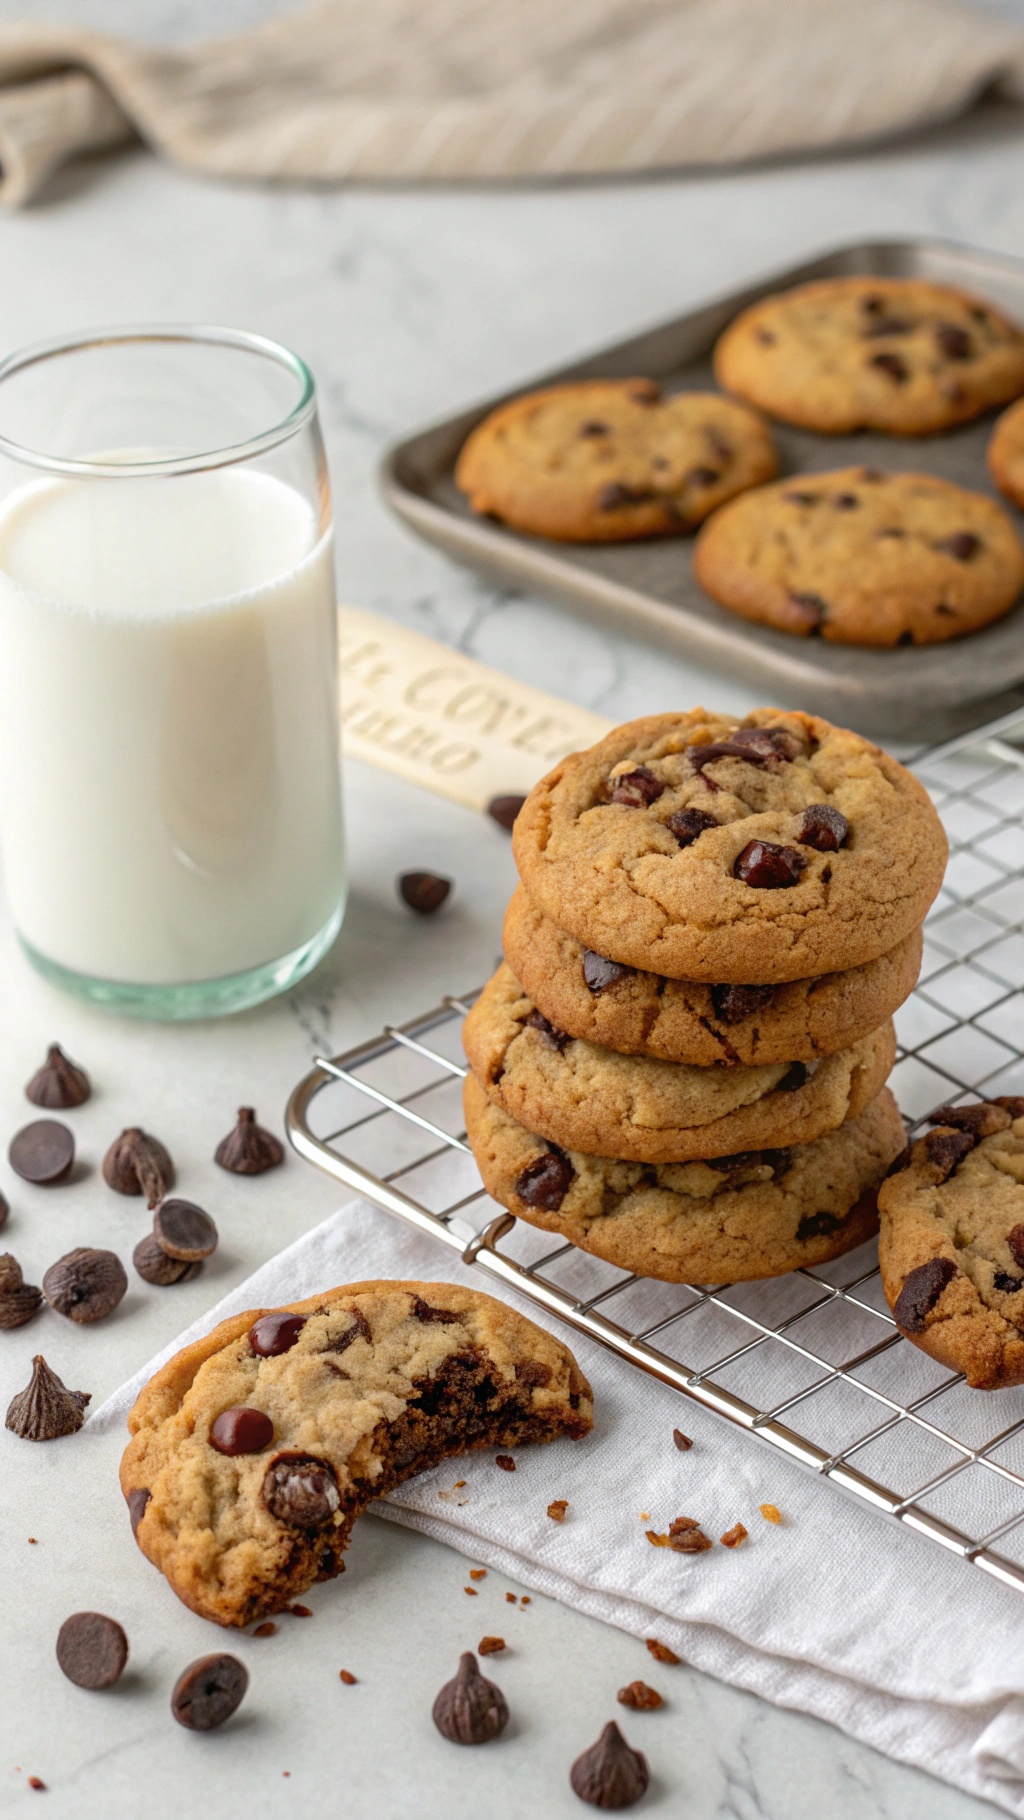
Chocolate chip cookies are a classic treat that everyone loves. They are simple to make and don’t require fancy ingredients. The image shows a stack of freshly baked cookies, golden brown and studded with chocolate chips, alongside a glass of milk. This combination is perfect for a cozy snack or dessert.
Making these cookies on a budget is easy. You likely have most of the ingredients at home. Flour, sugar, butter, and chocolate chips are all affordable and can be found in any grocery store. Plus, these cookies can be whipped up in no time!
Let’s get to the recipe so you can enjoy these delightful cookies without breaking the bank.
Ingredients
- 1 cup all-purpose flour
- 1/2 cup granulated sugar
- 1/2 cup brown sugar
- 1/2 cup unsalted butter, softened
- 1/2 teaspoon baking soda
- 1/4 teaspoon salt
- 1 teaspoon vanilla extract
- 1 cup chocolate chips
- 1 large egg
Instructions
- Preheat the oven to 350°F (175°C). Line a baking sheet with parchment paper.
- In a large bowl, cream together the softened butter, granulated sugar, and brown sugar until smooth.
- Add the egg and vanilla extract, mixing until well combined.
- In another bowl, whisk together the flour, baking soda, and salt. Gradually add this mixture to the wet ingredients, stirring until just combined.
- Fold in the chocolate chips.
- Drop spoonfuls of dough onto the prepared baking sheet, spacing them about 2 inches apart.
- Bake for 10-12 minutes, or until the edges are golden brown. Let them cool on the baking sheet for a few minutes before transferring to a wire rack.
Classic Rice Krispies Treats Made Easy
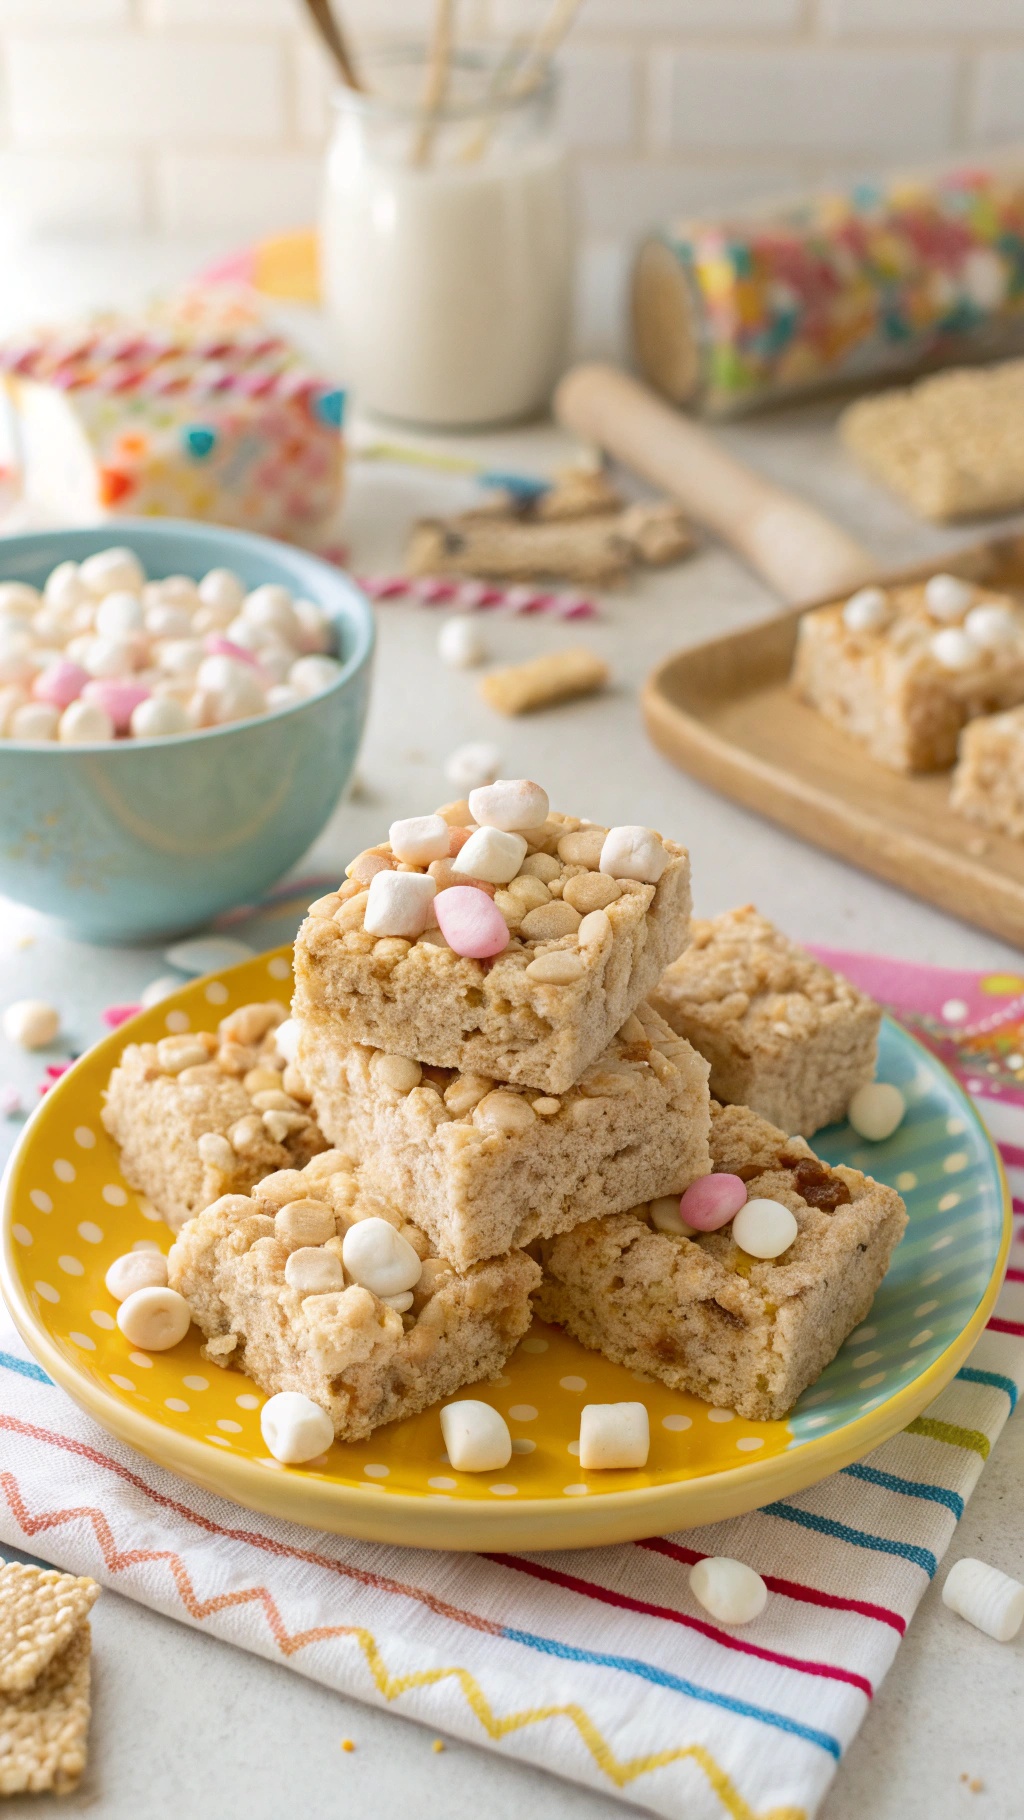
Rice Krispies treats are a timeless favorite that brings back childhood memories. They are simple to make and require just a few ingredients. The image shows a delightful stack of these chewy squares topped with colorful mini marshmallows, making them even more fun and appealing.
This recipe is not only budget-friendly but also perfect for a quick snack or dessert. With just rice cereal, marshmallows, and butter, you can whip up a batch in no time. The treats are soft, gooey, and oh-so-satisfying!
Let’s get to the recipe so you can enjoy these delicious treats!
Ingredients
- 3 tablespoons unsalted butter
- 1 package (10 oz) mini marshmallows
- 6 cups Rice Krispies cereal
- 1/2 cup mini marshmallows (for topping)
Instructions
- Melt the Butter: In a large saucepan, melt the butter over low heat. Once melted, add the mini marshmallows and stir until completely melted and smooth.
- Add Cereal: Remove the saucepan from heat and quickly stir in the Rice Krispies cereal until well coated.
- Press into Pan: Using a buttered spatula or wax paper, press the mixture evenly into a greased 9x13-inch pan.
- Add Toppings: Sprinkle the additional mini marshmallows on top and gently press them into the mixture.
- Cool and Cut: Allow the treats to cool completely before cutting them into squares. Enjoy your delicious Rice Krispies treats!
Frugal Lemon Bars For A Tart Delight
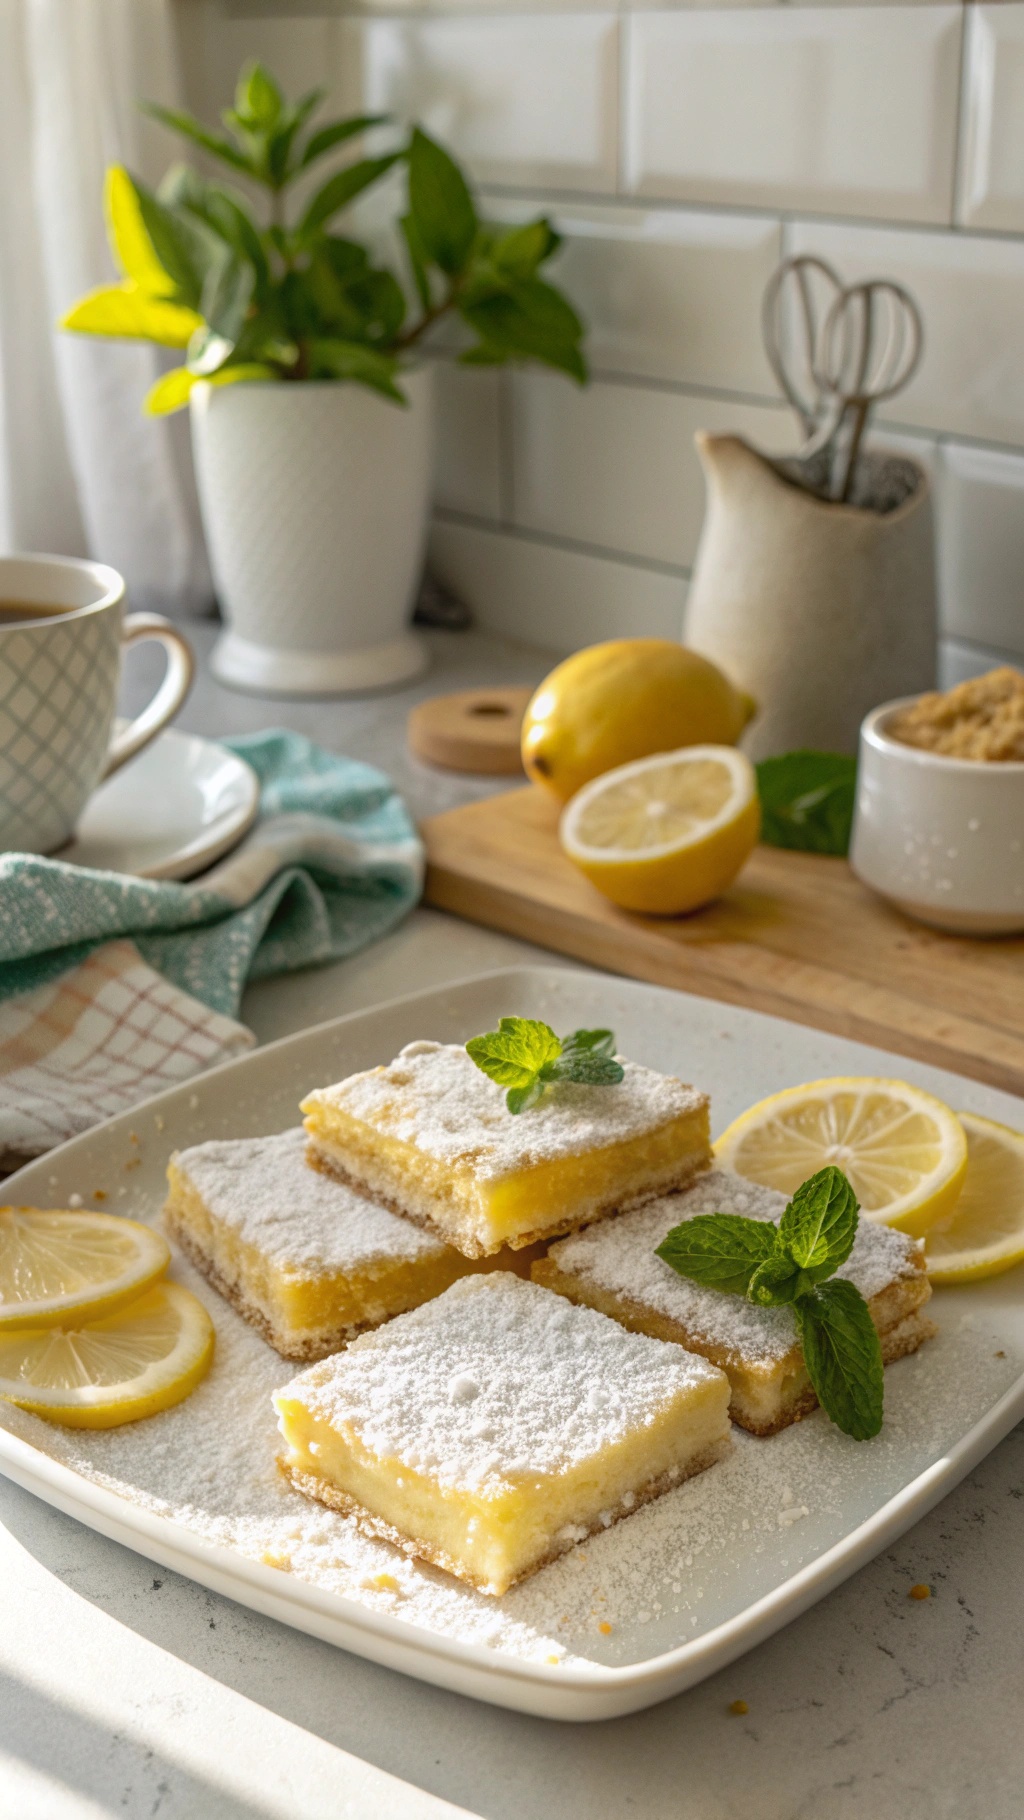
Lemon bars are a classic treat that brings a burst of sunshine to your day. These frugal lemon bars are not only easy to make, but they also fit perfectly within a budget. With just a few simple ingredients, you can whip up a batch that’s both tangy and sweet.
The image showcases beautifully cut lemon bars dusted with powdered sugar, garnished with fresh mint leaves. The vibrant yellow filling contrasts nicely with the light crust, making them visually appealing. A few lemon slices nearby hint at the zesty flavor that awaits. This delightful dessert is perfect for sharing with friends or enjoying during a quiet afternoon with a cup of tea.
Now, let’s get to the recipe!
Ingredients
- 1 cup all-purpose flour
- 1/2 cup unsalted butter, softened
- 1/4 cup granulated sugar
- 1/4 teaspoon salt
- 2 large eggs
- 1 cup granulated sugar (for filling)
- 1/4 cup fresh lemon juice
- 1 tablespoon lemon zest
- 1/4 teaspoon baking powder
- Powdered sugar for dusting
Instructions
- Preheat the oven to 350°F (175°C). Grease an 8x8 inch baking dish.
- Make the Crust: In a bowl, mix flour, softened butter, 1/4 cup sugar, and salt until crumbly. Press the mixture into the bottom of the prepared baking dish.
- Bake the Crust: Bake for 15 minutes or until lightly golden.
- Prepare the Filling: In another bowl, whisk together eggs, 1 cup sugar, lemon juice, lemon zest, and baking powder until smooth.
- Pour the filling over the baked crust and return to the oven. Bake for an additional 20-25 minutes, or until the filling is set.
- Cool completely before cutting into squares. Dust with powdered sugar before serving.


Comments
Post a Comment