7 Elegant Christmas Baking Ideas on a Budget
7 Elegant Christmas Baking Ideas on a Budget
Christmas baking doesn’t have to break the bank! With a little creativity and some clever tips, you can whip up delicious treats that look like they came from a fancy bakery, all without spending a fortune. Whether you’re planning to impress guests or just want to spread some holiday cheer, these budget-friendly baking ideas are sure to make your festive season merry and bright.
Decadent Red Velvet Cupcakes For A Festive Touch
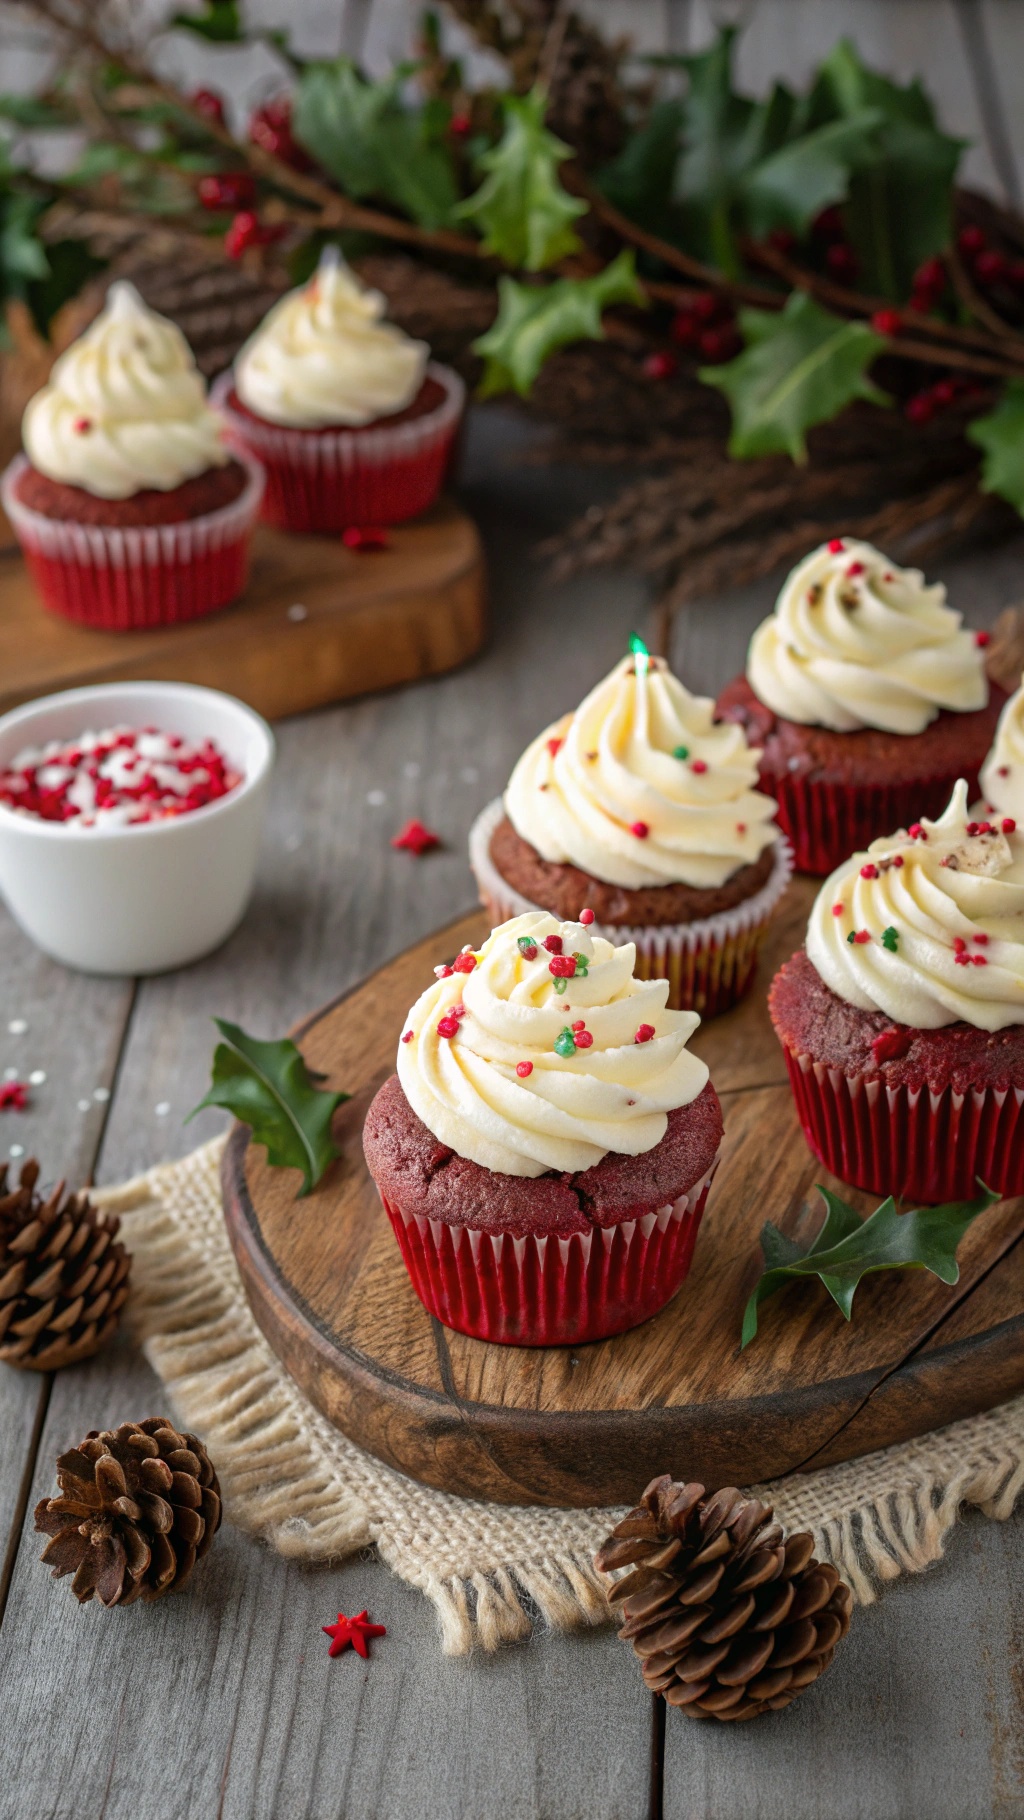
Red velvet cupcakes are a classic choice for holiday baking. Their rich color and soft texture make them a festive treat that looks impressive without breaking the bank. Topped with a swirl of cream cheese frosting and a sprinkle of holiday-themed decorations, these cupcakes are sure to catch the eye at any gathering.
The image showcases beautifully frosted red velvet cupcakes, each adorned with colorful sprinkles and a festive touch. The deep red hue of the cupcakes contrasts perfectly with the creamy white frosting, creating a delightful visual appeal. Surrounding the cupcakes are pinecones and holly, adding to the Christmas spirit.
These cupcakes are not just pretty; they are delicious too! With a simple recipe, you can whip up a batch that will impress your friends and family. Let’s get into the ingredients and instructions so you can bake these delightful treats for your holiday celebrations.
Ingredients
- 1 1/2 cups all-purpose flour
- 1 cup granulated sugar
- 1 teaspoon baking soda
- 1 teaspoon cocoa powder
- 1 teaspoon salt
- 1 cup vegetable oil
- 1 cup buttermilk, room temperature
- 2 large eggs
- 2 tablespoons red food coloring
- 1 teaspoon vanilla extract
- 1 teaspoon white vinegar
- 1 cup cream cheese, softened
- 2 cups powdered sugar
- 1 teaspoon vanilla extract (for frosting)
- Holiday sprinkles for decoration
Instructions
- Preheat your oven to 350°F (175°C). Line a cupcake tin with paper liners.
- In a large bowl, mix together the flour, sugar, baking soda, cocoa powder, and salt.
- In another bowl, combine the oil, buttermilk, eggs, food coloring, vanilla extract, and vinegar. Mix until well combined.
- Gradually add the wet ingredients to the dry ingredients, stirring until just combined.
- Fill each cupcake liner about two-thirds full with the batter. Bake for 18-20 minutes, or until a toothpick inserted in the center comes out clean.
- Let the cupcakes cool in the pan for 5 minutes, then transfer them to a wire rack to cool completely.
- For the frosting, beat the cream cheese until smooth. Gradually add the powdered sugar and vanilla extract, mixing until creamy.
- Once the cupcakes are cool, frost them generously with the cream cheese frosting and top with holiday sprinkles.
Chewy Gingerbread Cookies That Charm Everyone
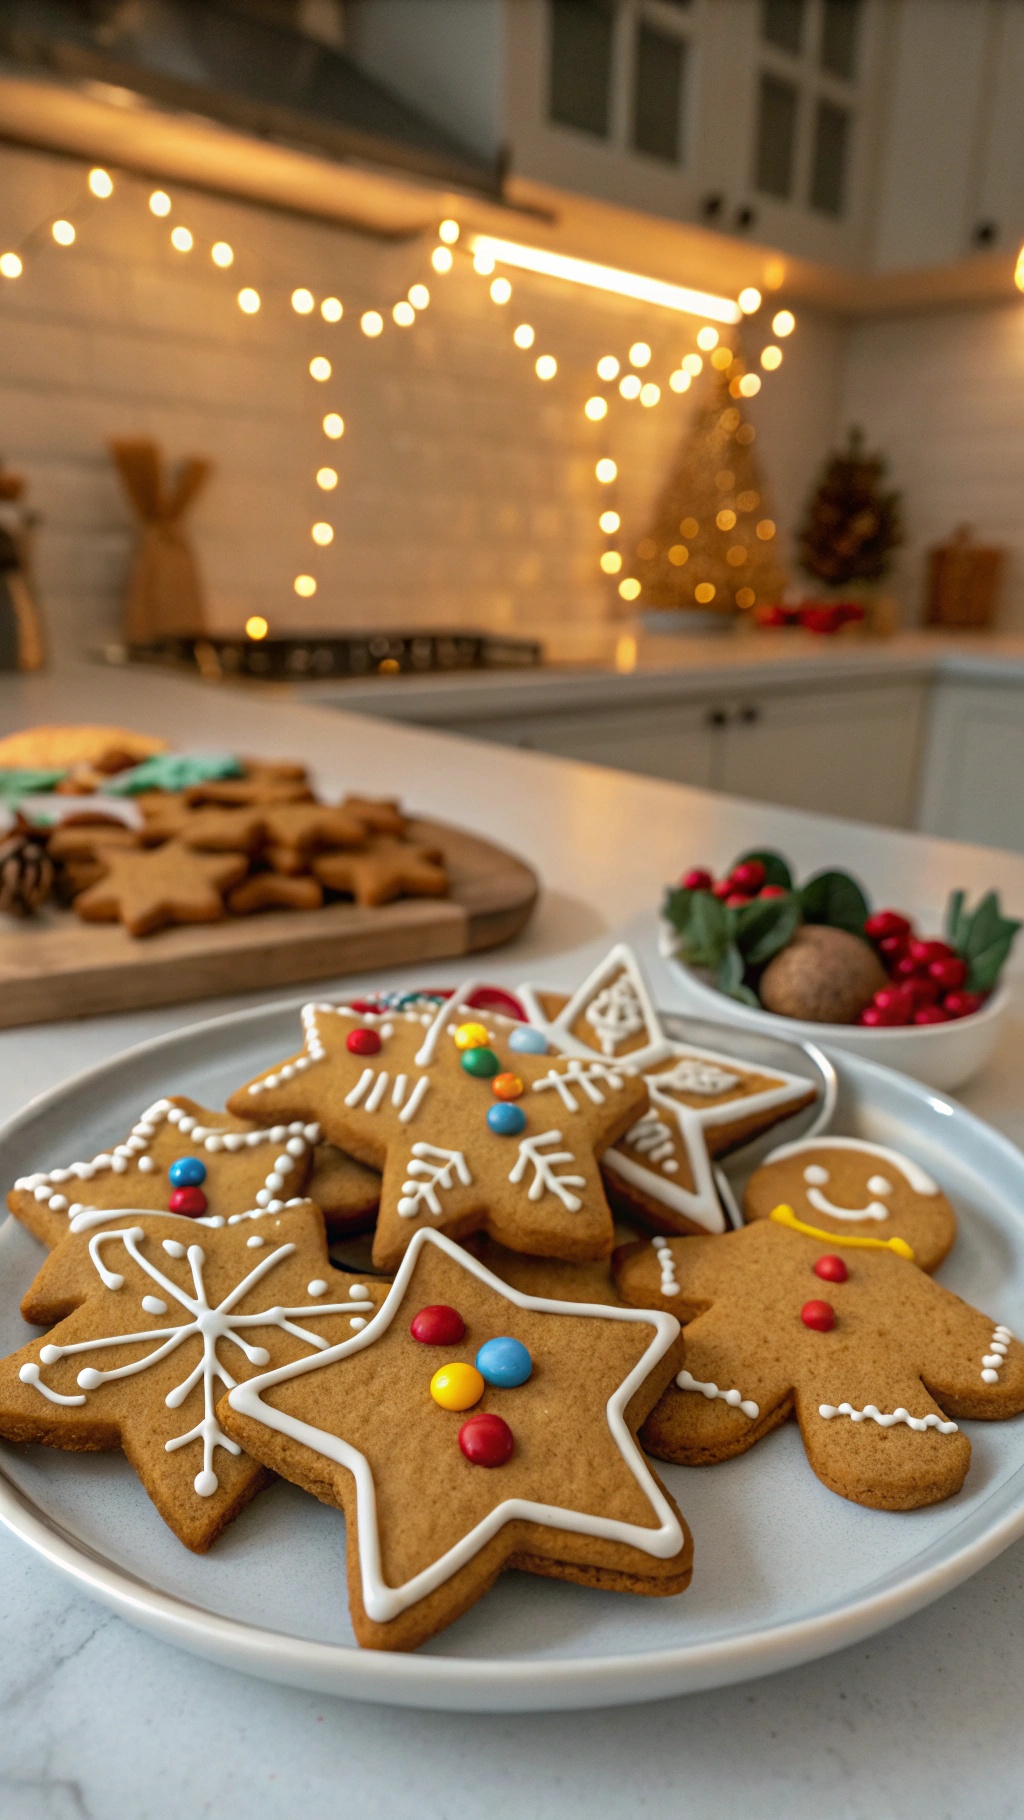
Gingerbread cookies are a holiday classic that never fails to impress. Their warm, spicy aroma fills the kitchen, creating a cozy atmosphere. These chewy cookies are not just delicious; they also look festive and inviting. Decorated with colorful icing and sprinkles, they are perfect for sharing with friends and family.
Making gingerbread cookies is easy and budget-friendly. You can whip up a batch with simple ingredients you probably already have at home. Plus, the decorating part is where the fun really begins! Gather your loved ones, and let everyone add their personal touch to the cookies.
These cookies are great for holiday parties, cookie exchanges, or just a sweet treat at home. They are sure to charm everyone who tries them!
Ingredients
- 3 cups all-purpose flour
- 1 teaspoon baking soda
- 1 tablespoon ground ginger
- 1 tablespoon ground cinnamon
- 1/2 teaspoon ground cloves
- 1/2 teaspoon salt
- 3/4 cup unsalted butter, softened
- 1 cup brown sugar, packed
- 1/2 cup molasses
- 1 large egg
- 1 teaspoon vanilla extract
- Decorating icing and candies (optional)
Instructions
- Mix Dry Ingredients: In a bowl, whisk together flour, baking soda, ginger, cinnamon, cloves, and salt. Set aside.
- Cream Butter and Sugar: In a large bowl, beat the softened butter and brown sugar until fluffy. Add molasses, egg, and vanilla, mixing until well combined.
- Combine Mixtures: Gradually add the dry ingredients to the wet mixture, stirring until a dough forms. If the dough is too sticky, add a little more flour.
- Chill the Dough: Wrap the dough in plastic wrap and refrigerate for at least 2 hours or overnight. This helps the flavors meld and makes it easier to roll out.
- Preheat Oven: Preheat your oven to 350°F (175°C). Line baking sheets with parchment paper.
- Roll and Cut: On a floured surface, roll out the dough to about 1/4 inch thick. Use cookie cutters to cut out shapes and place them on the baking sheets.
- Bake: Bake for 8-10 minutes, or until the edges are firm. Let them cool on the baking sheets for a few minutes before transferring to wire racks.
- Decorate: Once cooled, decorate with icing and candies as desired. Let the icing set before serving.
Lemon Bars That Brighten Up Any Festive Table
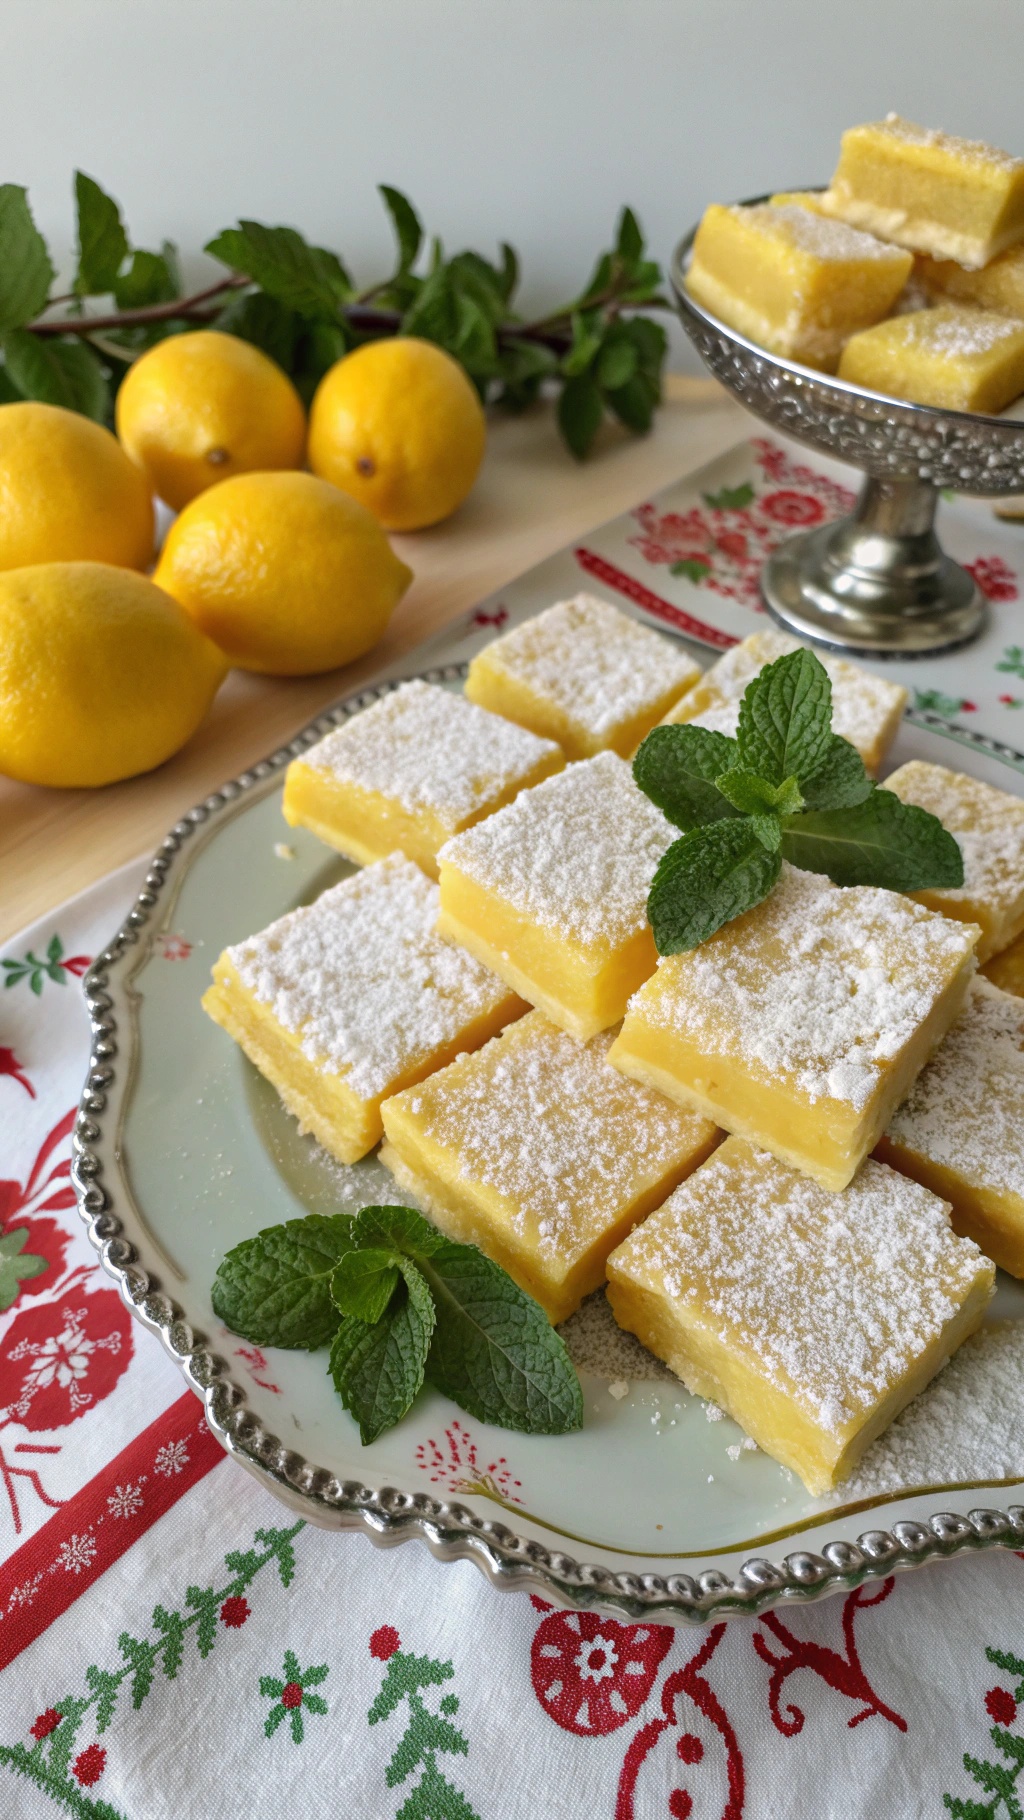
Lemon bars are a delightful treat that can bring a burst of sunshine to your holiday gatherings. Their bright yellow color and zesty flavor make them a perfect addition to any festive table. These bars are not only easy to make but also look elegant, making them a great choice for impressing your guests without breaking the bank.
The combination of a buttery crust and a tangy lemon filling creates a balance that is simply irresistible. Topped with a dusting of powdered sugar and a sprig of mint, they look as fancy as they taste. Plus, they can be made ahead of time, allowing you to enjoy more time with family and friends during the holidays.
Here’s a simple recipe to whip up these delicious lemon bars:
Ingredients
- 1 cup all-purpose flour
- 1/2 cup unsalted butter, softened
- 1/4 cup granulated sugar
- 1/4 teaspoon salt
- 2 large eggs
- 1 cup granulated sugar (for filling)
- 1/4 cup fresh lemon juice
- 1 tablespoon lemon zest
- 1/4 teaspoon baking powder
- Powdered sugar for dusting
Instructions
- Preheat your oven to 350°F (175°C). Grease an 8-inch square baking dish.
- In a bowl, mix flour, softened butter, 1/4 cup sugar, and salt until crumbly. Press this mixture into the bottom of the prepared dish.
- Bake the crust for about 15 minutes or until lightly golden.
- While the crust is baking, whisk together the eggs, 1 cup sugar, lemon juice, lemon zest, and baking powder in a separate bowl.
- Pour the lemon mixture over the baked crust and return to the oven. Bake for an additional 20-25 minutes until set.
- Let the bars cool completely before cutting into squares. Dust with powdered sugar before serving.
These lemon bars are sure to brighten up your holiday celebrations!
Rich And Creamy Pumpkin Pie For A Holiday Classic
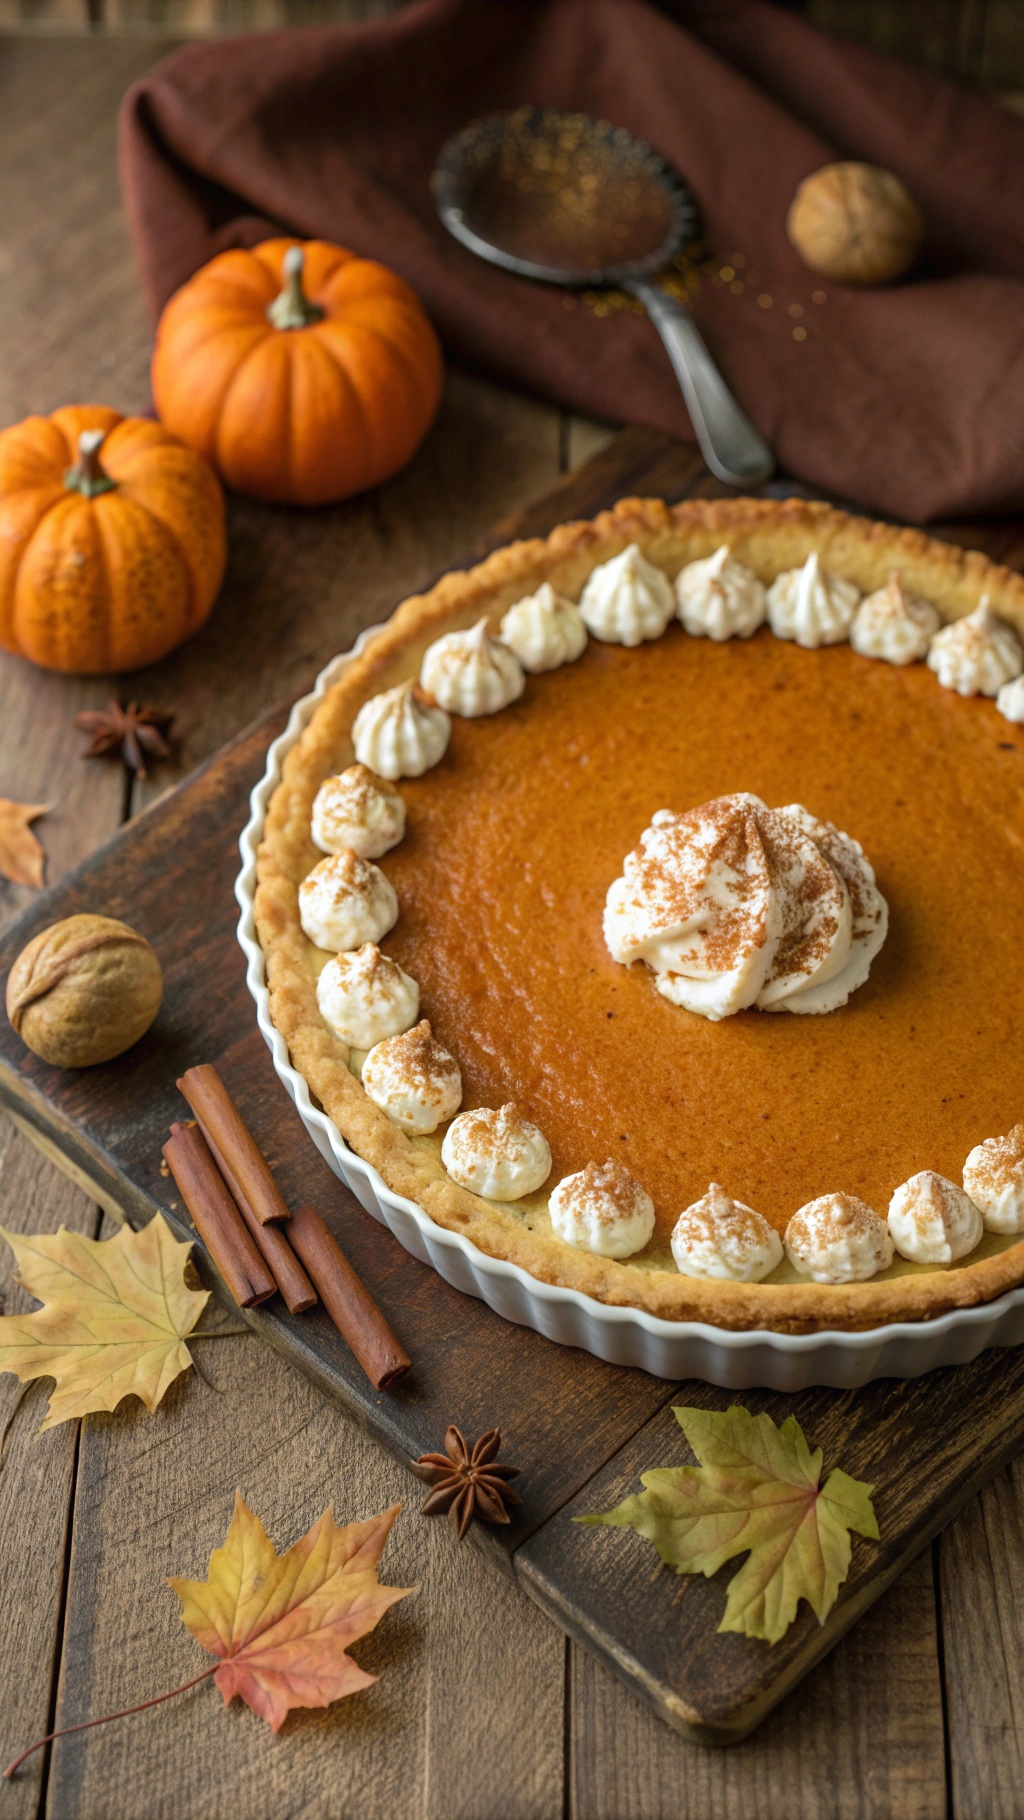
When it comes to holiday desserts, pumpkin pie is a classic that never goes out of style. This rich and creamy pumpkin pie looks fancy but is surprisingly budget-friendly. The golden crust and smooth filling make it a showstopper on any holiday table.
The image showcases a beautifully baked pumpkin pie topped with dollops of whipped cream and a sprinkle of cinnamon. Surrounding the pie are small pumpkins and autumn leaves, adding a warm, festive touch. The rustic wooden background enhances the cozy vibe, perfect for a holiday gathering.
Making this pie is easy and fun. With just a few simple ingredients, you can create a dessert that will impress your family and friends. Let’s get into the details of how to whip up this delightful treat!
Ingredients
- 1 unbaked pie crust
- 1 can (15 oz) pumpkin puree
- 1 cup heavy cream
- 3/4 cup granulated sugar
- 2 large eggs
- 1 teaspoon vanilla extract
- 1 teaspoon ground cinnamon
- 1/2 teaspoon ground nutmeg
- 1/4 teaspoon ground ginger
- 1/4 teaspoon salt
Instructions
- Preheat the oven to 425°F (220°C).
- In a large bowl, mix together the pumpkin puree, heavy cream, sugar, eggs, vanilla, cinnamon, nutmeg, ginger, and salt until smooth.
- Pour the filling into the unbaked pie crust.
- Bake for 15 minutes, then reduce the temperature to 350°F (175°C) and bake for an additional 35-40 minutes, or until the filling is set.
- Let the pie cool before serving. Top with whipped cream and a sprinkle of cinnamon if desired.
Decadent Chocolate Peppermint Bark Perfect For Gifting
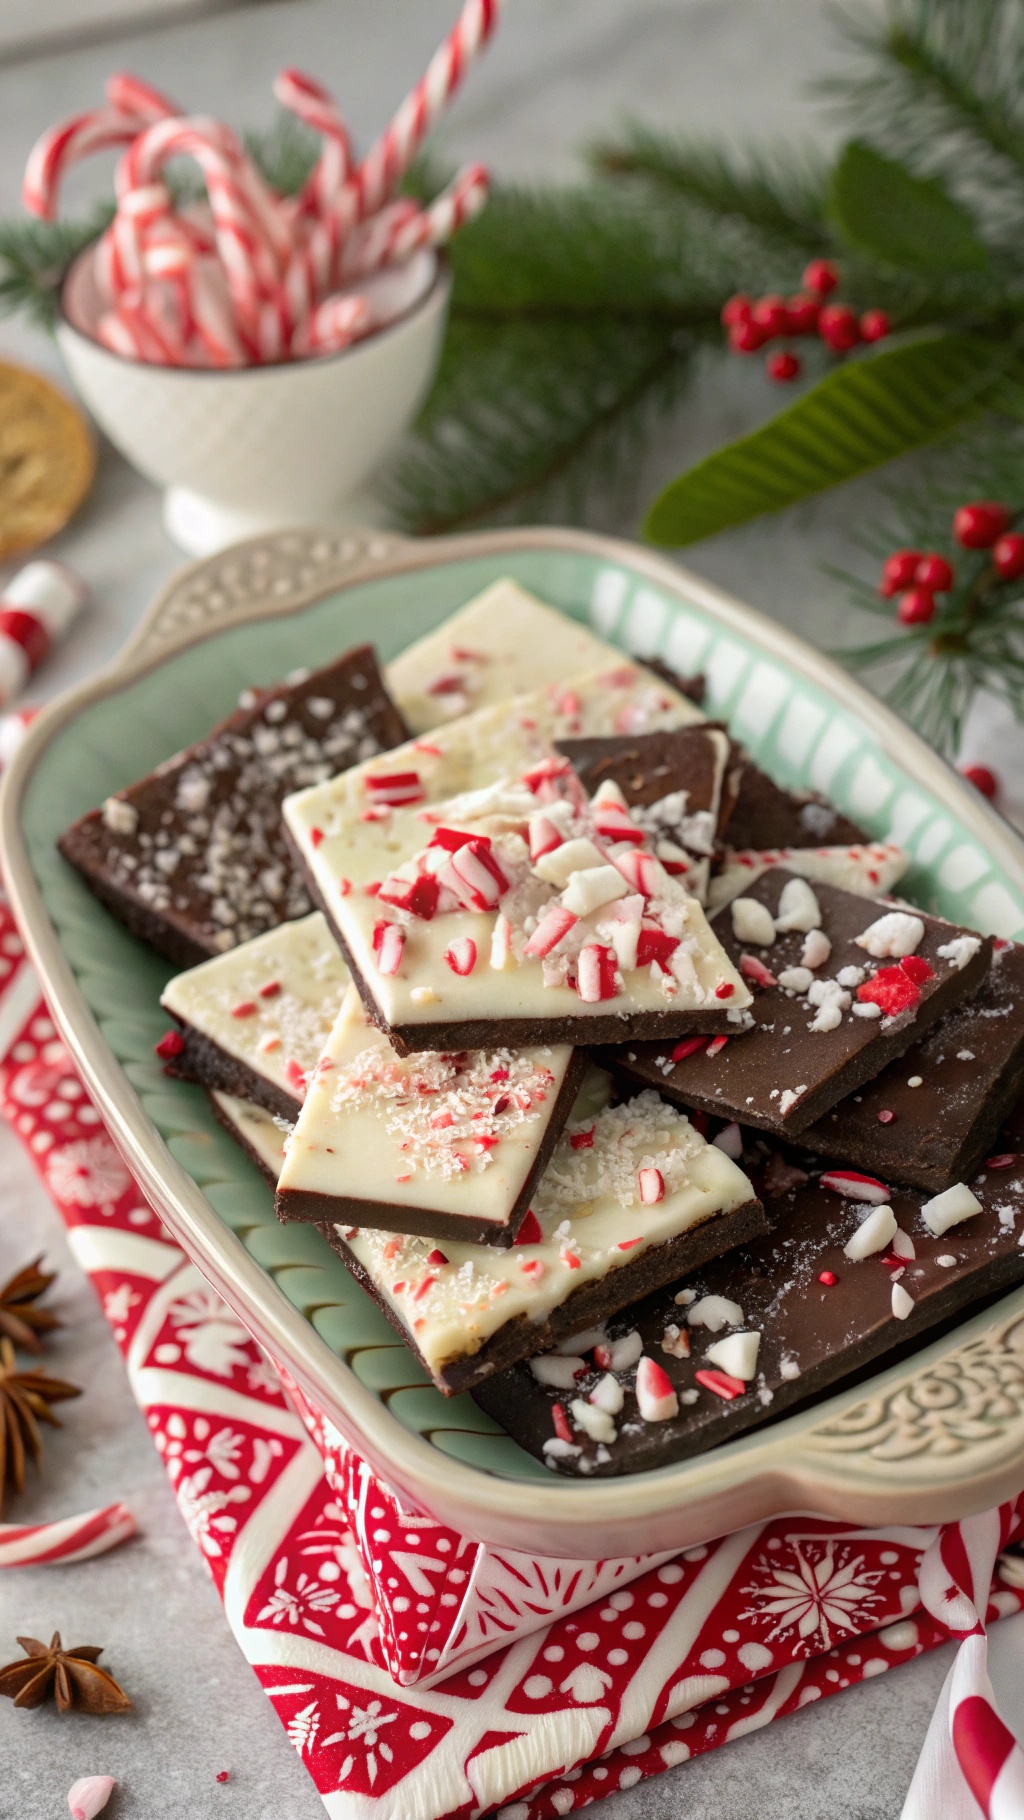
Chocolate peppermint bark is a festive treat that looks fancy but is super easy to make. This delightful combination of rich chocolate and refreshing peppermint is perfect for holiday gifting. The image shows a beautiful assortment of chocolate bark, topped with crushed candy canes and sprinkled with sea salt. It’s a treat that not only tastes amazing but also adds a touch of elegance to your holiday gifts.
Making chocolate peppermint bark is a simple process. You can use dark, milk, or white chocolate, depending on your preference. The layers of chocolate create a lovely contrast, while the crushed candy canes on top add a pop of color and a crunchy texture. Wrap it up in a cute box or a festive bag, and you have a thoughtful gift that anyone would love!
Ingredients
- 8 ounces dark chocolate, chopped
- 8 ounces white chocolate, chopped
- 1 teaspoon peppermint extract
- 1/2 cup crushed candy canes
- 1/4 teaspoon sea salt (optional)
Instructions
- Melt the Dark Chocolate: In a microwave-safe bowl, melt the dark chocolate in 30-second intervals, stirring in between until smooth.
- Add Peppermint: Stir in the peppermint extract and mix well.
- Spread the Dark Chocolate: Pour the melted dark chocolate onto a parchment-lined baking sheet and spread it into an even layer. Let it cool for about 10 minutes.
- Melt the White Chocolate: In another bowl, melt the white chocolate in the same way as the dark chocolate.
- Layer the White Chocolate: Pour the melted white chocolate over the dark chocolate layer and spread it evenly.
- Add Toppings: Sprinkle the crushed candy canes and sea salt on top before the white chocolate sets.
- Chill: Place the baking sheet in the refrigerator for about 30 minutes until the bark is firm.
- Break into Pieces: Once set, break the bark into pieces and package it for gifting.
Fluffy Cinnamon Rolls That Smell Like Christmas Morning

There's something magical about waking up to the smell of fresh cinnamon rolls on Christmas morning. These fluffy treats are not just delicious; they also bring a warm, festive vibe to your home. Imagine pulling a tray of golden-brown rolls from the oven, the sweet aroma filling the air, and everyone gathering around to enjoy them. It’s the perfect way to start the day!
These cinnamon rolls are easy to make and budget-friendly, yet they look and taste like they came from a fancy bakery. The combination of cinnamon, sugar, and a creamy glaze makes them irresistible. Plus, you can prepare the dough the night before and bake them fresh in the morning, saving you time and hassle.
Ingredients
- 4 cups all-purpose flour
- 1/4 cup granulated sugar
- 2 1/4 teaspoons active dry yeast
- 1 teaspoon salt
- 1/4 cup unsalted butter, melted
- 1 cup milk, warmed
- 2 large eggs
- 1/2 cup brown sugar, packed
- 2 tablespoons ground cinnamon
- 1/4 teaspoon ground nutmeg
- 1/4 cup unsalted butter, softened
- 1 cup cream cheese, softened
- 2 cups powdered sugar
- 1 teaspoon vanilla extract
Instructions
- Prepare the Dough: In a large bowl, combine warmed milk, sugar, and yeast. Let it sit for about 5 minutes until foamy. Stir in melted butter, eggs, and salt. Gradually add flour, mixing until a soft dough forms.
- Knead the Dough: Turn the dough onto a floured surface and knead for about 5-7 minutes until smooth and elastic. Place in a greased bowl, cover, and let rise in a warm place until doubled in size, about 1 hour.
- Make the Filling: In a small bowl, mix brown sugar, cinnamon, and nutmeg. Roll out the dough into a rectangle, spread softened butter over the surface, and sprinkle the cinnamon mixture evenly. Roll tightly and slice into individual rolls.
- Bake the Rolls: Place the rolls in a greased baking dish and let rise for another 30 minutes. Preheat the oven to 350°F (175°C). Bake for 25-30 minutes until golden brown.
- Prepare the Frosting: While the rolls are baking, beat together cream cheese, powdered sugar, and vanilla until smooth. Spread the frosting over warm rolls before serving.
Classic Cherry Pie That Brings Home The Holiday Spirit
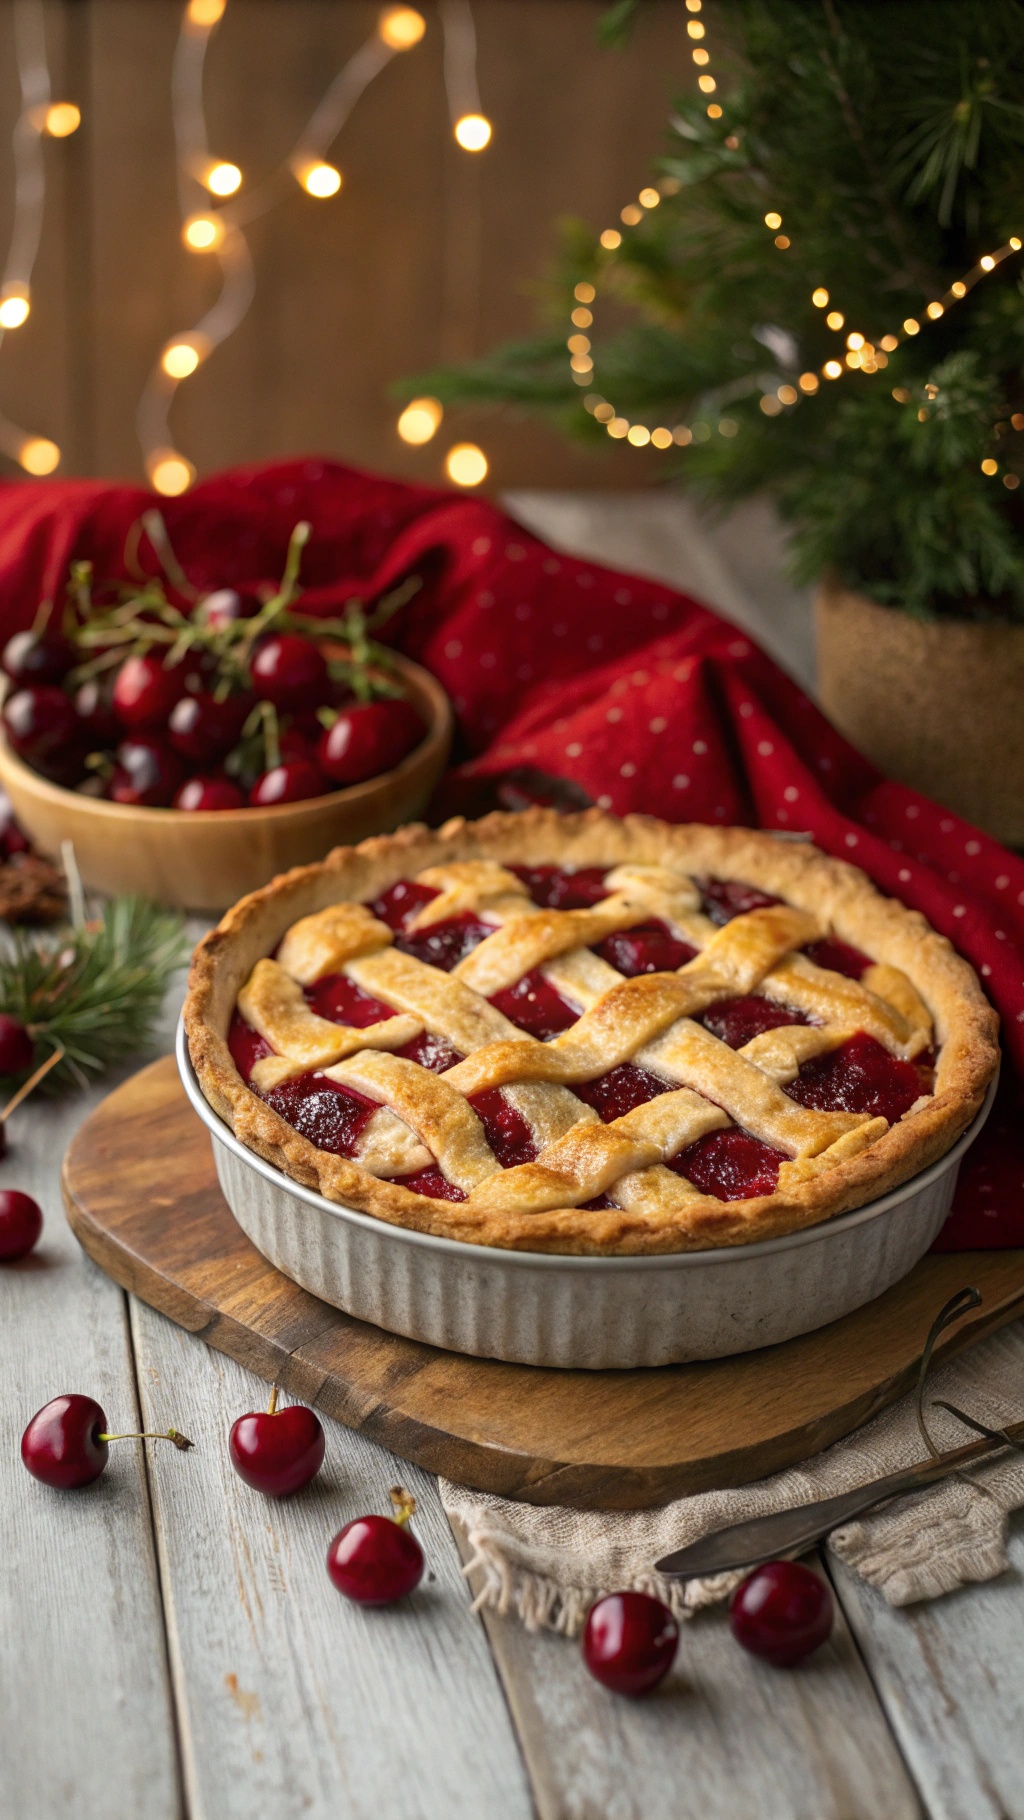
Cherry pie is a classic dessert that captures the essence of the holiday season. Its vibrant red filling and flaky crust make it a showstopper on any table. The aroma of cherries baking fills the air, creating a warm and inviting atmosphere. This pie not only tastes delicious but also looks impressive, making it perfect for holiday gatherings.
The beauty of this cherry pie lies in its simplicity. With just a few ingredients, you can create a dessert that feels fancy without breaking the bank. The combination of sweet cherries and a buttery crust is a winning recipe that everyone will love. Plus, it’s a great way to use seasonal fruit!
To make this delightful cherry pie, you’ll need fresh or frozen cherries, sugar, cornstarch, lemon juice, and a pie crust. The filling is easy to prepare, and the lattice top adds a touch of elegance. Serve it warm with a scoop of vanilla ice cream for a truly festive treat.
Ingredients
- 4 cups fresh or frozen cherries, pitted
- 1 cup granulated sugar
- 1/4 cup cornstarch
- 1 tablespoon lemon juice
- 1 teaspoon vanilla extract
- 1/4 teaspoon almond extract (optional)
- 1 package refrigerated pie crusts (or homemade)
- 1 egg (for egg wash)
- 1 tablespoon milk (for egg wash)
Instructions
- Preheat the oven to 425°F (220°C).
- In a large bowl, combine the cherries, sugar, cornstarch, lemon juice, vanilla extract, and almond extract. Stir until well mixed.
- Roll out one pie crust and place it in a 9-inch pie pan. Pour the cherry mixture into the crust.
- Roll out the second pie crust and cut it into strips to create a lattice top. Weave the strips over the cherry filling.
- In a small bowl, whisk together the egg and milk. Brush the mixture over the crust for a golden finish.
- Bake for 45-50 minutes, or until the crust is golden brown and the filling is bubbly. Let it cool for at least 30 minutes before serving.


Comments
Post a Comment